> ## Documentation Index
> Fetch the complete documentation index at: https://docs.conduktor.io/llms.txt
> Use this file to discover all available pages before exploring further.
# SSO configuration in Conduktor Console — LDAP and OIDC
> Set up SSO in Conduktor Console with LDAP or OIDC. Configuration examples for Okta, Azure AD, and external group mapping from your identity provider.
We offer several options when configuring SSO (Single Sign-On).
## Configure LDAP as SSO
[View the list of LDAP properties](#ldap-config-properties). Here's a sample snippet containing server, users and groups to put in your configuration file.
```yaml title="platform-config.yaml" theme={null}
sso:
ldap:
- name: "LDAP" # Custom name for LDAP connection
server: "ldap://openldap:1389" # LDAP server URI with port
managerDn: "cn=admin,dc=example,dc=org" # Bind DN
managerPassword: "adminpassword" # Bind password
search-subtree: true # Search subtree (default: true)
search-base: "ou=users,dc=example,dc=org" # Base DN to search for users
search-filter: "(uid={0})" # Search filter (default: "(uid={0})")
groups-enabled: true # Enable group membership (default: false)
groups-base: "ou=groups,dc=example,dc=org" # Base DN to search for groups
groups-filter: "(member={0})" # Filter on groups (default: "uniquemember={0}")
groups-attribute: "cn" # Group name entry (default: "cn")
```
```json title=".env" theme={null}
CDK_SSO_LDAP_0_NAME="LDAP"
CDK_SSO_LDAP_0_SERVER="ldap://openldap:1389"
CDK_SSO_LDAP_0_MANAGERDN="cn=admin,dc=example,dc=org"
CDK_SSO_LDAP_0_MANAGERPASSWORD="adminpassword"
CDK_SSO_LDAP_0_SEARCH-SUBTREE=true
CDK_SSO_LDAP_0_SEARCH-BASE="ou=users,dc=example,dc=org"
CDK_SSO_LDAP_0_SEARCH-FILTER="(uid={0})"
CDK_SSO_LDAP_0_GROUPS-ENABLED=true
CDK_SSO_LDAP_0_GROUPS-BASE="ou=groups,dc=example,dc=org"
CDK_SSO_LDAP_0_GROUPS-FILTER="(member={0})"
CDK_SSO_LDAP_0_GROUPS-ATTRIBUTE="cn"
```
If your LDAP server is **Active Directory** and you get an "invalid user" error when trying to log in, try setting your `search-filter` to `'(sAMAccountName={0})'`.
### User mapping
Here is the mapping between LDAP user's information and Conduktor Console:
| LDAP | Conduktor Console |
| -------------------------------------- | ----------------------------------------- |
| `uid` | User ID, used to log in |
| `mail`, `email` or `userPrincipalName` | User email (**The only mandatory field**) |
| `cn` | User name |
| `sn` | User family name |
| `givenName` | User first name |
| `displayName` | User display name |
#### Groups
To retrieve the groups each user belongs to, you have to set `groups-enabled` to `true`, and populate the attributes `groups-base` and `groups-filter`.
Note that depending on your LDAP `objectClass`, the attribute used to filter groups might be changed. For example:
| LDAP `objectClass` | Conduktor `groups-filter` |
| -------------------- | ------------------------- |
| `groupOfNames` | `"member={0}"` |
| `groupOfUniqueNames` | `"uniqueMember={0}"` |
##### Map to external groups
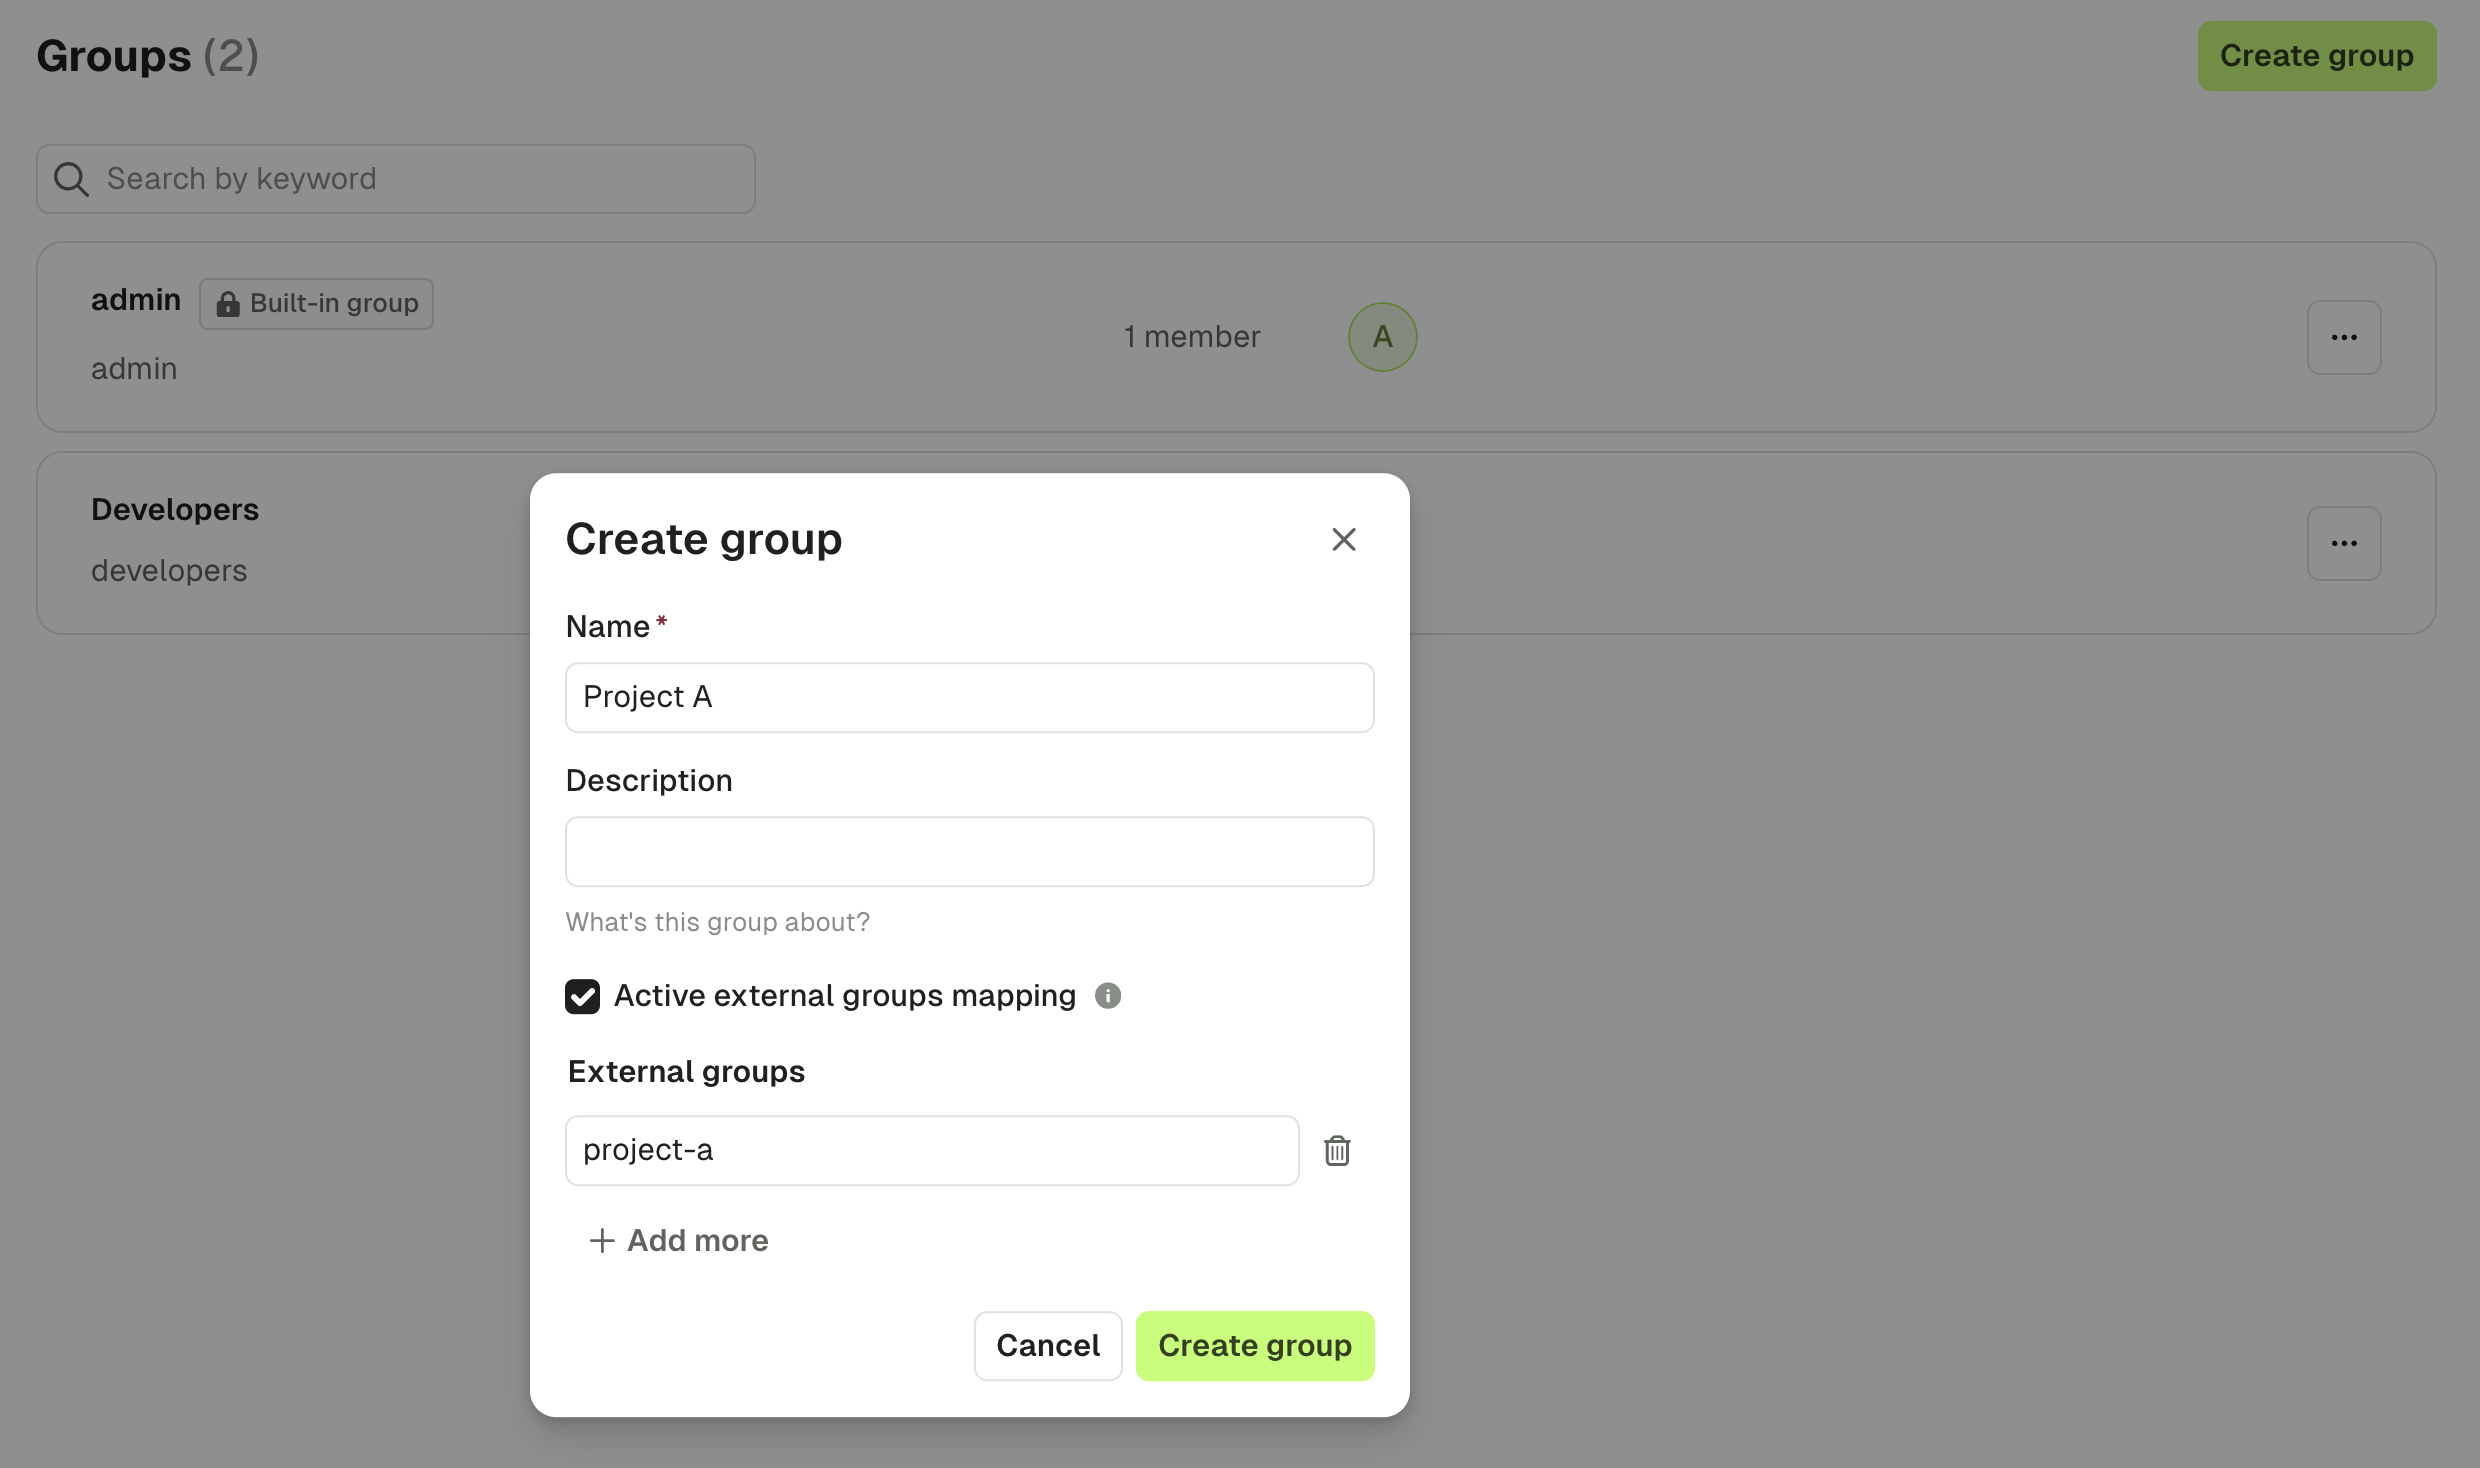
Now that your configuration is finished, you can set up a **mapping** between your LDAP groups and your Console groups. That way, when a user logs in, they will be automatically added to the corresponding Console groups, based on their LDAP groups.
To create this mapping, you have to create a group from Console, and mention the ID of the group on your LDAP (you should find it in the attribute you mentioned as `groups-base`).
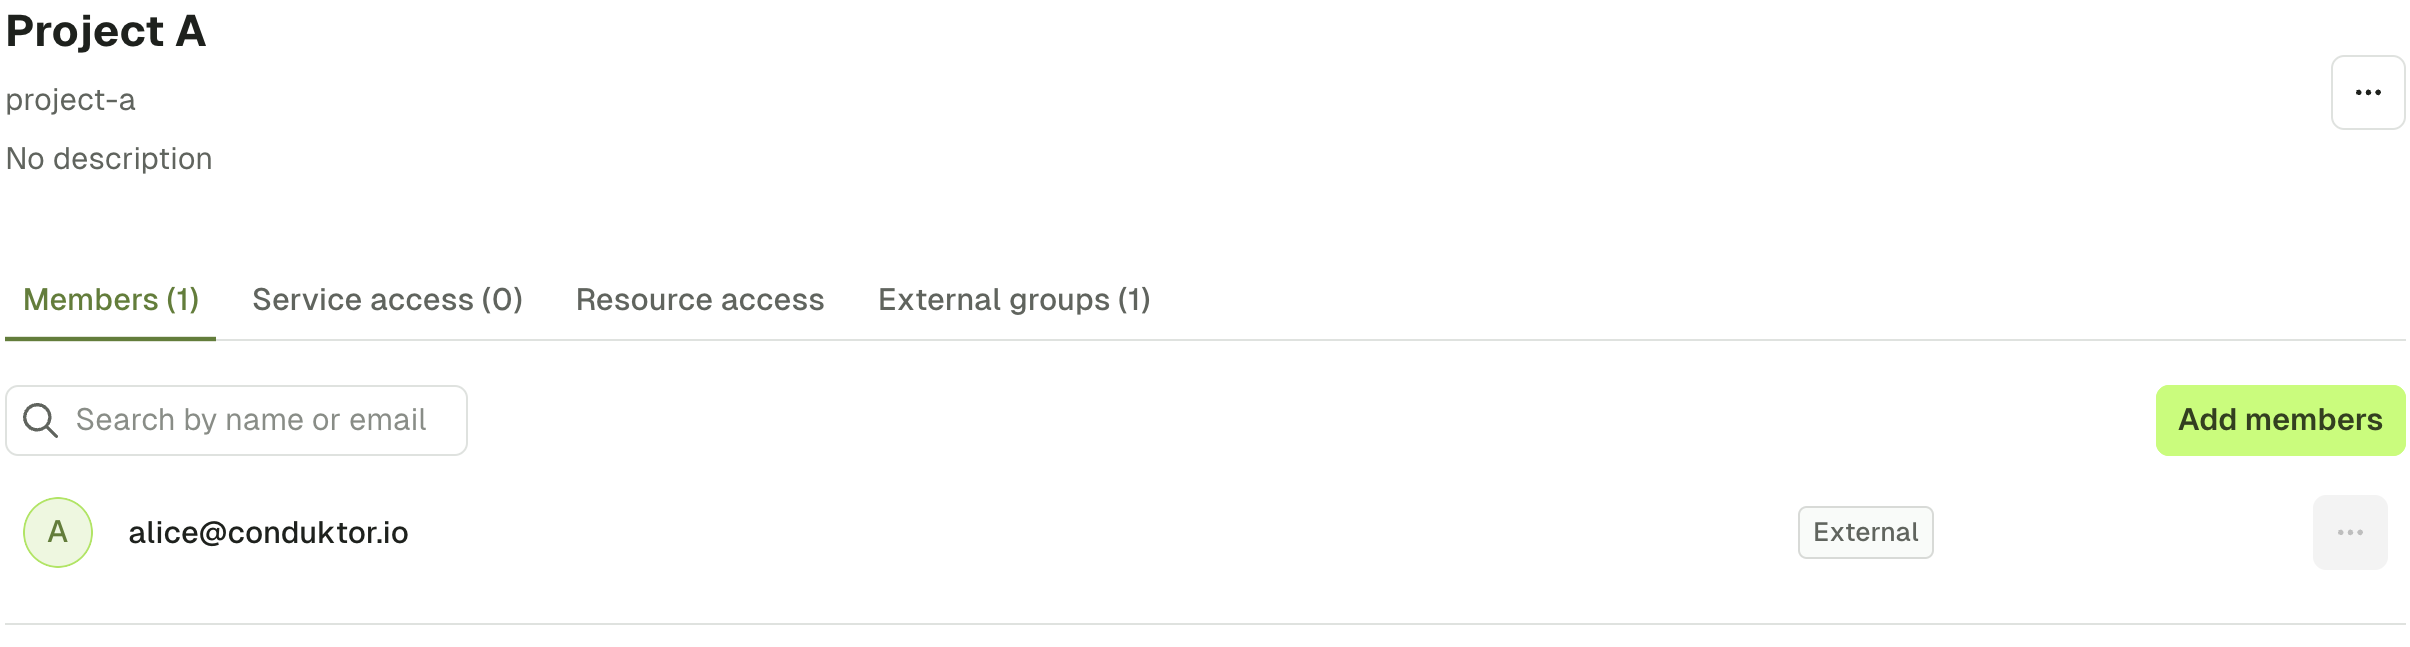
 After the user logged in, we can see they've been added to the group, without any action:
 #### Configure LDAPS certificate
For LDAPs (LDAP over SSL) connection, you have to provide a trusted certificate using Java JKS TrustStore file.
LDAPS SSL certificate can also be passed as PEM encoded string using the property `sso.trustedCertificates`.
```yaml title="platform-config.yaml" theme={null}
sso:
ignoreUntrustedCertificate: false
trustedCertificates: |
-----BEGIN CERTIFICATE-----
...
-----END CERTIFICATE-----
```
## Configure Auth0 as SSO
[View the list of Auth0 properties](#oauth2-config-properties).
On Auth0 side, you'll have to create a new application:
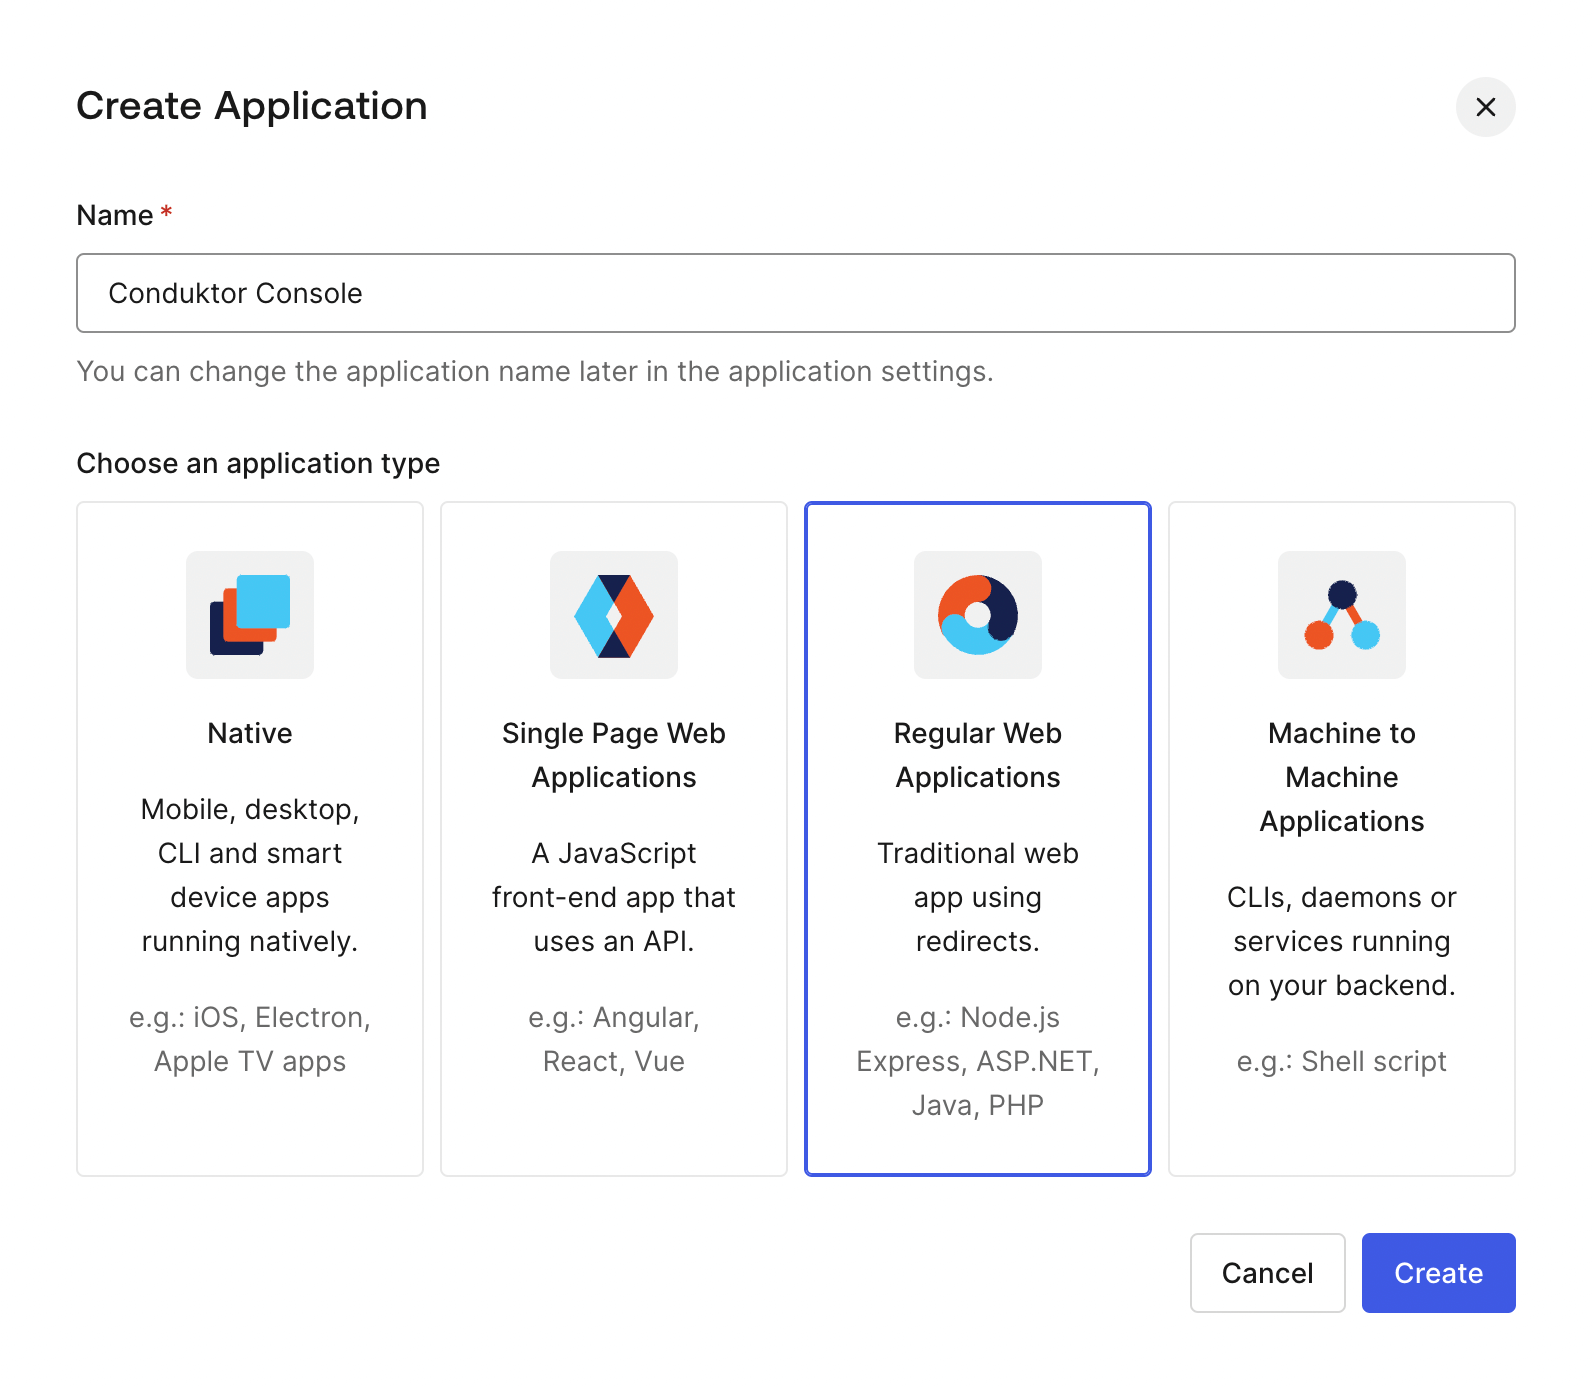
1. Create a regular web application:
#### Configure LDAPS certificate
For LDAPs (LDAP over SSL) connection, you have to provide a trusted certificate using Java JKS TrustStore file.
LDAPS SSL certificate can also be passed as PEM encoded string using the property `sso.trustedCertificates`.
```yaml title="platform-config.yaml" theme={null}
sso:
ignoreUntrustedCertificate: false
trustedCertificates: |
-----BEGIN CERTIFICATE-----
...
-----END CERTIFICATE-----
```
## Configure Auth0 as SSO
[View the list of Auth0 properties](#oauth2-config-properties).
On Auth0 side, you'll have to create a new application:
1. Create a regular web application:
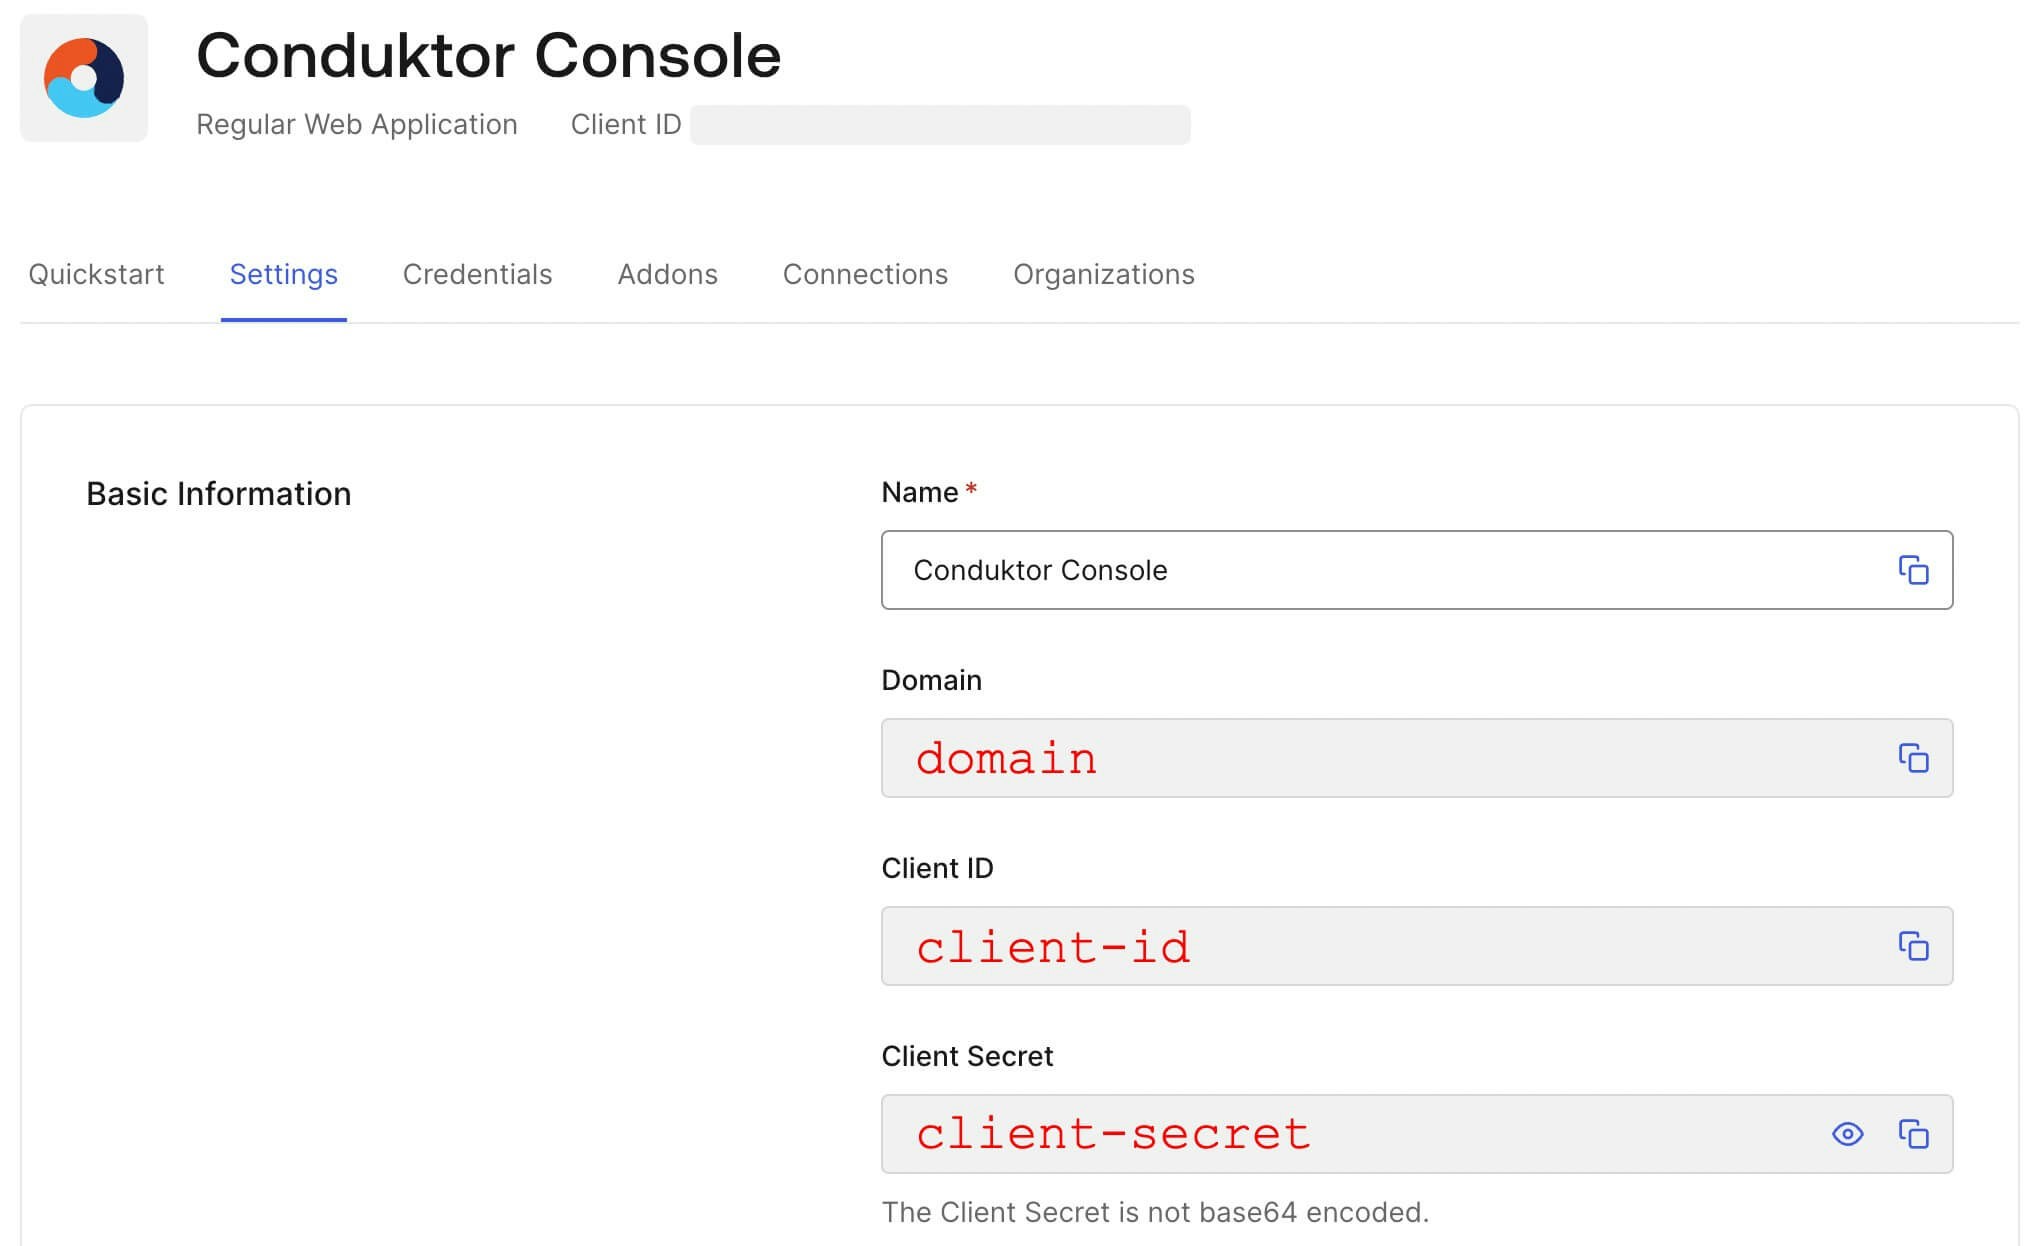
 2. Get the `client ID`, `client secret` and `domain`:
 3. Configure the callback URI.nThe redirect URI can be something like: `http(s)://(:)/oauth/callback/`. For example, if you deployed Console locally using the name `auth0` in your configuration file, you can use `http://localhost:8080/oauth/callback/auth0`.
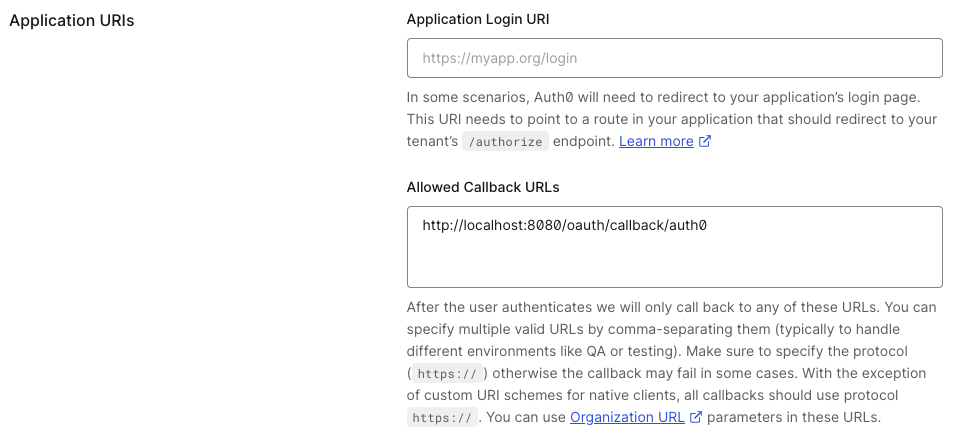 Remember to specify how you want to connect using the **Connections** tab of your Auth0 application.
### Configure Console
On the Console side, you can add the snippet below to your configuration file. Replace the `client ID`, `client secret` and `domain` with values from step 2 above.
```yaml title="platform-config.yaml" theme={null}
sso:
oauth2:
- name: "auth0"
client-id: ""
client-secret: ""
openid:
issuer: "https://"
```
```json title=".env" theme={null}
CDK_SSO_OAUTH2_0_NAME="auth0"
CDK_SSO_OAUTH2_0_DEFAULT=true
CDK_SSO_OAUTH2_0_CLIENT-ID=""
CDK_SSO_OAUTH2_0_CLIENT-SECRET=""
CDK_SSO_OAUTH2_0_OPENID_ISSUER="https://"
```
## Configure Amazon Cognito as SSO
On Amazon Cognito side, you'll have to create a user pool with an application:
1. Create a new user pool
Remember to specify how you want to connect using the **Connections** tab of your Auth0 application.
### Configure Console
On the Console side, you can add the snippet below to your configuration file. Replace the `client ID`, `client secret` and `domain` with values from step 2 above.
```yaml title="platform-config.yaml" theme={null}
sso:
oauth2:
- name: "auth0"
client-id: ""
client-secret: ""
openid:
issuer: "https://"
```
```json title=".env" theme={null}
CDK_SSO_OAUTH2_0_NAME="auth0"
CDK_SSO_OAUTH2_0_DEFAULT=true
CDK_SSO_OAUTH2_0_CLIENT-ID=""
CDK_SSO_OAUTH2_0_CLIENT-SECRET=""
CDK_SSO_OAUTH2_0_OPENID_ISSUER="https://"
```
## Configure Amazon Cognito as SSO
On Amazon Cognito side, you'll have to create a user pool with an application:
1. Create a new user pool
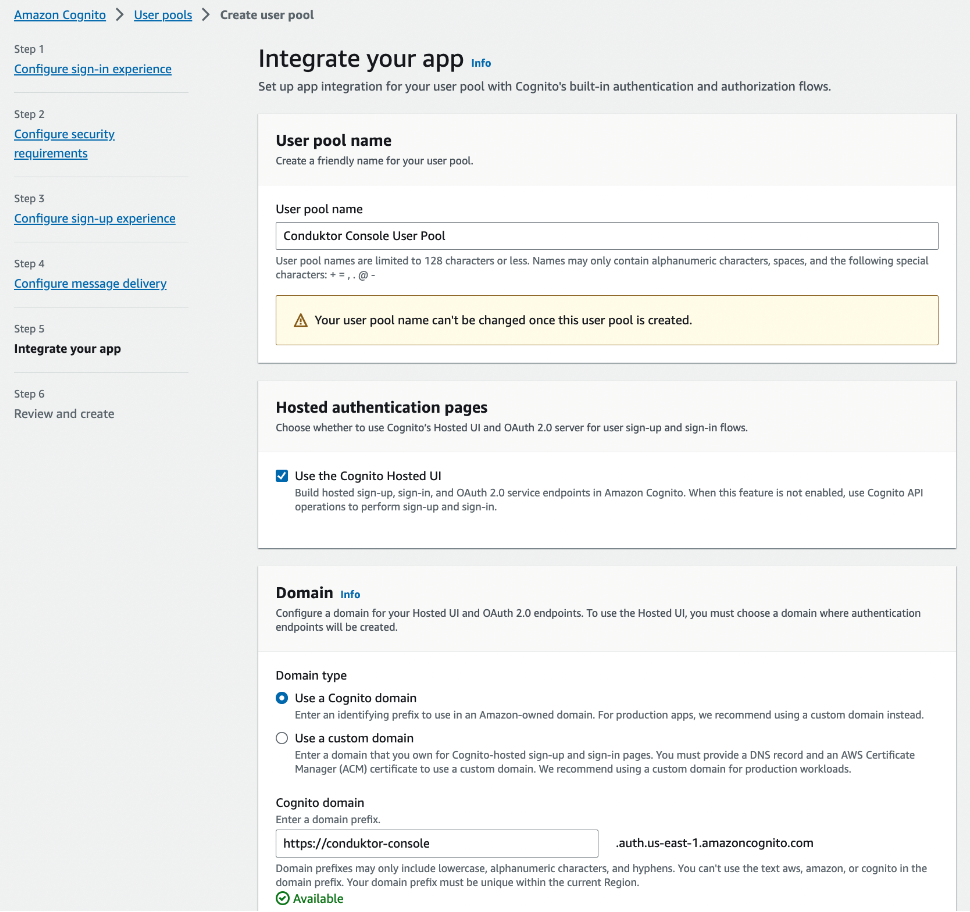 2. Configure the application client. You can select the name you want, shown here as `Conduktor Console` and enter the redirect URI as the following: `http(s)://(:)/oauth/callback/`. For example, if you deployed Console locally using the name `cognito` in your configuration file, you can use `http://localhost:8080/oauth/callback/cognito`.
Make sure that a client secret will be generated - select `Confidential client`.
2. Configure the application client. You can select the name you want, shown here as `Conduktor Console` and enter the redirect URI as the following: `http(s)://(:)/oauth/callback/`. For example, if you deployed Console locally using the name `cognito` in your configuration file, you can use `http://localhost:8080/oauth/callback/cognito`.
Make sure that a client secret will be generated - select `Confidential client`.
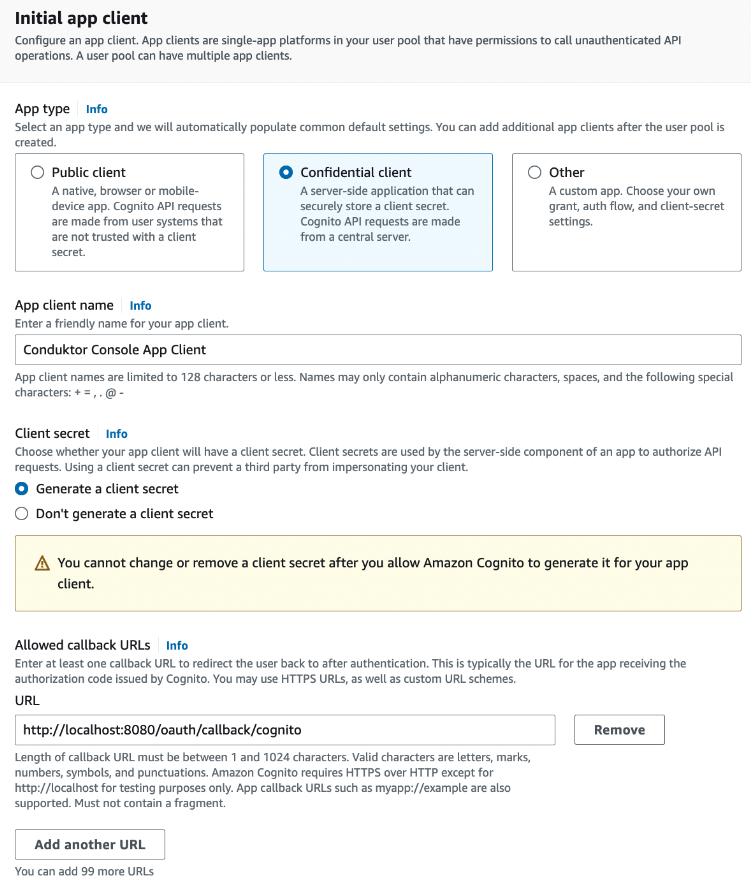 3. Set the scopes `profile`, `email` and `openid` in the **Advanced app settings**:
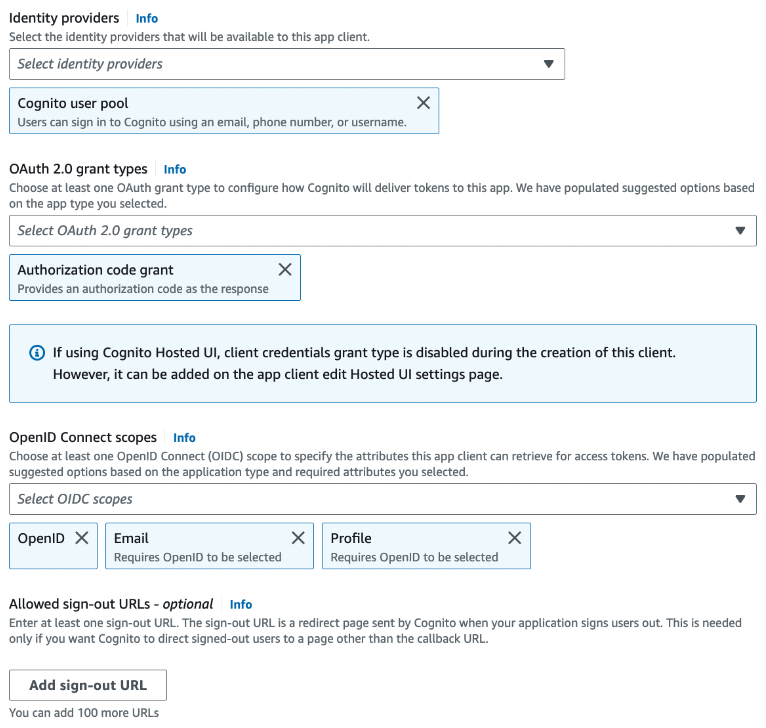 4. Get the `user pool ID`, `client ID`, and `client secret`, that you'll use in the configuration file of Console
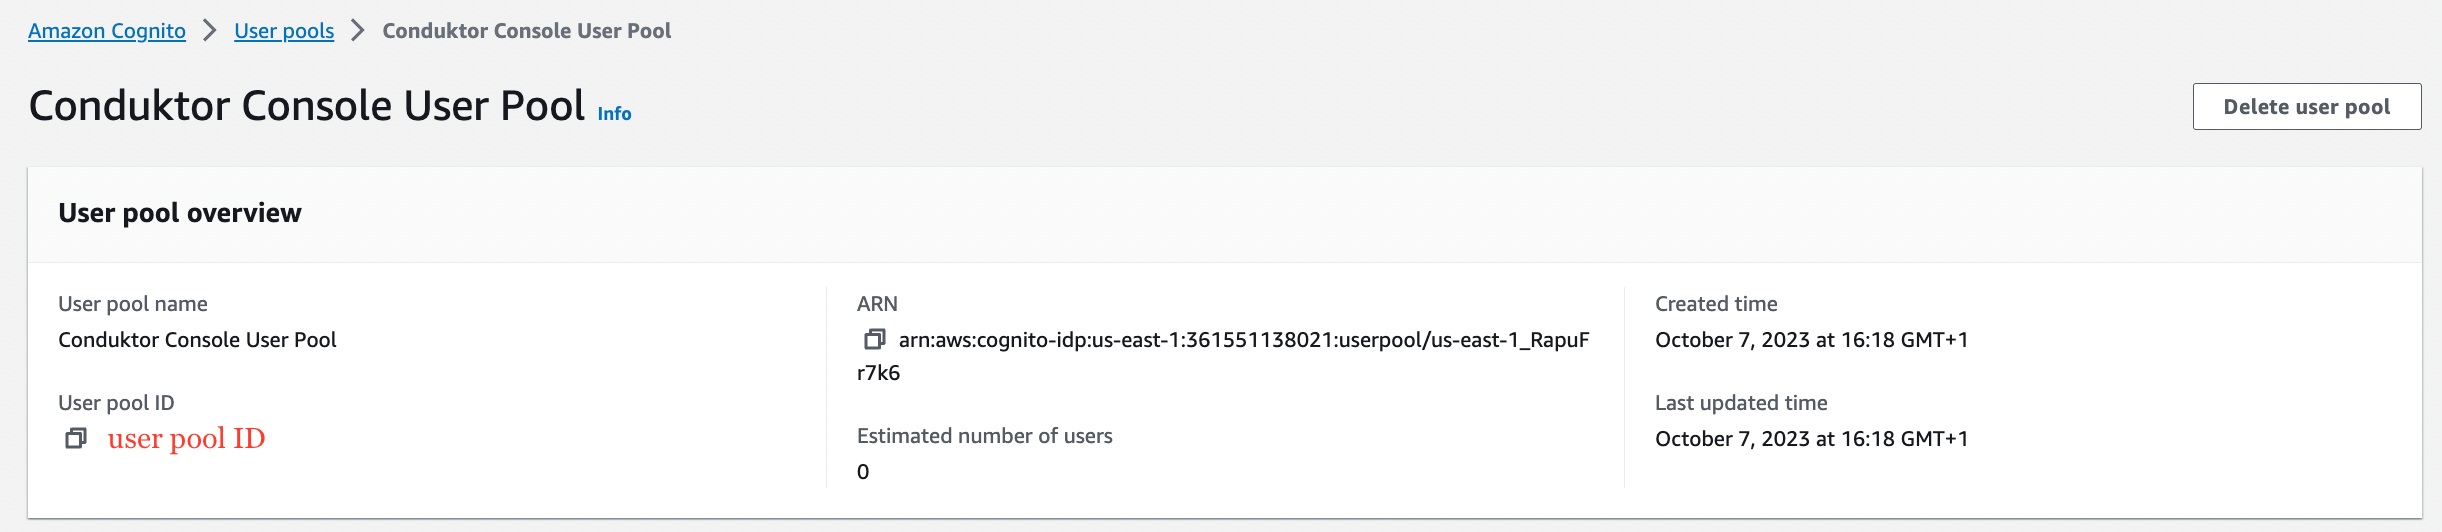
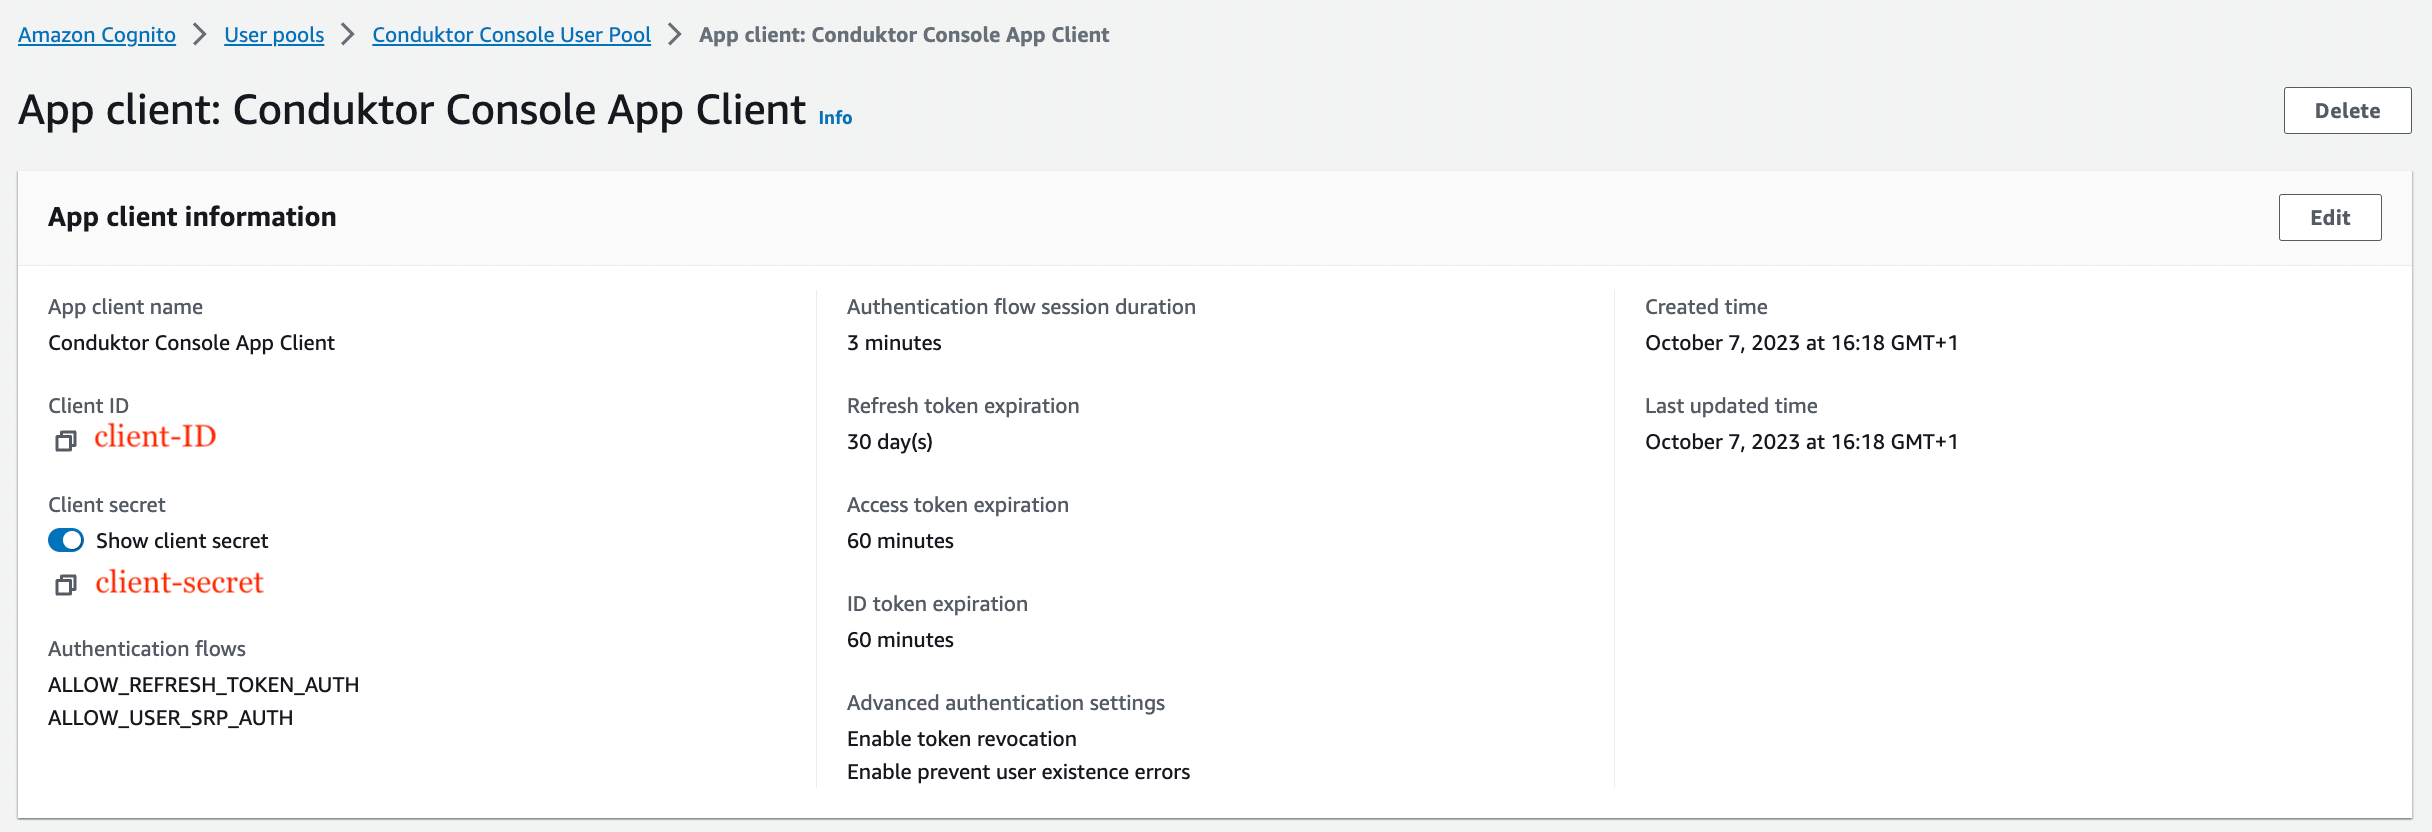 You can find the .well-known at: `https://cognito-idp..amazonaws.com//.well-known/openid-configuration`.
### Configure Console
On Console side, you can add the snippet below to your configuration file. You have to replace the `client ID`, `client secret`, `region`, and `pool ID`, with what you got during step 4.
```yaml title="platform-config.yaml" theme={null}
sso:
oauth2:
- name: "cognito"
client-id: ""
client-secret: ""
openid:
issuer: "https://cognito-idp..amazonaws.com/"
```
```json title=".env" theme={null}
CDK_SSO_OAUTH2_0_NAME="cognito"
CDK_SSO_OAUTH2_0_DEFAULT=true
CDK_SSO_OAUTH2_0_CLIENT-ID=""
CDK_SSO_OAUTH2_0_CLIENT-SECRET=""
CDK_SSO_OAUTH2_0_OPENID_ISSUER="https://cognito-idp..amazonaws.com/"
```
#### Configure groups
If you want to use the `external groups mapping` to map groups between your Conduktor Console instance and Amazon Cognito, you must set the property `groups-claim` to `"cognito:groups"` in Console configuration file. Below is the full snippet for your configuration file:
```yaml title="platform-config.yaml" theme={null}
sso:
oauth2:
- name: "cognito"
client-id: ""
client-secret: ""
groups-claim: "cognito:groups"
openid:
issuer: "https://cognito-idp..amazonaws.com/"
```
```json title=".env" theme={null}
CDK_SSO_OAUTH2_0_NAME="cognito"
CDK_SSO_OAUTH2_0_DEFAULT=true
CDK_SSO_OAUTH2_0_CLIENT-ID=""
CDK_SSO_OAUTH2_0_CLIENT-SECRET=""
CDK_SSO_OAUTH2_0_GROUPS-CLAIM="cognito:groups"
CDK_SSO_OAUTH2_0_OPENID_ISSUER="https://cognito-idp..amazonaws.com/"
```
##### Map to external groups
Now that your configuration is finished, you can set up the mapping between Amazon Cognito and Console groups. That way, when a user logs in, they will be automatically added to the corresponding Console groups, based on the groups they belong to in Amazon Cognito.
The value you need to put as an external group is the `Object ID` of the Amazon Cognito group.
## Configure Entra ID as SSO
On the Entra ID (formerly Azure Active Directory) side, you'll have to create a new application:
* **Step 1**: Create a new application in `App registrations` and set the callback URI
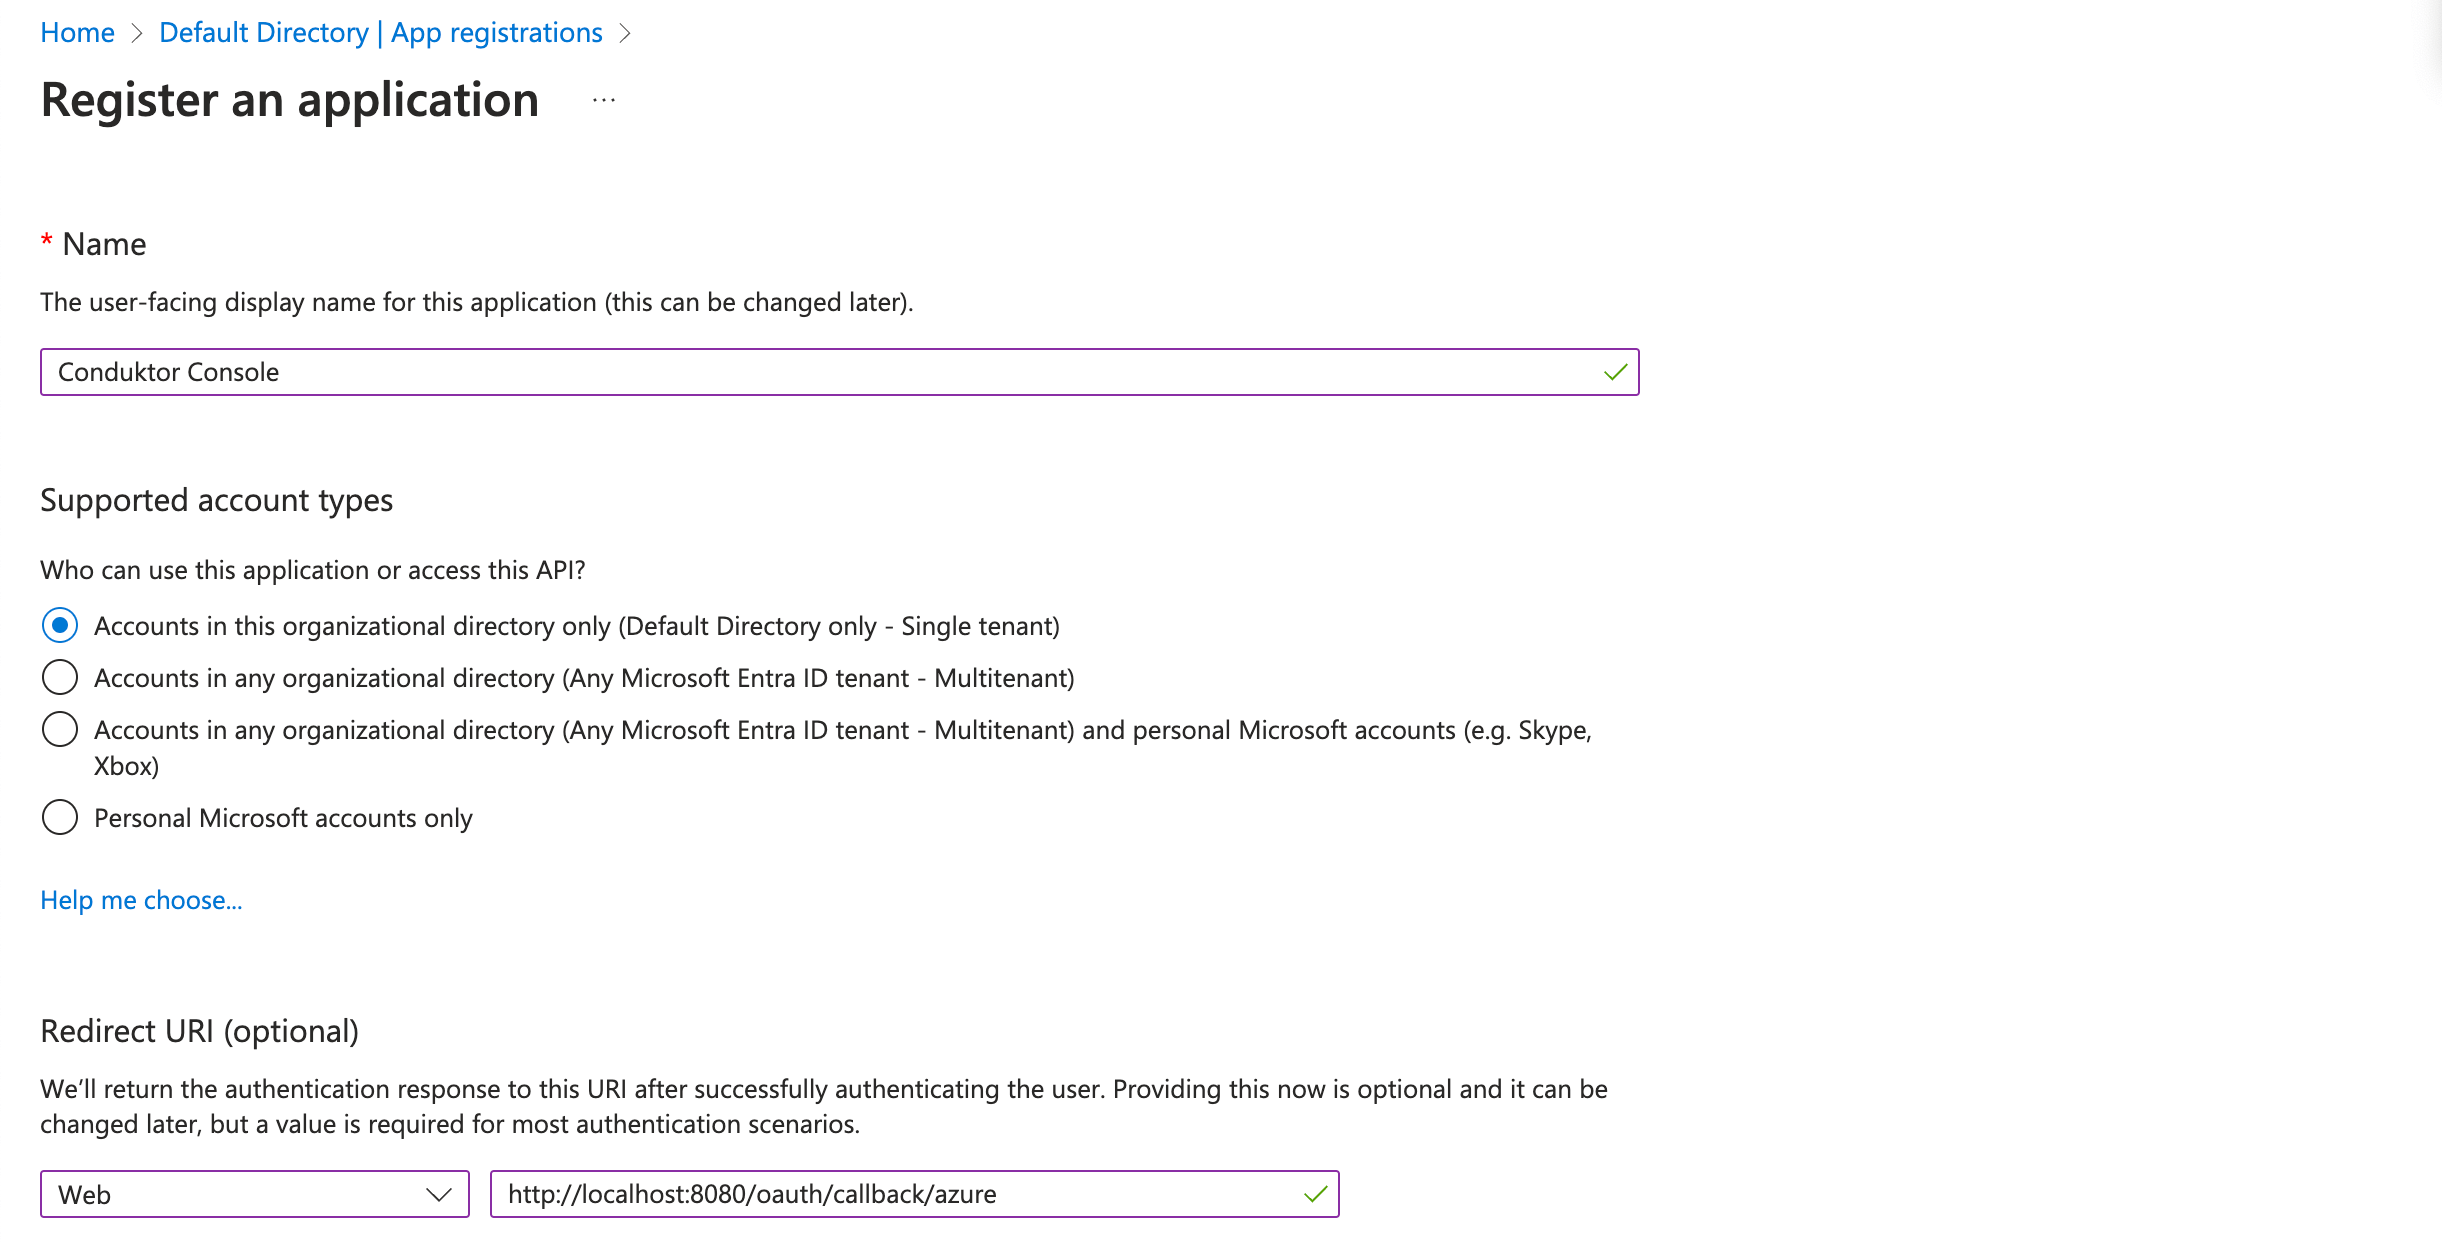
You can select the name you want, shown here as `Conduktor Console`, and enter the redirect URI as the following: `http(s)://(:)/oauth/callback/`.
For example, if you deployed Console locally using the name `azure` in your configuration file, you can use `http://localhost:8080/oauth/callback/azure`, like on the screenshot below.
You can find the .well-known at: `https://cognito-idp..amazonaws.com//.well-known/openid-configuration`.
### Configure Console
On Console side, you can add the snippet below to your configuration file. You have to replace the `client ID`, `client secret`, `region`, and `pool ID`, with what you got during step 4.
```yaml title="platform-config.yaml" theme={null}
sso:
oauth2:
- name: "cognito"
client-id: ""
client-secret: ""
openid:
issuer: "https://cognito-idp..amazonaws.com/"
```
```json title=".env" theme={null}
CDK_SSO_OAUTH2_0_NAME="cognito"
CDK_SSO_OAUTH2_0_DEFAULT=true
CDK_SSO_OAUTH2_0_CLIENT-ID=""
CDK_SSO_OAUTH2_0_CLIENT-SECRET=""
CDK_SSO_OAUTH2_0_OPENID_ISSUER="https://cognito-idp..amazonaws.com/"
```
#### Configure groups
If you want to use the `external groups mapping` to map groups between your Conduktor Console instance and Amazon Cognito, you must set the property `groups-claim` to `"cognito:groups"` in Console configuration file. Below is the full snippet for your configuration file:
```yaml title="platform-config.yaml" theme={null}
sso:
oauth2:
- name: "cognito"
client-id: ""
client-secret: ""
groups-claim: "cognito:groups"
openid:
issuer: "https://cognito-idp..amazonaws.com/"
```
```json title=".env" theme={null}
CDK_SSO_OAUTH2_0_NAME="cognito"
CDK_SSO_OAUTH2_0_DEFAULT=true
CDK_SSO_OAUTH2_0_CLIENT-ID=""
CDK_SSO_OAUTH2_0_CLIENT-SECRET=""
CDK_SSO_OAUTH2_0_GROUPS-CLAIM="cognito:groups"
CDK_SSO_OAUTH2_0_OPENID_ISSUER="https://cognito-idp..amazonaws.com/"
```
##### Map to external groups
Now that your configuration is finished, you can set up the mapping between Amazon Cognito and Console groups. That way, when a user logs in, they will be automatically added to the corresponding Console groups, based on the groups they belong to in Amazon Cognito.
The value you need to put as an external group is the `Object ID` of the Amazon Cognito group.
## Configure Entra ID as SSO
On the Entra ID (formerly Azure Active Directory) side, you'll have to create a new application:
* **Step 1**: Create a new application in `App registrations` and set the callback URI
You can select the name you want, shown here as `Conduktor Console`, and enter the redirect URI as the following: `http(s)://(:)/oauth/callback/`.
For example, if you deployed Console locally using the name `azure` in your configuration file, you can use `http://localhost:8080/oauth/callback/azure`, like on the screenshot below.
 * **Step 2**: Create a new client secret from the **Certificates and secrets** tab
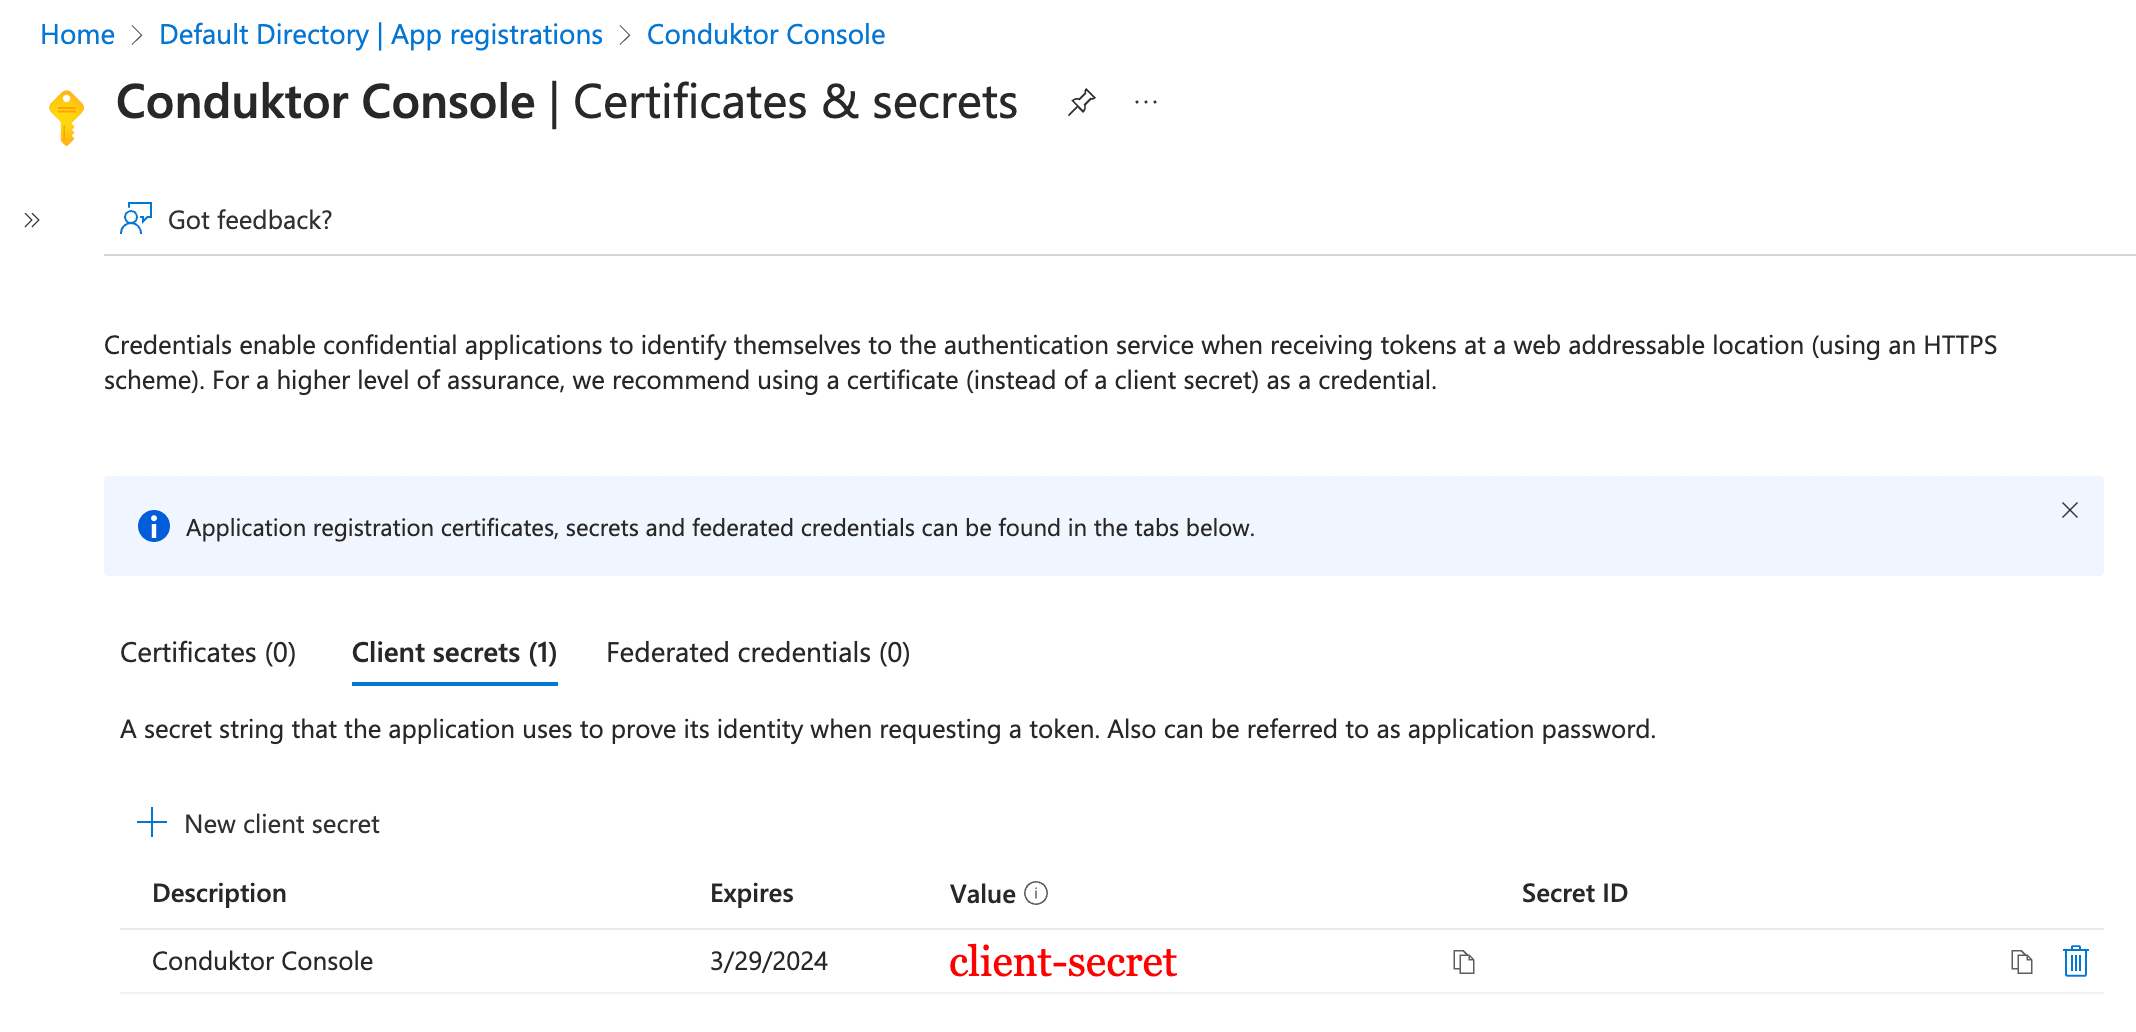 You need to keep the `Value` somewhere safe, as you will not have access to it again.
* **Step 3**: Find the `client ID` and `tenant ID` in the **Overview** tab
You need to keep the `Value` somewhere safe, as you will not have access to it again.
* **Step 3**: Find the `client ID` and `tenant ID` in the **Overview** tab
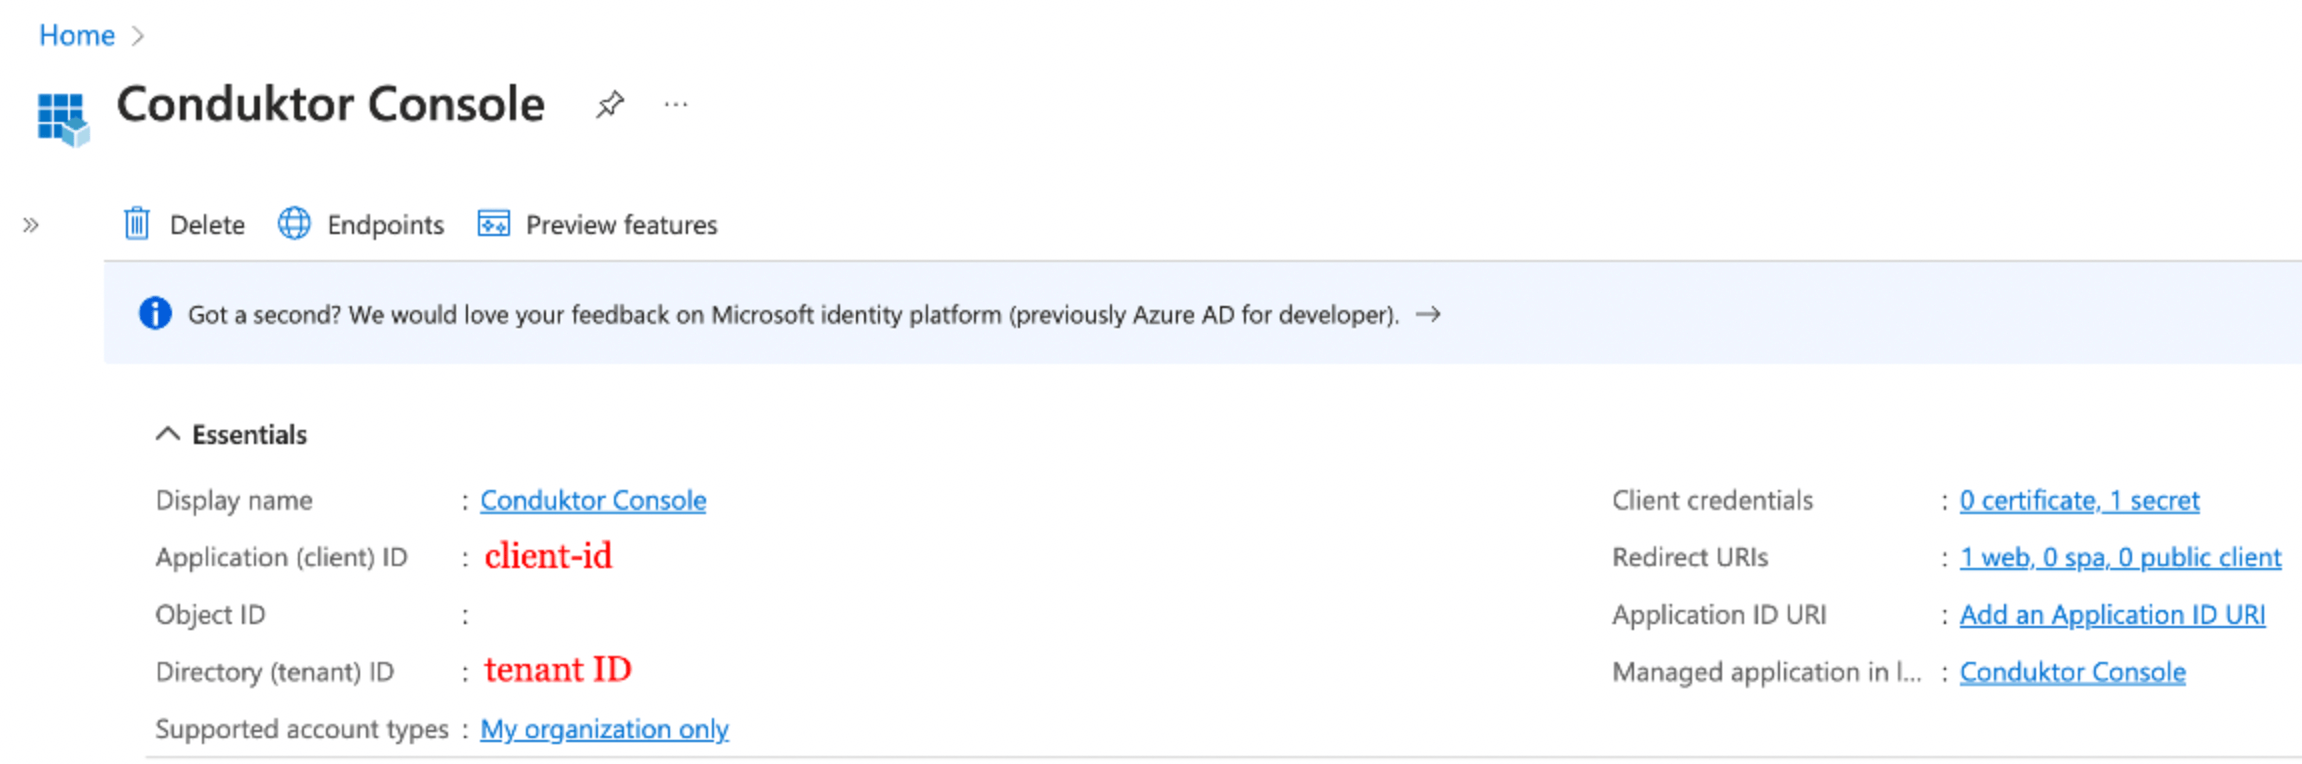 You can find the .well-known at: `https://login.microsoftonline.com//v2.0/.well-known/openid-configuration`.
### Configure Console
On Console side, you can add the snippet below to your configuration file. You have to replace the client ID, client secret, and tenant ID, with what you got during steps 2 and 3.
```yaml title="platform-config.yaml" theme={null}
sso:
oauth2:
- name: "azure"
client-id: ""
client-secret: ""
openid:
issuer: "https://login.microsoftonline.com//v2.0"
```
```json title=".env" theme={null}
CDK_SSO_OAUTH2_0_NAME="azure"
CDK_SSO_OAUTH2_0_DEFAULT=true
CDK_SSO_OAUTH2_0_CLIENT-ID=""
CDK_SSO_OAUTH2_0_CLIENT-SECRET=""
CDK_SSO_OAUTH2_0_OPENID_ISSUER="https://login.microsoftonline.com//v2.0"
```
#### Configure groups
If you want to use the `external groups mapping` to map groups between your Conduktor Console instance and Azure, you must add this claim to your Azure application in the **Token configuration** tab:
You can find the .well-known at: `https://login.microsoftonline.com//v2.0/.well-known/openid-configuration`.
### Configure Console
On Console side, you can add the snippet below to your configuration file. You have to replace the client ID, client secret, and tenant ID, with what you got during steps 2 and 3.
```yaml title="platform-config.yaml" theme={null}
sso:
oauth2:
- name: "azure"
client-id: ""
client-secret: ""
openid:
issuer: "https://login.microsoftonline.com//v2.0"
```
```json title=".env" theme={null}
CDK_SSO_OAUTH2_0_NAME="azure"
CDK_SSO_OAUTH2_0_DEFAULT=true
CDK_SSO_OAUTH2_0_CLIENT-ID=""
CDK_SSO_OAUTH2_0_CLIENT-SECRET=""
CDK_SSO_OAUTH2_0_OPENID_ISSUER="https://login.microsoftonline.com//v2.0"
```
#### Configure groups
If you want to use the `external groups mapping` to map groups between your Conduktor Console instance and Azure, you must add this claim to your Azure application in the **Token configuration** tab:
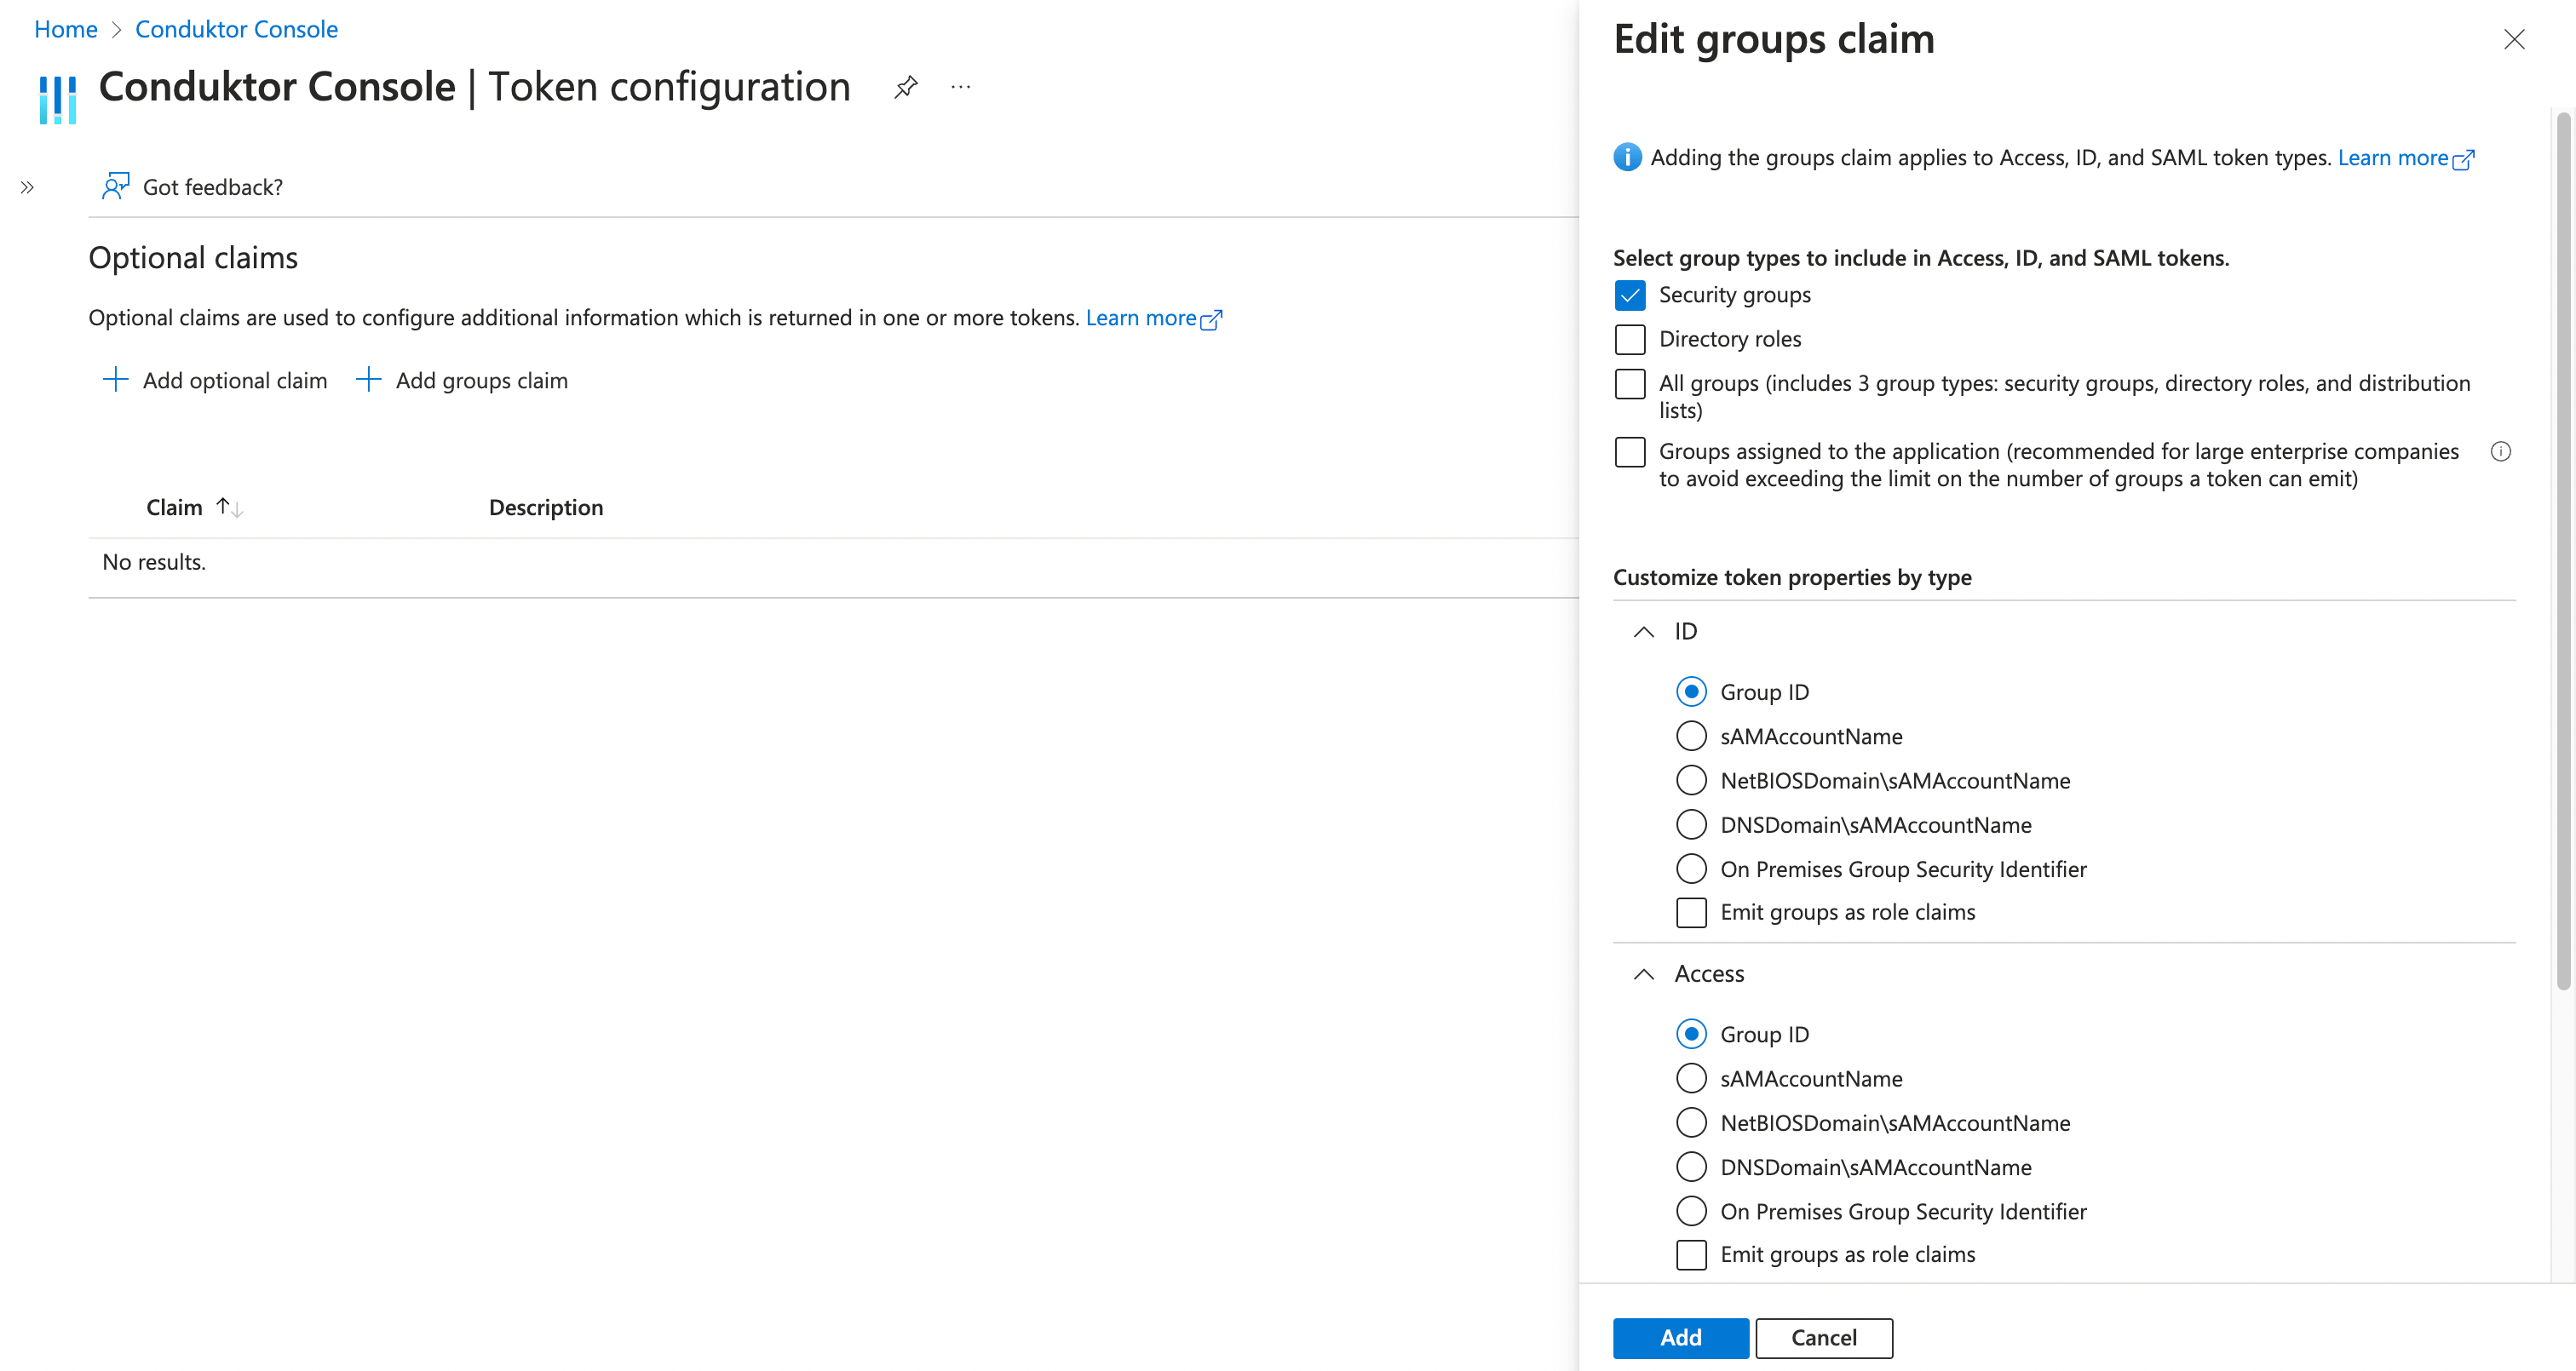 The external groups mapping will not work for users who belong to [more than 200 groups](https://learn.microsoft.com/en-us/entra/identity/hybrid/connect/how-to-connect-fed-group-claims) . In this case, you will need to [assign some groups to the application](https://learn.microsoft.com/en-us/azure/active-directory/manage-apps/assign-user-or-group-access-portal?pivots=portal#assign-users-and-groups-to-an-application) and check the **Groups assigned to the application** box when creating the groups claim on Azure AD. This is to avoid exceeding the limit on the number of groups a token can contain.
Then, you must set the property `groups-claim` to `"groups"` in the Console configuration file. Below is the full snippet for your configuration file:
```yaml title="platform-config.yaml" theme={null}
sso:
oauth2:
- name: "azure"
client-id: ""
client-secret: ""
groups-claim: "groups"
openid:
issuer: "https://login.microsoftonline.com//v2.0"
```
```json title=".env" theme={null}
CDK_SSO_OAUTH2_0_NAME="azure"
CDK_SSO_OAUTH2_0_DEFAULT=true
CDK_SSO_OAUTH2_0_CLIENT-ID=""
CDK_SSO_OAUTH2_0_CLIENT-SECRET=""
CDK_SSO_OAUTH2_0_GROUPS-CLAIM="groups"
CDK_SSO_OAUTH2_0_OPENID_ISSUER="https://login.microsoftonline.com//v2.0"
```
##### Map to external groups
Now that your configuration is finished, you can set up the mapping between Azure AD and Console groups. That way, when a user will log in, they will be automatically added to the corresponding Console groups, based on the groups they belong to in Azure AD.
The value you need to put as an external group is the `Object ID` of the Azure AD group.
## Configure Google as SSO
On Google side:
* **Step 1**: Create an application on the **OAuth consent screen** tab
The scopes needed are `email`, `profile`, and `openid`. Optionally, you need `read only` for external group mapping.
The external groups mapping will not work for users who belong to [more than 200 groups](https://learn.microsoft.com/en-us/entra/identity/hybrid/connect/how-to-connect-fed-group-claims) . In this case, you will need to [assign some groups to the application](https://learn.microsoft.com/en-us/azure/active-directory/manage-apps/assign-user-or-group-access-portal?pivots=portal#assign-users-and-groups-to-an-application) and check the **Groups assigned to the application** box when creating the groups claim on Azure AD. This is to avoid exceeding the limit on the number of groups a token can contain.
Then, you must set the property `groups-claim` to `"groups"` in the Console configuration file. Below is the full snippet for your configuration file:
```yaml title="platform-config.yaml" theme={null}
sso:
oauth2:
- name: "azure"
client-id: ""
client-secret: ""
groups-claim: "groups"
openid:
issuer: "https://login.microsoftonline.com//v2.0"
```
```json title=".env" theme={null}
CDK_SSO_OAUTH2_0_NAME="azure"
CDK_SSO_OAUTH2_0_DEFAULT=true
CDK_SSO_OAUTH2_0_CLIENT-ID=""
CDK_SSO_OAUTH2_0_CLIENT-SECRET=""
CDK_SSO_OAUTH2_0_GROUPS-CLAIM="groups"
CDK_SSO_OAUTH2_0_OPENID_ISSUER="https://login.microsoftonline.com//v2.0"
```
##### Map to external groups
Now that your configuration is finished, you can set up the mapping between Azure AD and Console groups. That way, when a user will log in, they will be automatically added to the corresponding Console groups, based on the groups they belong to in Azure AD.
The value you need to put as an external group is the `Object ID` of the Azure AD group.
## Configure Google as SSO
On Google side:
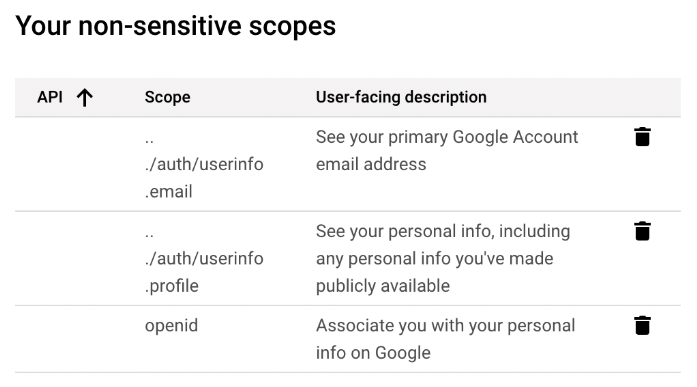
* **Step 1**: Create an application on the **OAuth consent screen** tab
The scopes needed are `email`, `profile`, and `openid`. Optionally, you need `read only` for external group mapping.
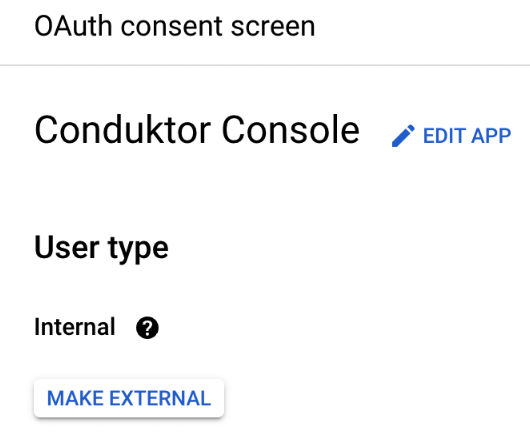
 * **Step 2**: Restrict access to your internal workspace by checking the `Internal` user type in the **OAuth consent screen**.
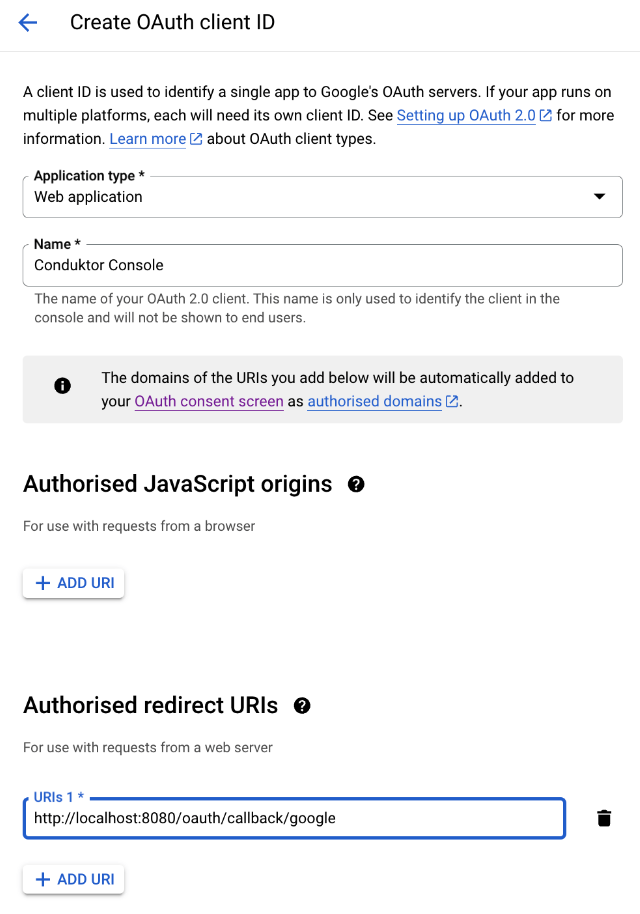
 * **Step 3**: Create a new `OAuth client ID`
You can select the name you want, shown here as `Conduktor Console`, and enter the redirect URI like this: `http(s)://(:)/oauth/callback/`.
For example, if you deployed Console locally using the name `google` in your configuration file, you can use `http://localhost:8080/oauth/callback/google`, like on the screenshot below.
* **Step 3**: Create a new `OAuth client ID`
You can select the name you want, shown here as `Conduktor Console`, and enter the redirect URI like this: `http(s)://(:)/oauth/callback/`.
For example, if you deployed Console locally using the name `google` in your configuration file, you can use `http://localhost:8080/oauth/callback/google`, like on the screenshot below.
 * **Step 4**: Get the `client ID` and the `secret ID`
After the creation, the pop-up below appears. You can save the client ID and secret as JSON if you want.
You can find the .well-known at: [`https://accounts.google.com/.well-known/openid-configuration`](https://accounts.google.com/.well-known/openid-configuration) .
If you need to add an **authorized domain** to your Google account, you can follow [this guide](https://support.google.com/cloud/answer/6158849?hl=en-GB#authorized-domains\&zippy=%2Cauthorized-domains) .
### Configure Console
On Console side, you can add the snippet below to your configuration file. You have to replace the client ID and secret with what you got during the step 4.
```yaml title="platform-config.yaml" theme={null}
sso:
oauth2:
- name: "google"
client-id: ""
client-secret: ""
scopes: "openid,email,profile"
openid:
issuer: "https://accounts.google.com"
```
```json title=".env" theme={null}
CDK_SSO_OAUTH2_0_NAME="google"
CDK_SSO_OAUTH2_0_CLIENT-ID=""
CDK_SSO_OAUTH2_0_CLIENT-SECRET=""
CDK_SSO_OAUTH2_0_SCOPES="openid,email,profile"
CDK_SSO_OAUTH2_0_OPENID_ISSUER="https://accounts.google.com"
```
#### Configure groups
An additional scope `https://www.googleapis.com/auth/cloud-identity.groups.readonly` is required if you want to sync Google Group with Conduktor Groups.
```yaml title="platform-config.yaml" theme={null}
sso:
oauth2:
- name: "google"
client-id: ""
client-secret: ""
scopes: "openid,email,profile,https://www.googleapis.com/auth/cloud-identity.groups.readonly"
openid:
issuer: "https://accounts.google.com"
```
```json title=".env" theme={null}
CDK_SSO_OAUTH2_0_NAME="google"
CDK_SSO_OAUTH2_0_CLIENT-ID=""
CDK_SSO_OAUTH2_0_CLIENT-SECRET=""
CDK_SSO_OAUTH2_0_SCOPES="openid,email,profile,https://www.googleapis.com/auth/cloud-identity.groups.readonly"
CDK_SSO_OAUTH2_0_OPENID_ISSUER="https://accounts.google.com"
```
##### Map to external groups
Now that your configuration is finished, you can set up the mapping between Google groups and Console groups.
That way, when a user logs in, they will be automatically added to the corresponding Console groups, based on the groups they belong to in Google.
The value you need to put as an external group is the `email` address of the Google Group.
## Configure JumpCloud as SSO
On the JumpCloud side, you'll have to create a new application:
* **Step 1**: Create a new application in `SSO Applications`.
* **Step 4**: Get the `client ID` and the `secret ID`
After the creation, the pop-up below appears. You can save the client ID and secret as JSON if you want.
You can find the .well-known at: [`https://accounts.google.com/.well-known/openid-configuration`](https://accounts.google.com/.well-known/openid-configuration) .
If you need to add an **authorized domain** to your Google account, you can follow [this guide](https://support.google.com/cloud/answer/6158849?hl=en-GB#authorized-domains\&zippy=%2Cauthorized-domains) .
### Configure Console
On Console side, you can add the snippet below to your configuration file. You have to replace the client ID and secret with what you got during the step 4.
```yaml title="platform-config.yaml" theme={null}
sso:
oauth2:
- name: "google"
client-id: ""
client-secret: ""
scopes: "openid,email,profile"
openid:
issuer: "https://accounts.google.com"
```
```json title=".env" theme={null}
CDK_SSO_OAUTH2_0_NAME="google"
CDK_SSO_OAUTH2_0_CLIENT-ID=""
CDK_SSO_OAUTH2_0_CLIENT-SECRET=""
CDK_SSO_OAUTH2_0_SCOPES="openid,email,profile"
CDK_SSO_OAUTH2_0_OPENID_ISSUER="https://accounts.google.com"
```
#### Configure groups
An additional scope `https://www.googleapis.com/auth/cloud-identity.groups.readonly` is required if you want to sync Google Group with Conduktor Groups.
```yaml title="platform-config.yaml" theme={null}
sso:
oauth2:
- name: "google"
client-id: ""
client-secret: ""
scopes: "openid,email,profile,https://www.googleapis.com/auth/cloud-identity.groups.readonly"
openid:
issuer: "https://accounts.google.com"
```
```json title=".env" theme={null}
CDK_SSO_OAUTH2_0_NAME="google"
CDK_SSO_OAUTH2_0_CLIENT-ID=""
CDK_SSO_OAUTH2_0_CLIENT-SECRET=""
CDK_SSO_OAUTH2_0_SCOPES="openid,email,profile,https://www.googleapis.com/auth/cloud-identity.groups.readonly"
CDK_SSO_OAUTH2_0_OPENID_ISSUER="https://accounts.google.com"
```
##### Map to external groups
Now that your configuration is finished, you can set up the mapping between Google groups and Console groups.
That way, when a user logs in, they will be automatically added to the corresponding Console groups, based on the groups they belong to in Google.
The value you need to put as an external group is the `email` address of the Google Group.
## Configure JumpCloud as SSO
On the JumpCloud side, you'll have to create a new application:
* **Step 1**: Create a new application in `SSO Applications`.
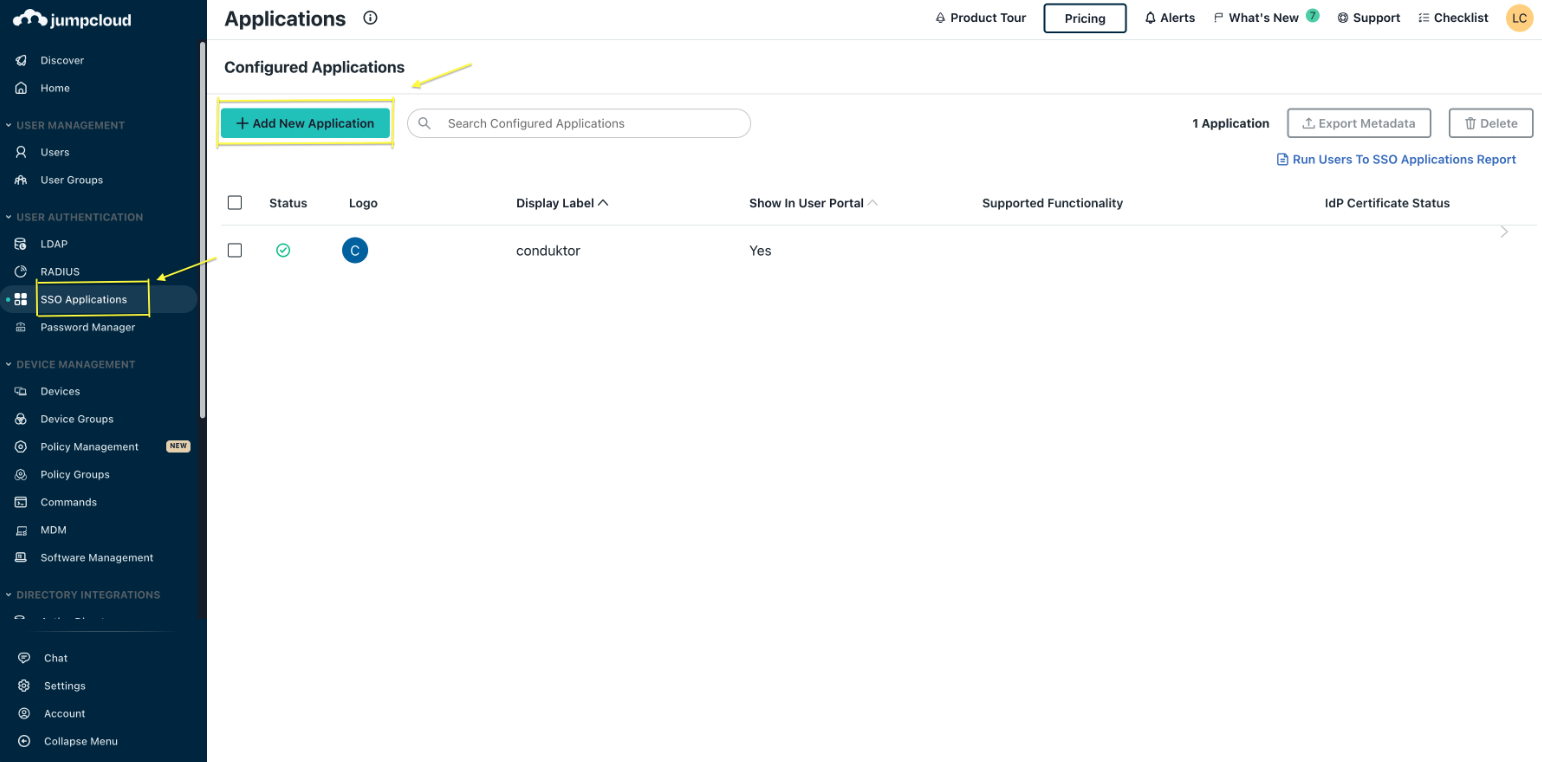 * **Step 2**: Select a `Custom Application` as shown below.
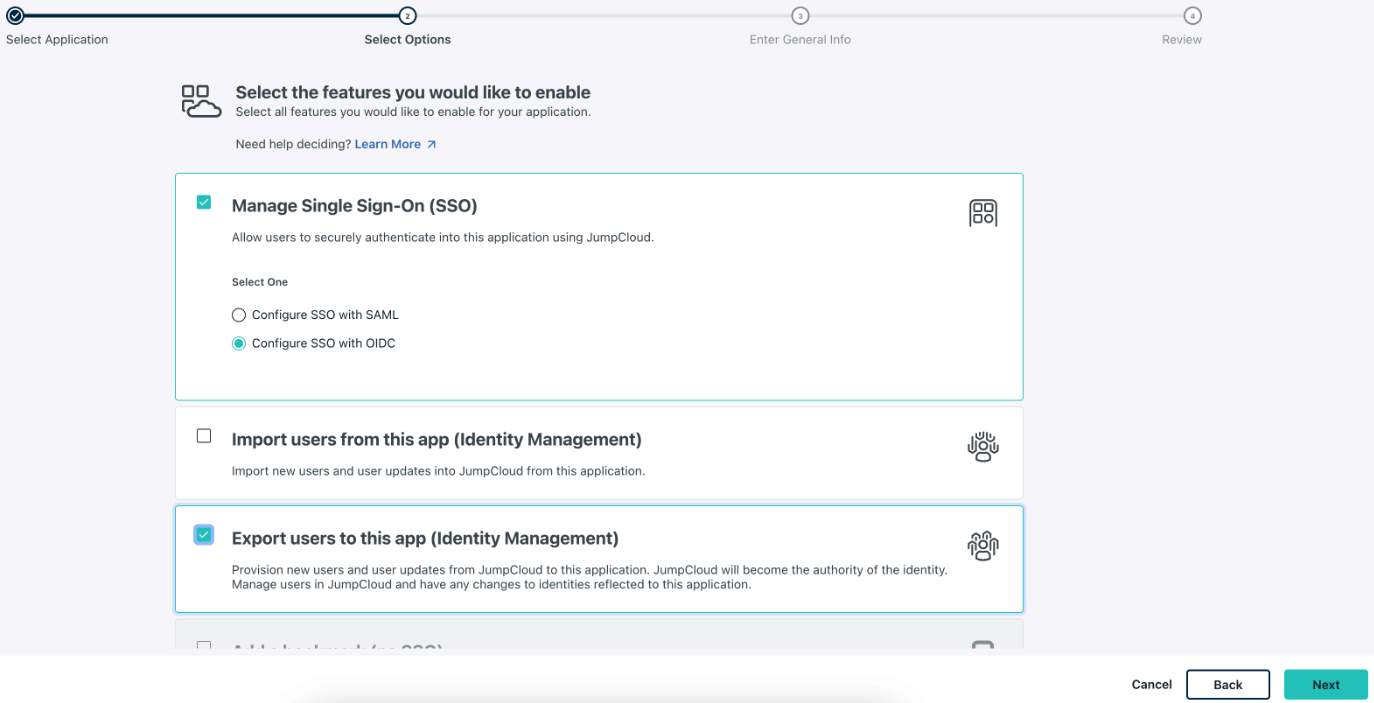
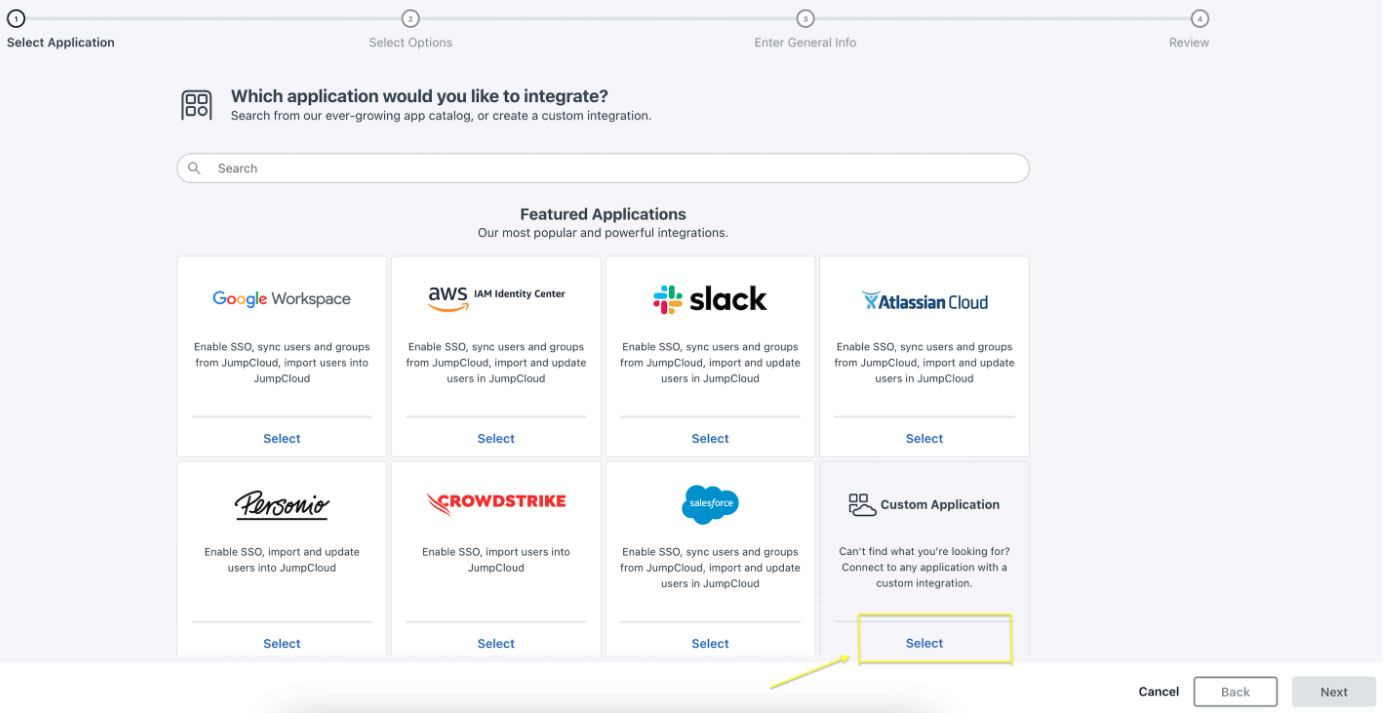 Then ensure to select `Manage Single Sign-On (SSO)`, then `Configure SSO with OIDC` and `Export users to this app (Identity Management)` as seen in the screenshot below.
 Following this, enter general information for your custom application, including the display label, such as `conduktor` as seen in the screenshot below and configure this application.
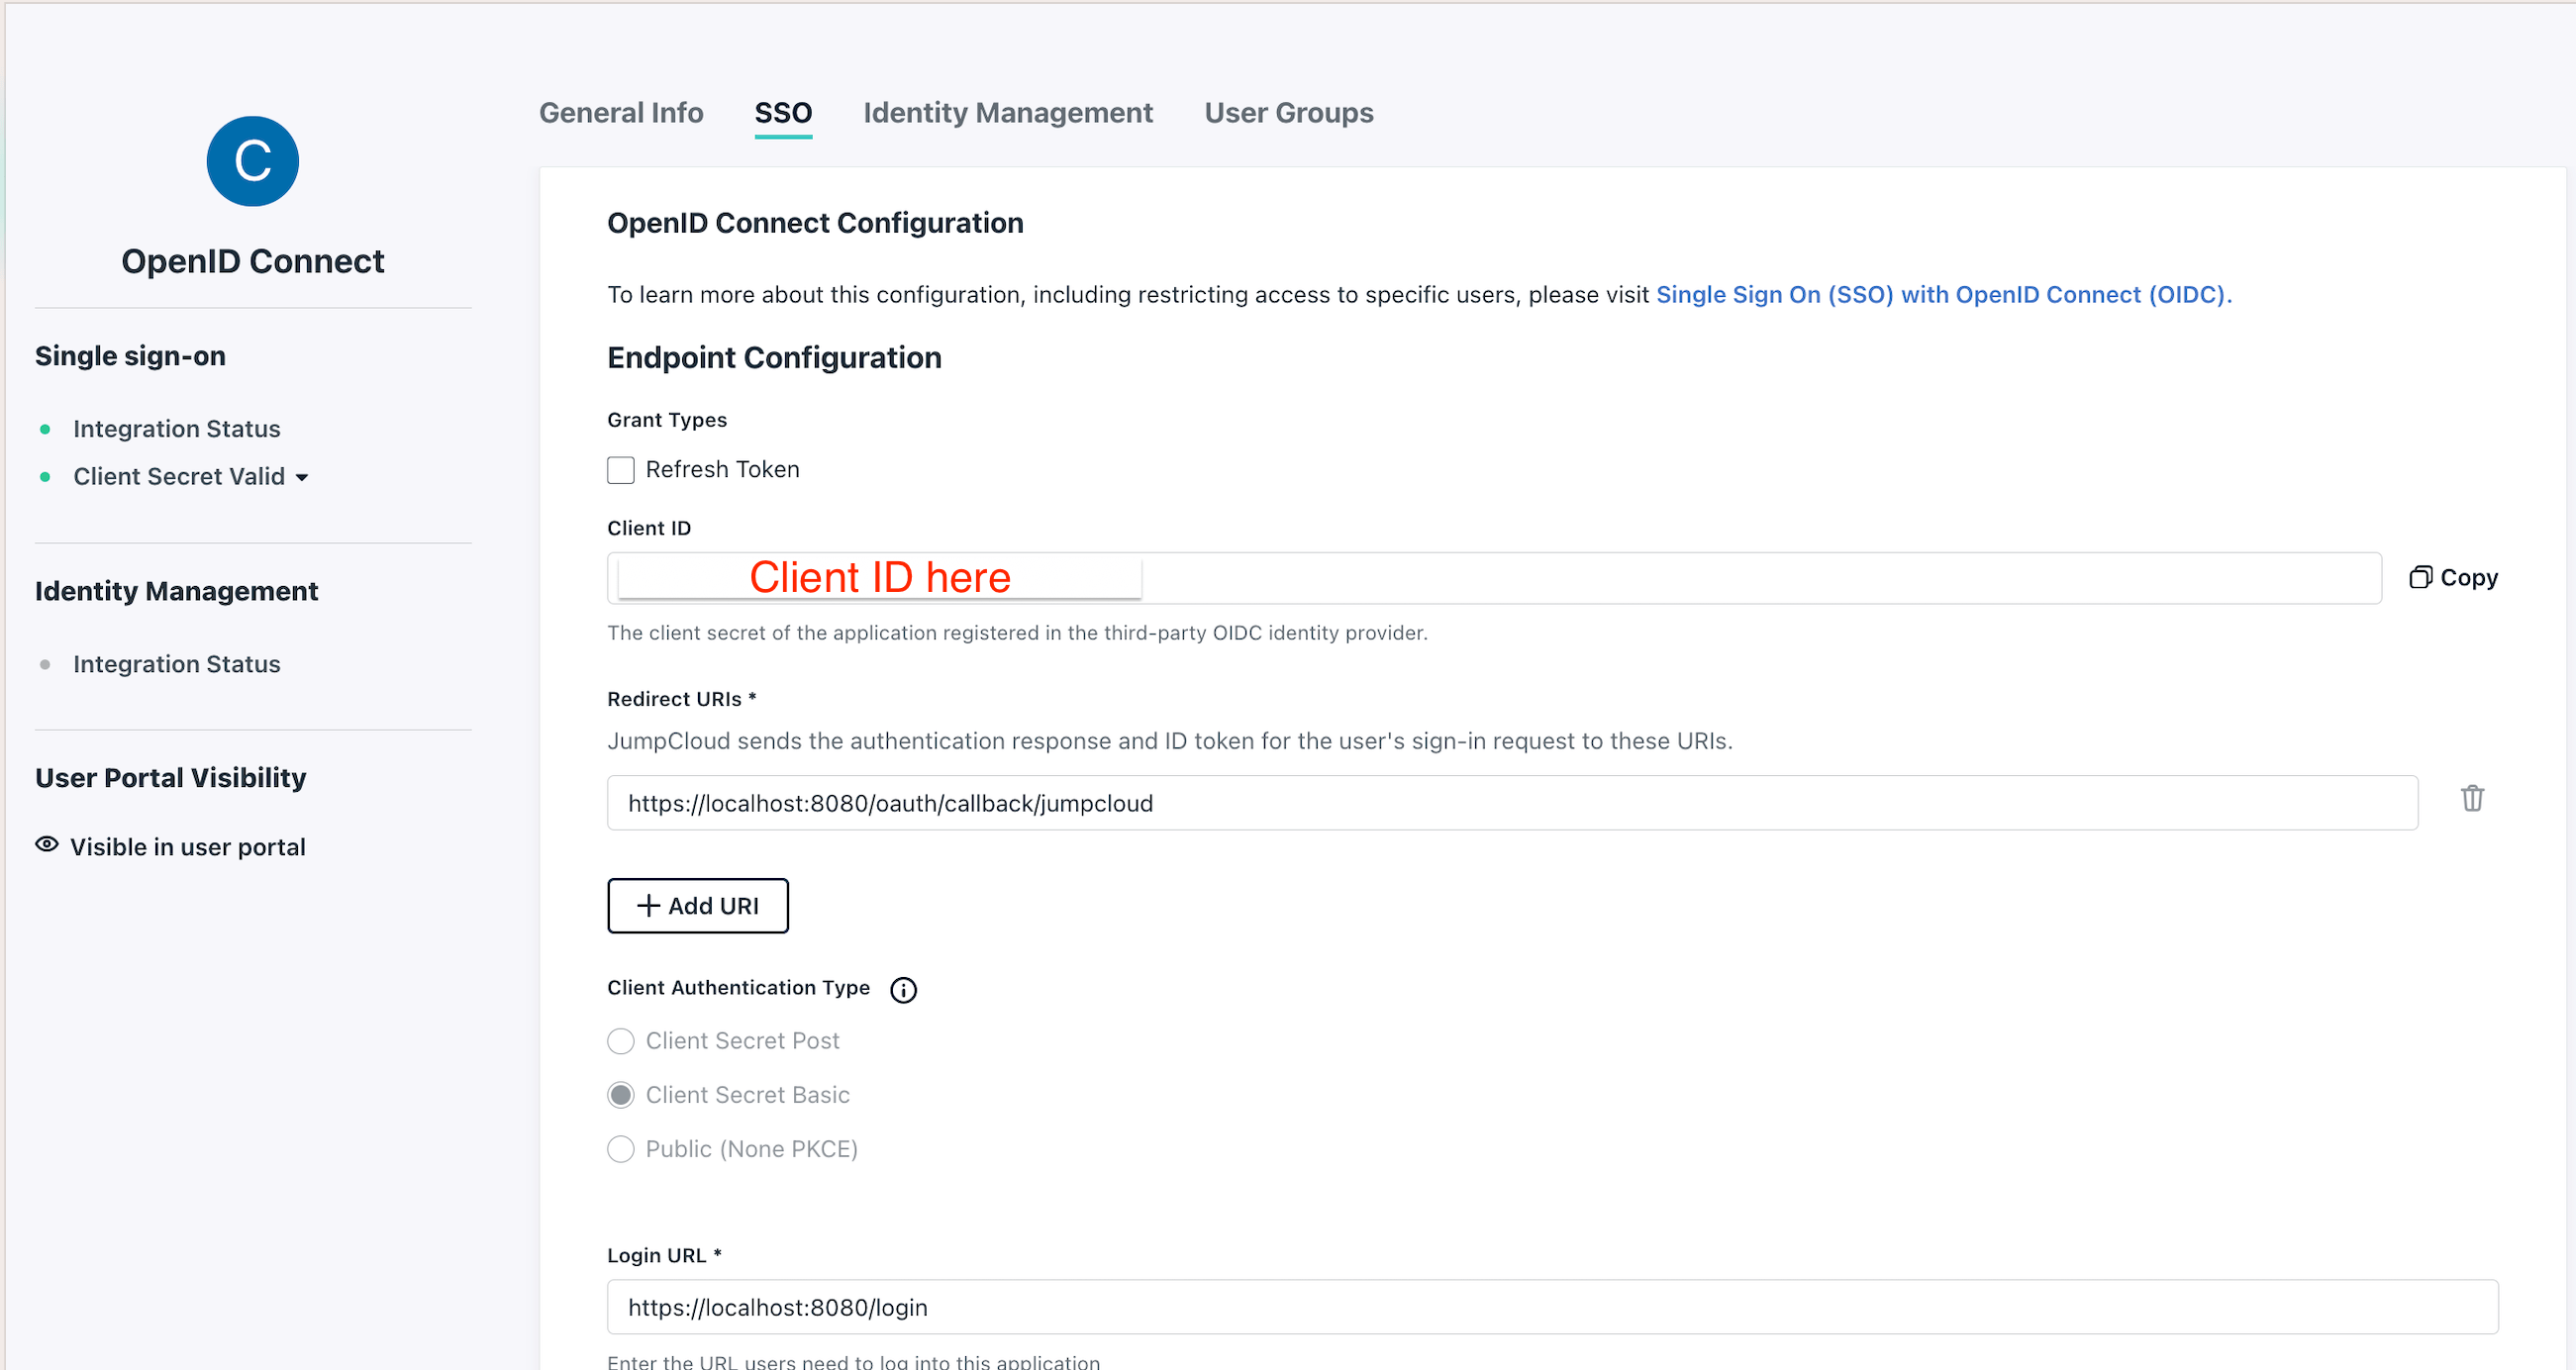
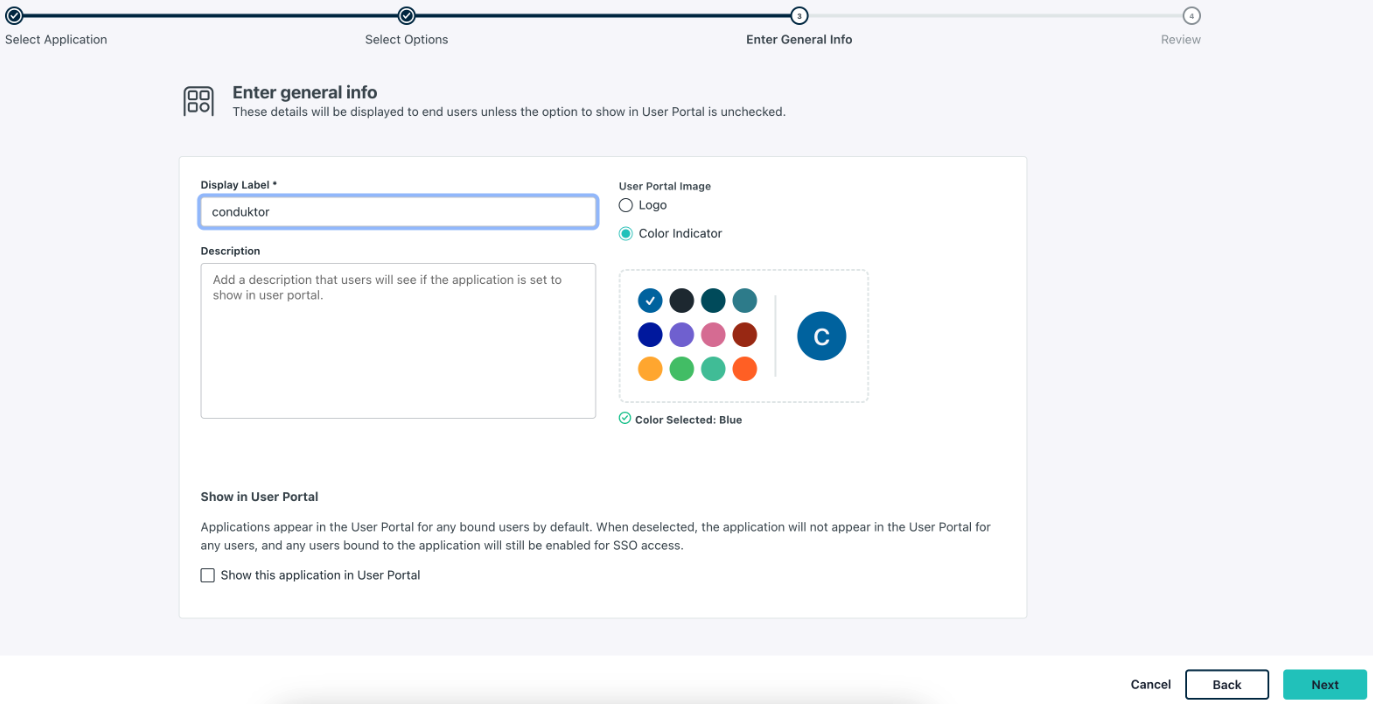 * **Step 3**: Configure OAuth settings including `Redirect URI(s)`, `Login URL` and the client authentication type.
The Redirect URI is where JumpCloud sends the authentication response and ID token for the user's sign-in request to. The Login URL is the URL users need to log into this application.
Enter the redirect URI in the following way:
`http(s)://:/oauth/callback/`.
For example, if you deployed Console locally using the name `jumpcloud` in your configuration file, you can use
`https://localhost:8080/oauth/callback/jumpcloud`, as seen in the screenshot below.
Enter the Login URL, which is the URL users need to log into this application. In the example below, this is `https://localhost:8080` .
For the **Client Authentication Type** make sure to select the **Client Secret Basic** option.
* **Step 3**: Configure OAuth settings including `Redirect URI(s)`, `Login URL` and the client authentication type.
The Redirect URI is where JumpCloud sends the authentication response and ID token for the user's sign-in request to. The Login URL is the URL users need to log into this application.
Enter the redirect URI in the following way:
`http(s)://:/oauth/callback/`.
For example, if you deployed Console locally using the name `jumpcloud` in your configuration file, you can use
`https://localhost:8080/oauth/callback/jumpcloud`, as seen in the screenshot below.
Enter the Login URL, which is the URL users need to log into this application. In the example below, this is `https://localhost:8080` .
For the **Client Authentication Type** make sure to select the **Client Secret Basic** option.
 * **Step 4**: Find the `Client ID` and `Client Secret`.
After clicking activate during Step 3 you will be shown configurations for `Client ID` and `Client Secret`, be sure to save these somewhere safe.
* **Step 4**: Find the `Client ID` and `Client Secret`.
After clicking activate during Step 3 you will be shown configurations for `Client ID` and `Client Secret`, be sure to save these somewhere safe.
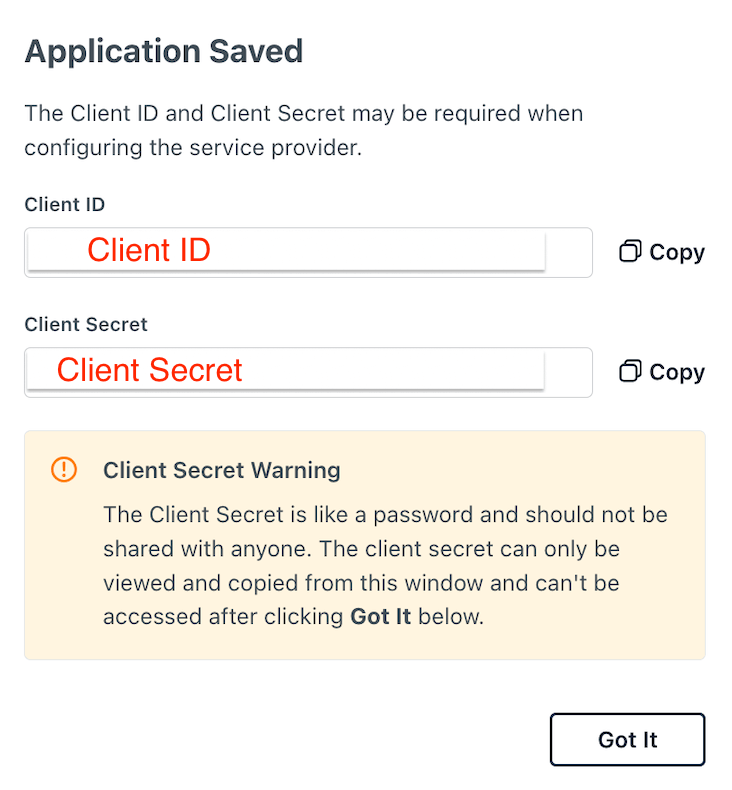 You need to keep the `Client Secret` somewhere safe, as you will not have access to it again.
### Configure Console
On the Conduktor Console side, you can add the snippet below to your configuration file. You will have to replace the Client ID and Client Secret, as shown in steps 3 and 4.
You can find the opendid issuer at: `https://oauth.id.jumpcloud.com/` as shown [`here`](https://jumpcloud.com/support/sso-with-oidc)
```yaml title="platform-config.yaml" theme={null}
sso:
oauth2:
- name: "jumpcloud"
client-id: ""
client-secret: ""
groups-claim: "groups" #if wanting to use groups mapping
openid:
issuer: "https://oauth.id.jumpcloud.com/"
```
Or using environment variables:
```json theme={null}
CDK_SSO_OAUTH2_0_NAME="jumpcloud"
CDK_SSO_OAUTH2_0_DEFAULT=true
CDK_SSO_OAUTH2_0_CLIENT-ID=""
CDK_SSO_OAUTH2_0_CLIENT-SECRET=""
CDK_SSO_OAUTH2_0_GROUPS-CLAIM="groups"
CDK_SSO_OAUTH2_0_OPENID_ISSUER="https://oauth.id.jumpcloud.com/"
```
#### Configure groups
If you want to use the `external groups mapping` to map groups between your Conduktor Console instance and JumpCloud:
From the JumpCloud side, ensure you have:
* Checked `Email` and `Profile` under the standard scopes
* Set the `email_verified` to true
* The same value in `group attribute` as in the `groups-claim` or `CDK_SSO_OAUTH2_0_GROUPS-CLAIM` value of your Console's configuration
See the example screenshot shown below.
You need to keep the `Client Secret` somewhere safe, as you will not have access to it again.
### Configure Console
On the Conduktor Console side, you can add the snippet below to your configuration file. You will have to replace the Client ID and Client Secret, as shown in steps 3 and 4.
You can find the opendid issuer at: `https://oauth.id.jumpcloud.com/` as shown [`here`](https://jumpcloud.com/support/sso-with-oidc)
```yaml title="platform-config.yaml" theme={null}
sso:
oauth2:
- name: "jumpcloud"
client-id: ""
client-secret: ""
groups-claim: "groups" #if wanting to use groups mapping
openid:
issuer: "https://oauth.id.jumpcloud.com/"
```
Or using environment variables:
```json theme={null}
CDK_SSO_OAUTH2_0_NAME="jumpcloud"
CDK_SSO_OAUTH2_0_DEFAULT=true
CDK_SSO_OAUTH2_0_CLIENT-ID=""
CDK_SSO_OAUTH2_0_CLIENT-SECRET=""
CDK_SSO_OAUTH2_0_GROUPS-CLAIM="groups"
CDK_SSO_OAUTH2_0_OPENID_ISSUER="https://oauth.id.jumpcloud.com/"
```
#### Configure groups
If you want to use the `external groups mapping` to map groups between your Conduktor Console instance and JumpCloud:
From the JumpCloud side, ensure you have:
* Checked `Email` and `Profile` under the standard scopes
* Set the `email_verified` to true
* The same value in `group attribute` as in the `groups-claim` or `CDK_SSO_OAUTH2_0_GROUPS-CLAIM` value of your Console's configuration
See the example screenshot shown below.
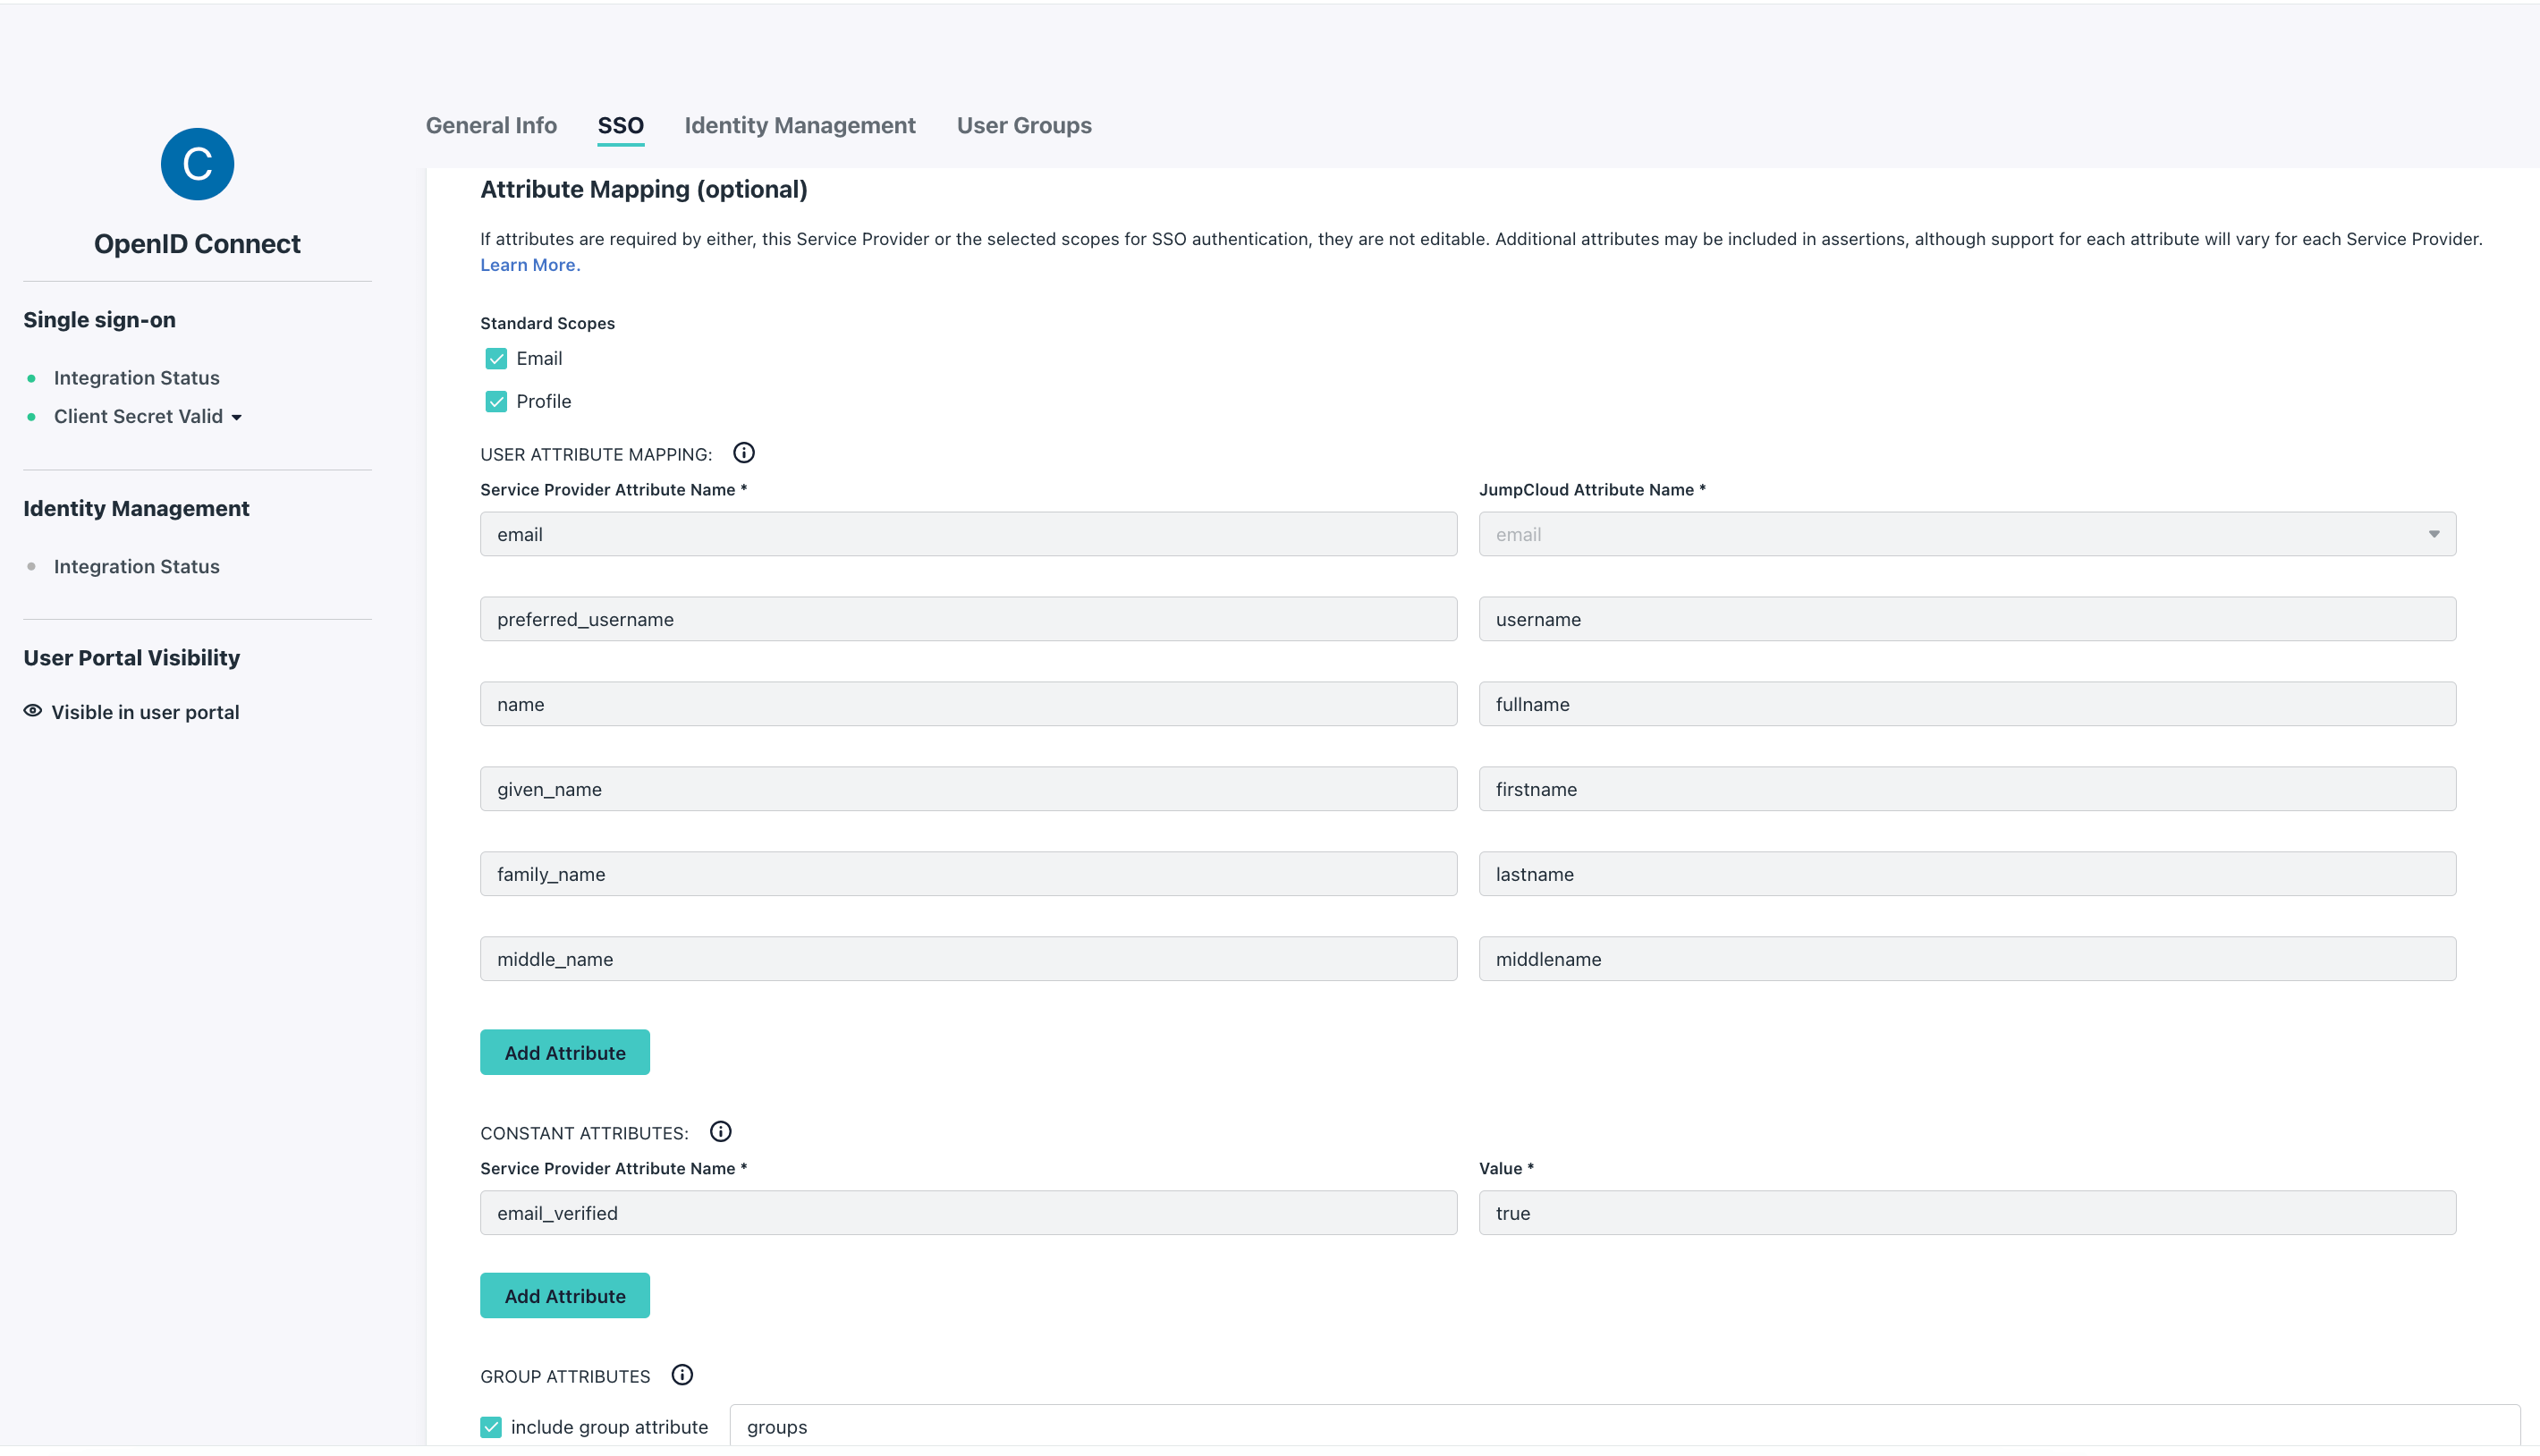 From the Conduktor Console side, you must set the property `groups-claim` to `"groups"` in the Console configuration file.
Below is the full snippet for your configuration file:
```yaml title="platform-config.yaml" theme={null}
sso:
oauth2:
- name: "jumpcloud"
client-id: ""
client-secret: ""
groups-claim: "groups"
openid:
issuer: "https://oauth.id.jumpcloud.com/"
```
Or using environment variables:
```json theme={null}
CDK_SSO_OAUTH2_0_NAME="jumpcloud"
CDK_SSO_OAUTH2_0_DEFAULT=true
CDK_SSO_OAUTH2_0_CLIENT-ID=""
CDK_SSO_OAUTH2_0_CLIENT-SECRET=""
CDK_SSO_OAUTH2_0_GROUPS-CLAIM="groups"
CDK_SSO_OAUTH2_0_OPENID_ISSUER="https://oauth.id.jumpcloud.com/"
```
##### Map to external groups
Now that your configuration is finished, you can [set up the mapping](https://docs.conduktor.io/platform/get-started/configuration/user-authentication/external-group-sync/#create-an-external-group-mapping) between JumpCloud and Conduktor Console groups. This way, when a user logs in, they will be automatically added to the corresponding Conduktor Console groups, based on the groups they belong to in JumpCloud.
The value you need to put as an external group is the name of the JumpCloud group.
## Configure Keycloak as SSO
On Keycloak side, you'll have to create a new application:
* **Step 1**: create a new OpenID Connect client, and set the `client ID`
From the Conduktor Console side, you must set the property `groups-claim` to `"groups"` in the Console configuration file.
Below is the full snippet for your configuration file:
```yaml title="platform-config.yaml" theme={null}
sso:
oauth2:
- name: "jumpcloud"
client-id: ""
client-secret: ""
groups-claim: "groups"
openid:
issuer: "https://oauth.id.jumpcloud.com/"
```
Or using environment variables:
```json theme={null}
CDK_SSO_OAUTH2_0_NAME="jumpcloud"
CDK_SSO_OAUTH2_0_DEFAULT=true
CDK_SSO_OAUTH2_0_CLIENT-ID=""
CDK_SSO_OAUTH2_0_CLIENT-SECRET=""
CDK_SSO_OAUTH2_0_GROUPS-CLAIM="groups"
CDK_SSO_OAUTH2_0_OPENID_ISSUER="https://oauth.id.jumpcloud.com/"
```
##### Map to external groups
Now that your configuration is finished, you can [set up the mapping](https://docs.conduktor.io/platform/get-started/configuration/user-authentication/external-group-sync/#create-an-external-group-mapping) between JumpCloud and Conduktor Console groups. This way, when a user logs in, they will be automatically added to the corresponding Conduktor Console groups, based on the groups they belong to in JumpCloud.
The value you need to put as an external group is the name of the JumpCloud group.
## Configure Keycloak as SSO
On Keycloak side, you'll have to create a new application:
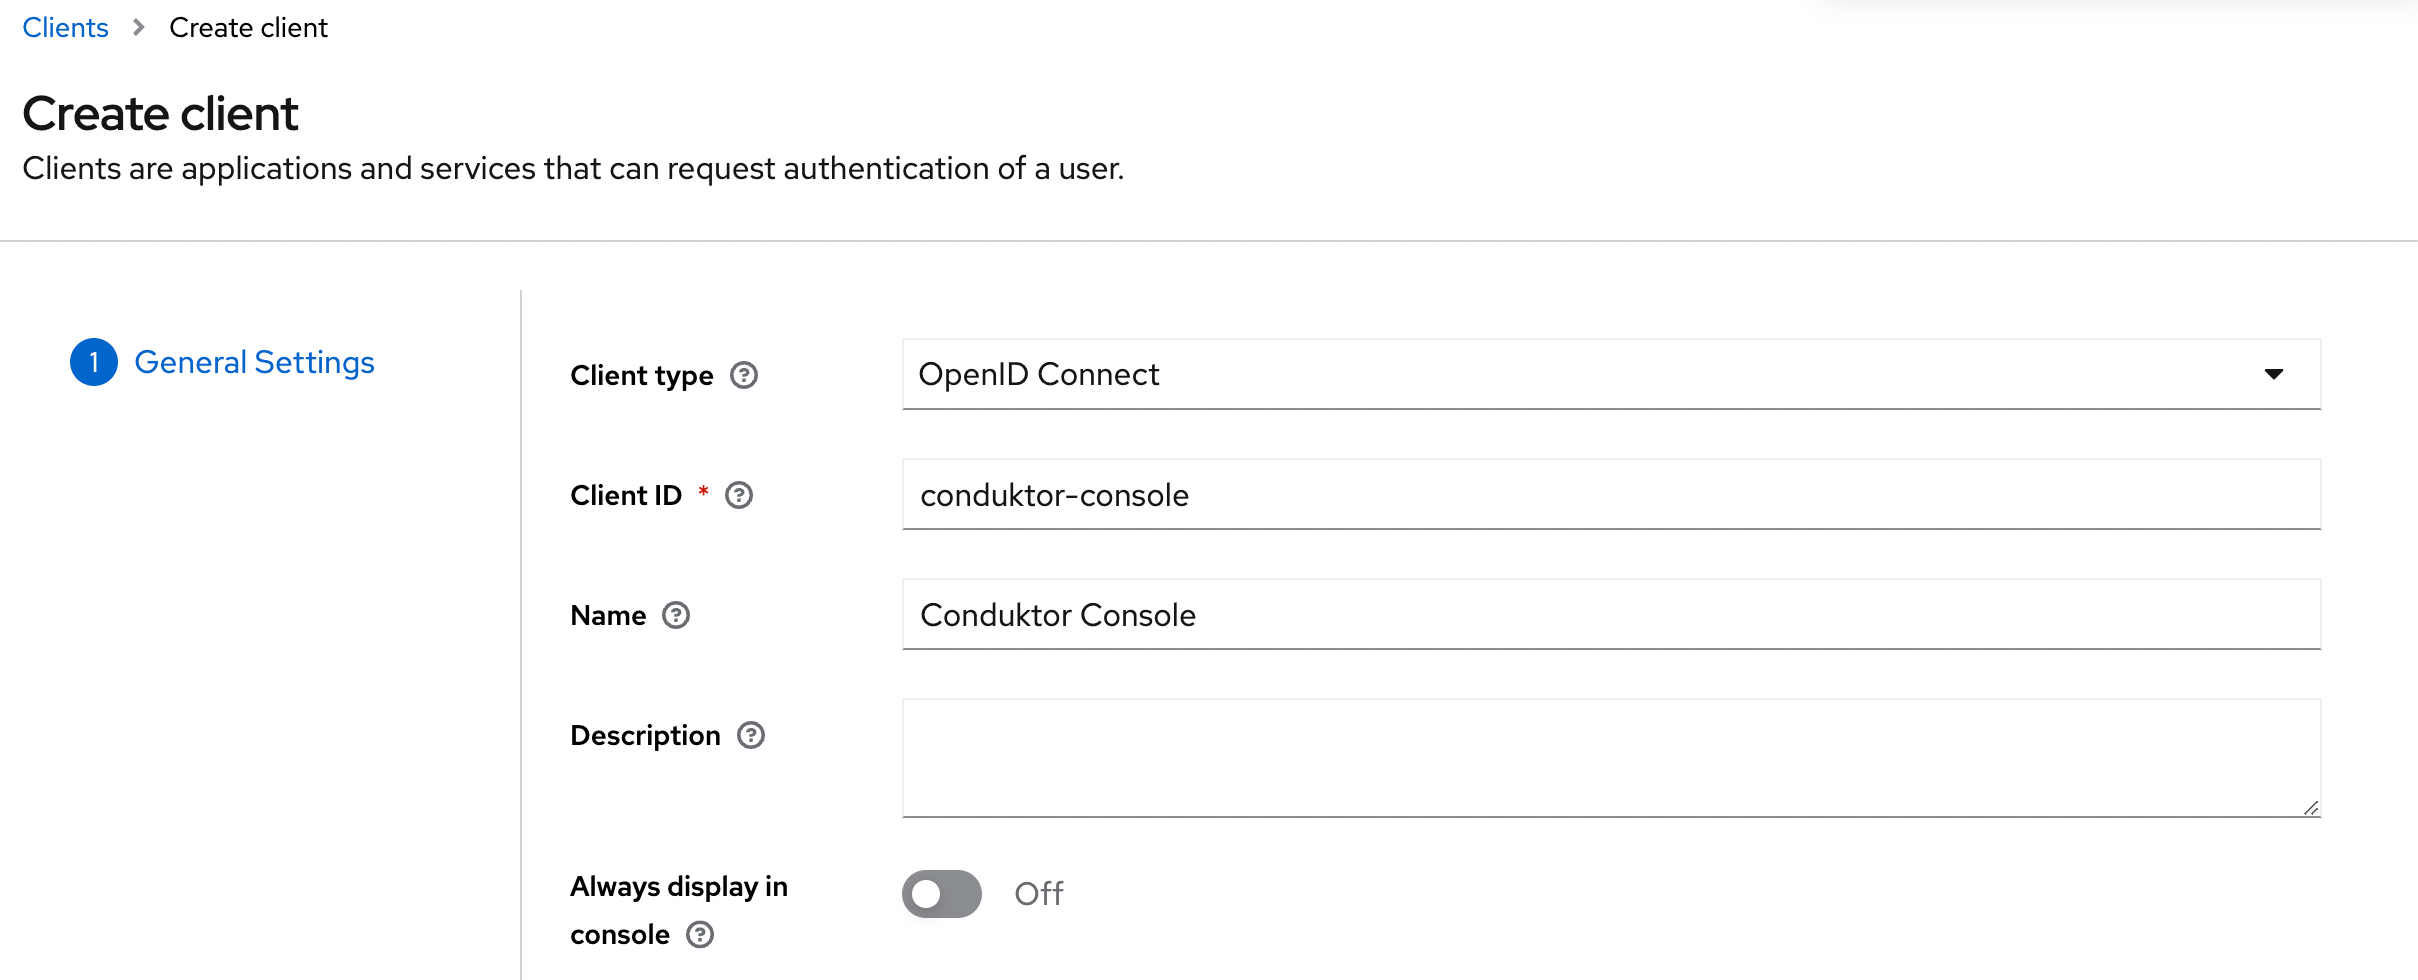
* **Step 1**: create a new OpenID Connect client, and set the `client ID`
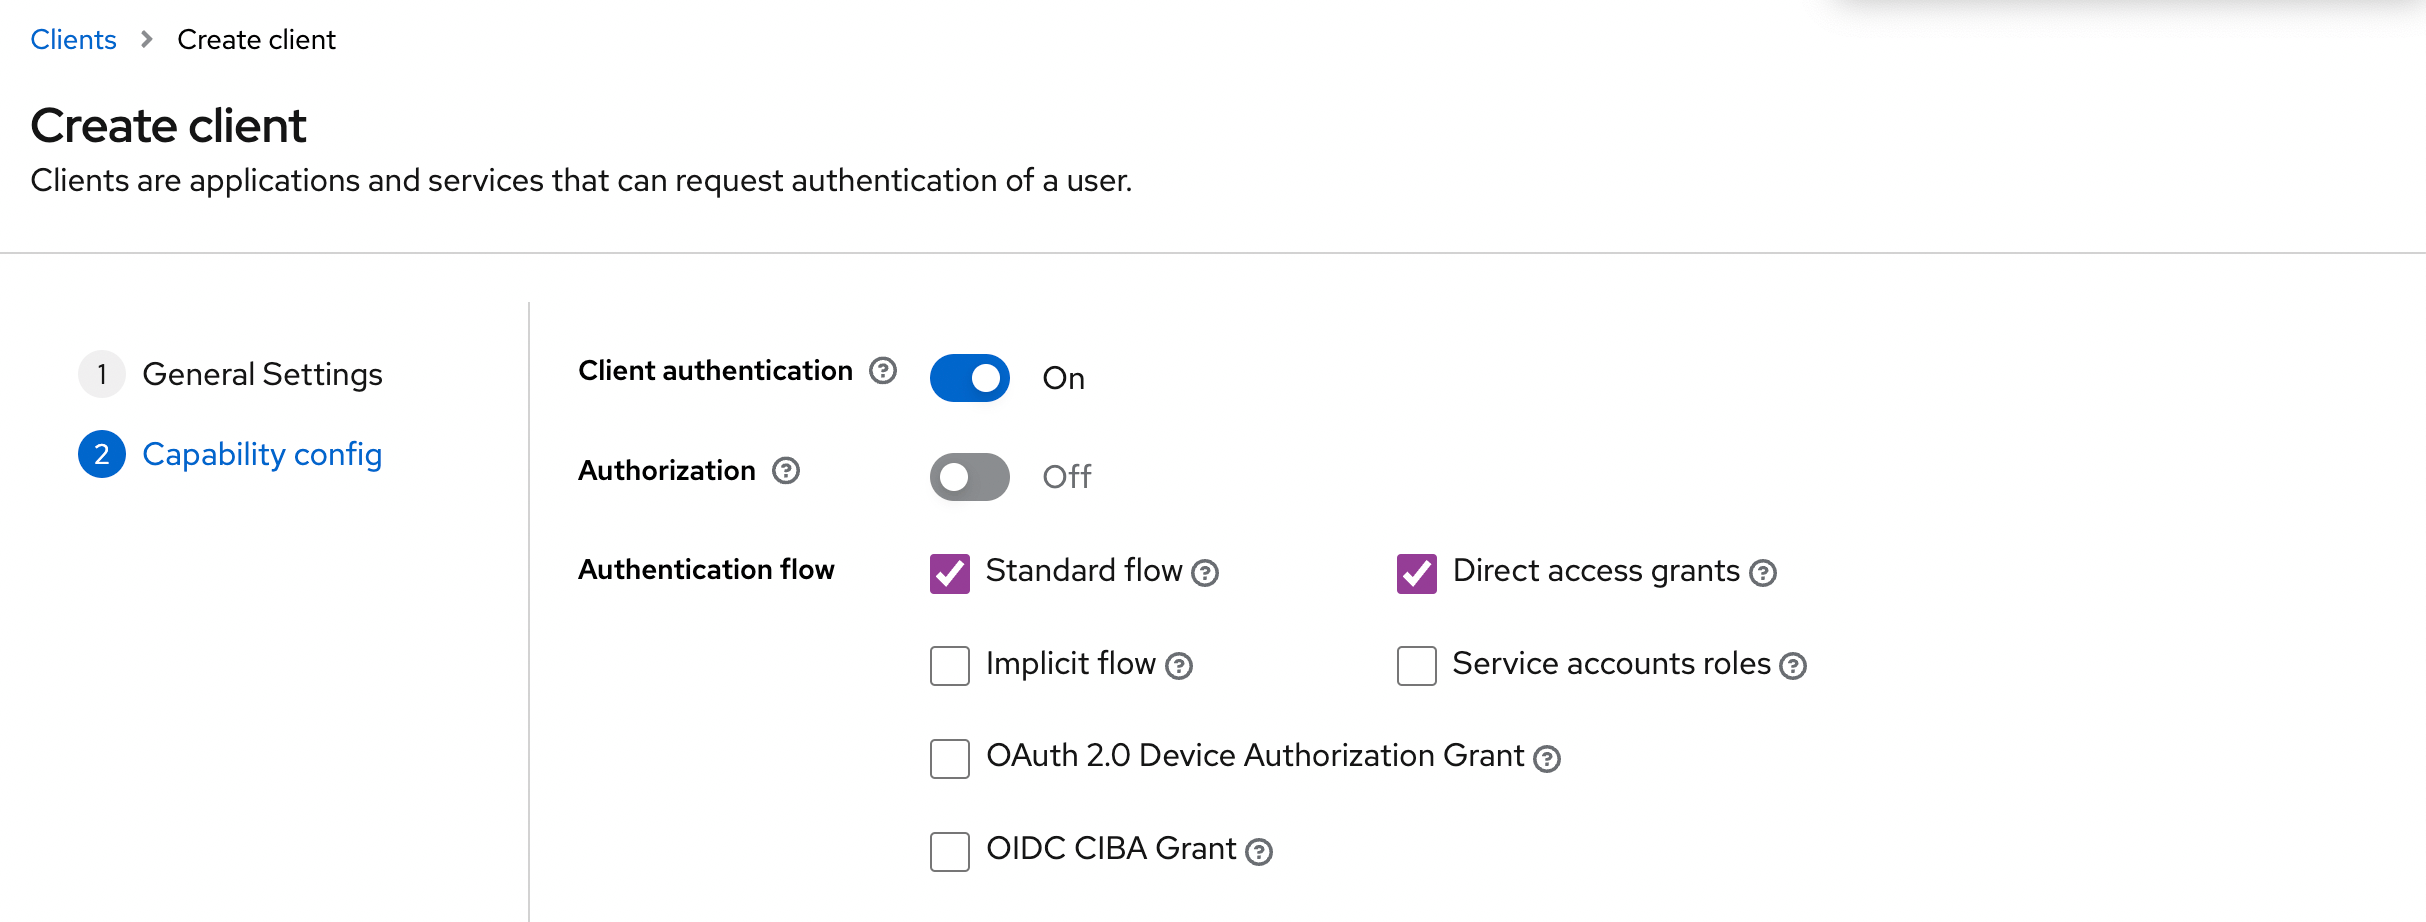
 * **Step 2**: Select the **Client authentication**
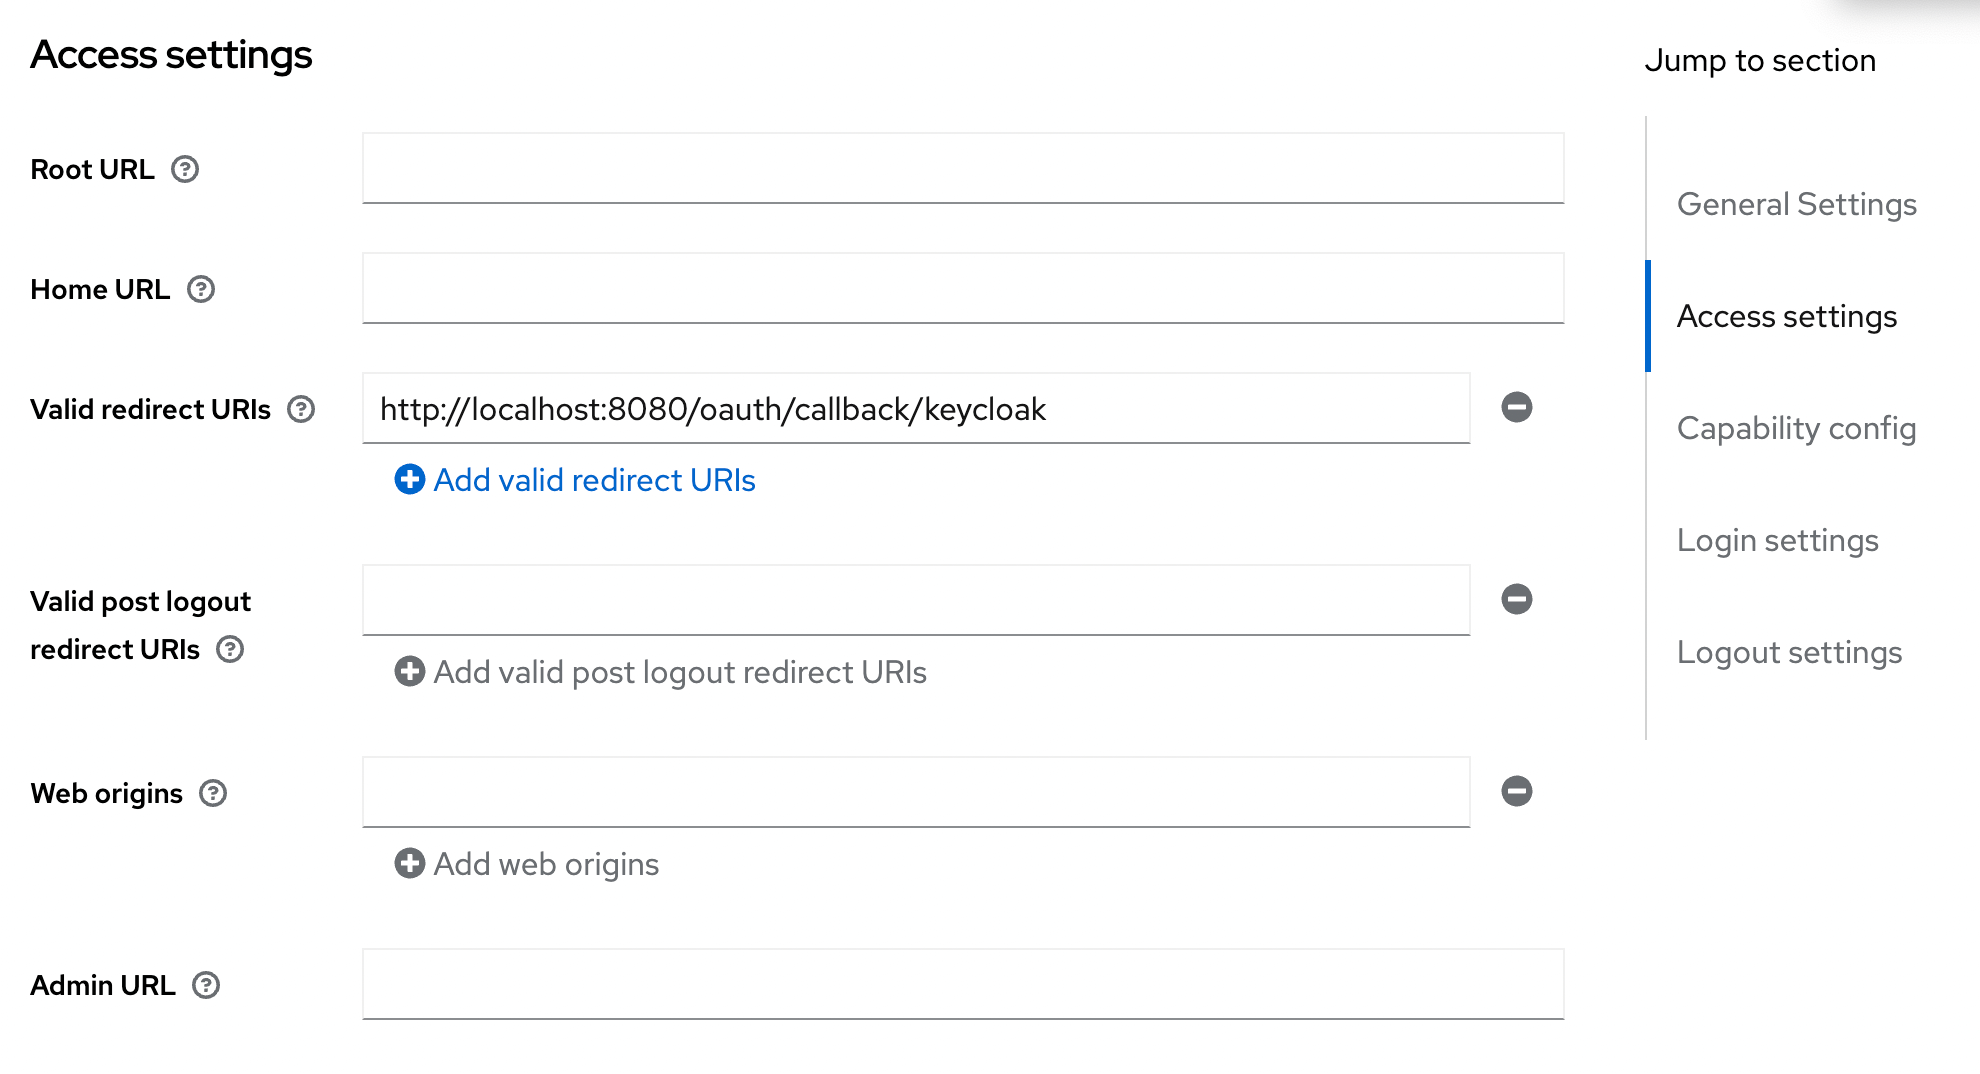
 * **Step 3**: Configure the redirect URI
You can configure it as the following: `http(s)://(:)/oauth/callback/`
For example, if you deployed Console locally using the name `keycloak` in your configuration file, you can use `http://localhost:8080/oauth/callback/keycloak`, like in the screenshot below.
* **Step 3**: Configure the redirect URI
You can configure it as the following: `http(s)://(:)/oauth/callback/`
For example, if you deployed Console locally using the name `keycloak` in your configuration file, you can use `http://localhost:8080/oauth/callback/keycloak`, like in the screenshot below.
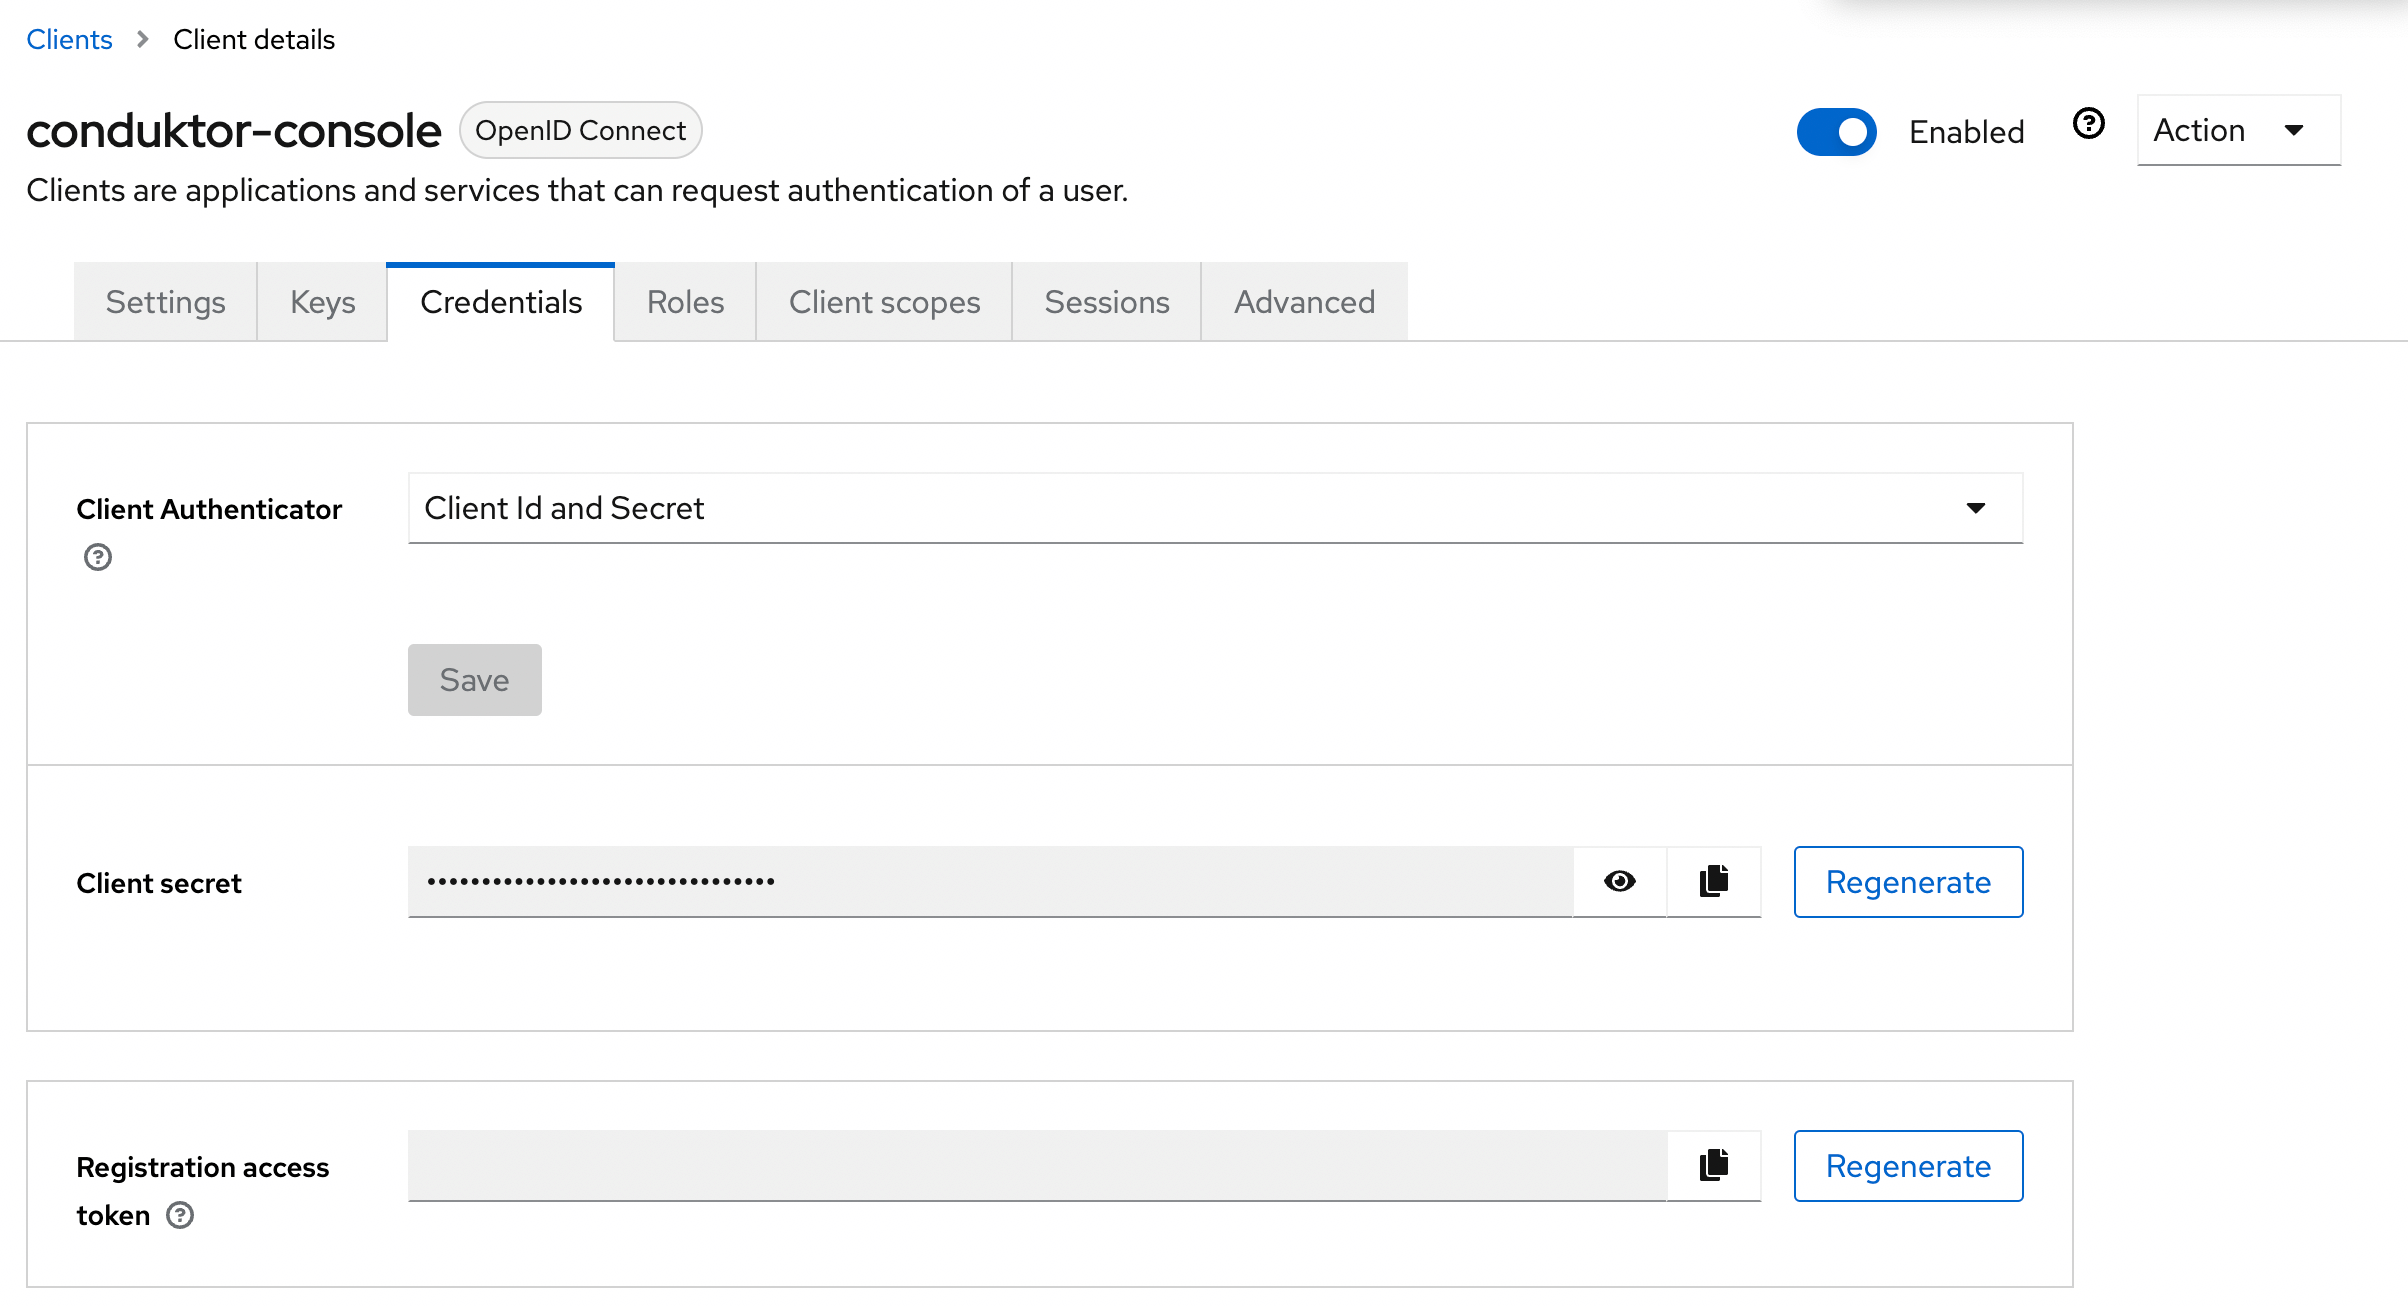
 * **Step 4**: Get the `client secret` in the **Credentials** tab
 You can find the .well-known at: `http://:/realms//.well-known/openid-configuration`.
### Configure Console
On Console side, you can add the snippet below to your configuration file. You have to replace the client ID, client secret, and tenant ID, with what you got during the previous steps.
```yaml title="platform-config.yaml" theme={null}
sso:
oauth2:
- name: "keycloak"
client-id: ""
client-secret: ""
openid:
issuer: "http://:/realms/"
```
```json title=".env" theme={null}
CDK_SSO_OAUTH2_0_NAME="keycloak"
CDK_SSO_OAUTH2_0_DEFAULT=true
CDK_SSO_OAUTH2_0_CLIENT-ID=""
CDK_SSO_OAUTH2_0_CLIENT-SECRET=""
CDK_SSO_OAUTH2_0_OPENID_ISSUER="http://:/realms/"
```
#### Configure groups
If you want to use the `external groups mapping` to map groups between your Conduktor Console instance and Keycloak, you must create a scope and add it to your Keycloak application:
* **Step 1**: Create the scope and configure the mapper to **Group Membership**
You can find the .well-known at: `http://:/realms//.well-known/openid-configuration`.
### Configure Console
On Console side, you can add the snippet below to your configuration file. You have to replace the client ID, client secret, and tenant ID, with what you got during the previous steps.
```yaml title="platform-config.yaml" theme={null}
sso:
oauth2:
- name: "keycloak"
client-id: ""
client-secret: ""
openid:
issuer: "http://:/realms/"
```
```json title=".env" theme={null}
CDK_SSO_OAUTH2_0_NAME="keycloak"
CDK_SSO_OAUTH2_0_DEFAULT=true
CDK_SSO_OAUTH2_0_CLIENT-ID=""
CDK_SSO_OAUTH2_0_CLIENT-SECRET=""
CDK_SSO_OAUTH2_0_OPENID_ISSUER="http://:/realms/"
```
#### Configure groups
If you want to use the `external groups mapping` to map groups between your Conduktor Console instance and Keycloak, you must create a scope and add it to your Keycloak application:
* **Step 1**: Create the scope and configure the mapper to **Group Membership**
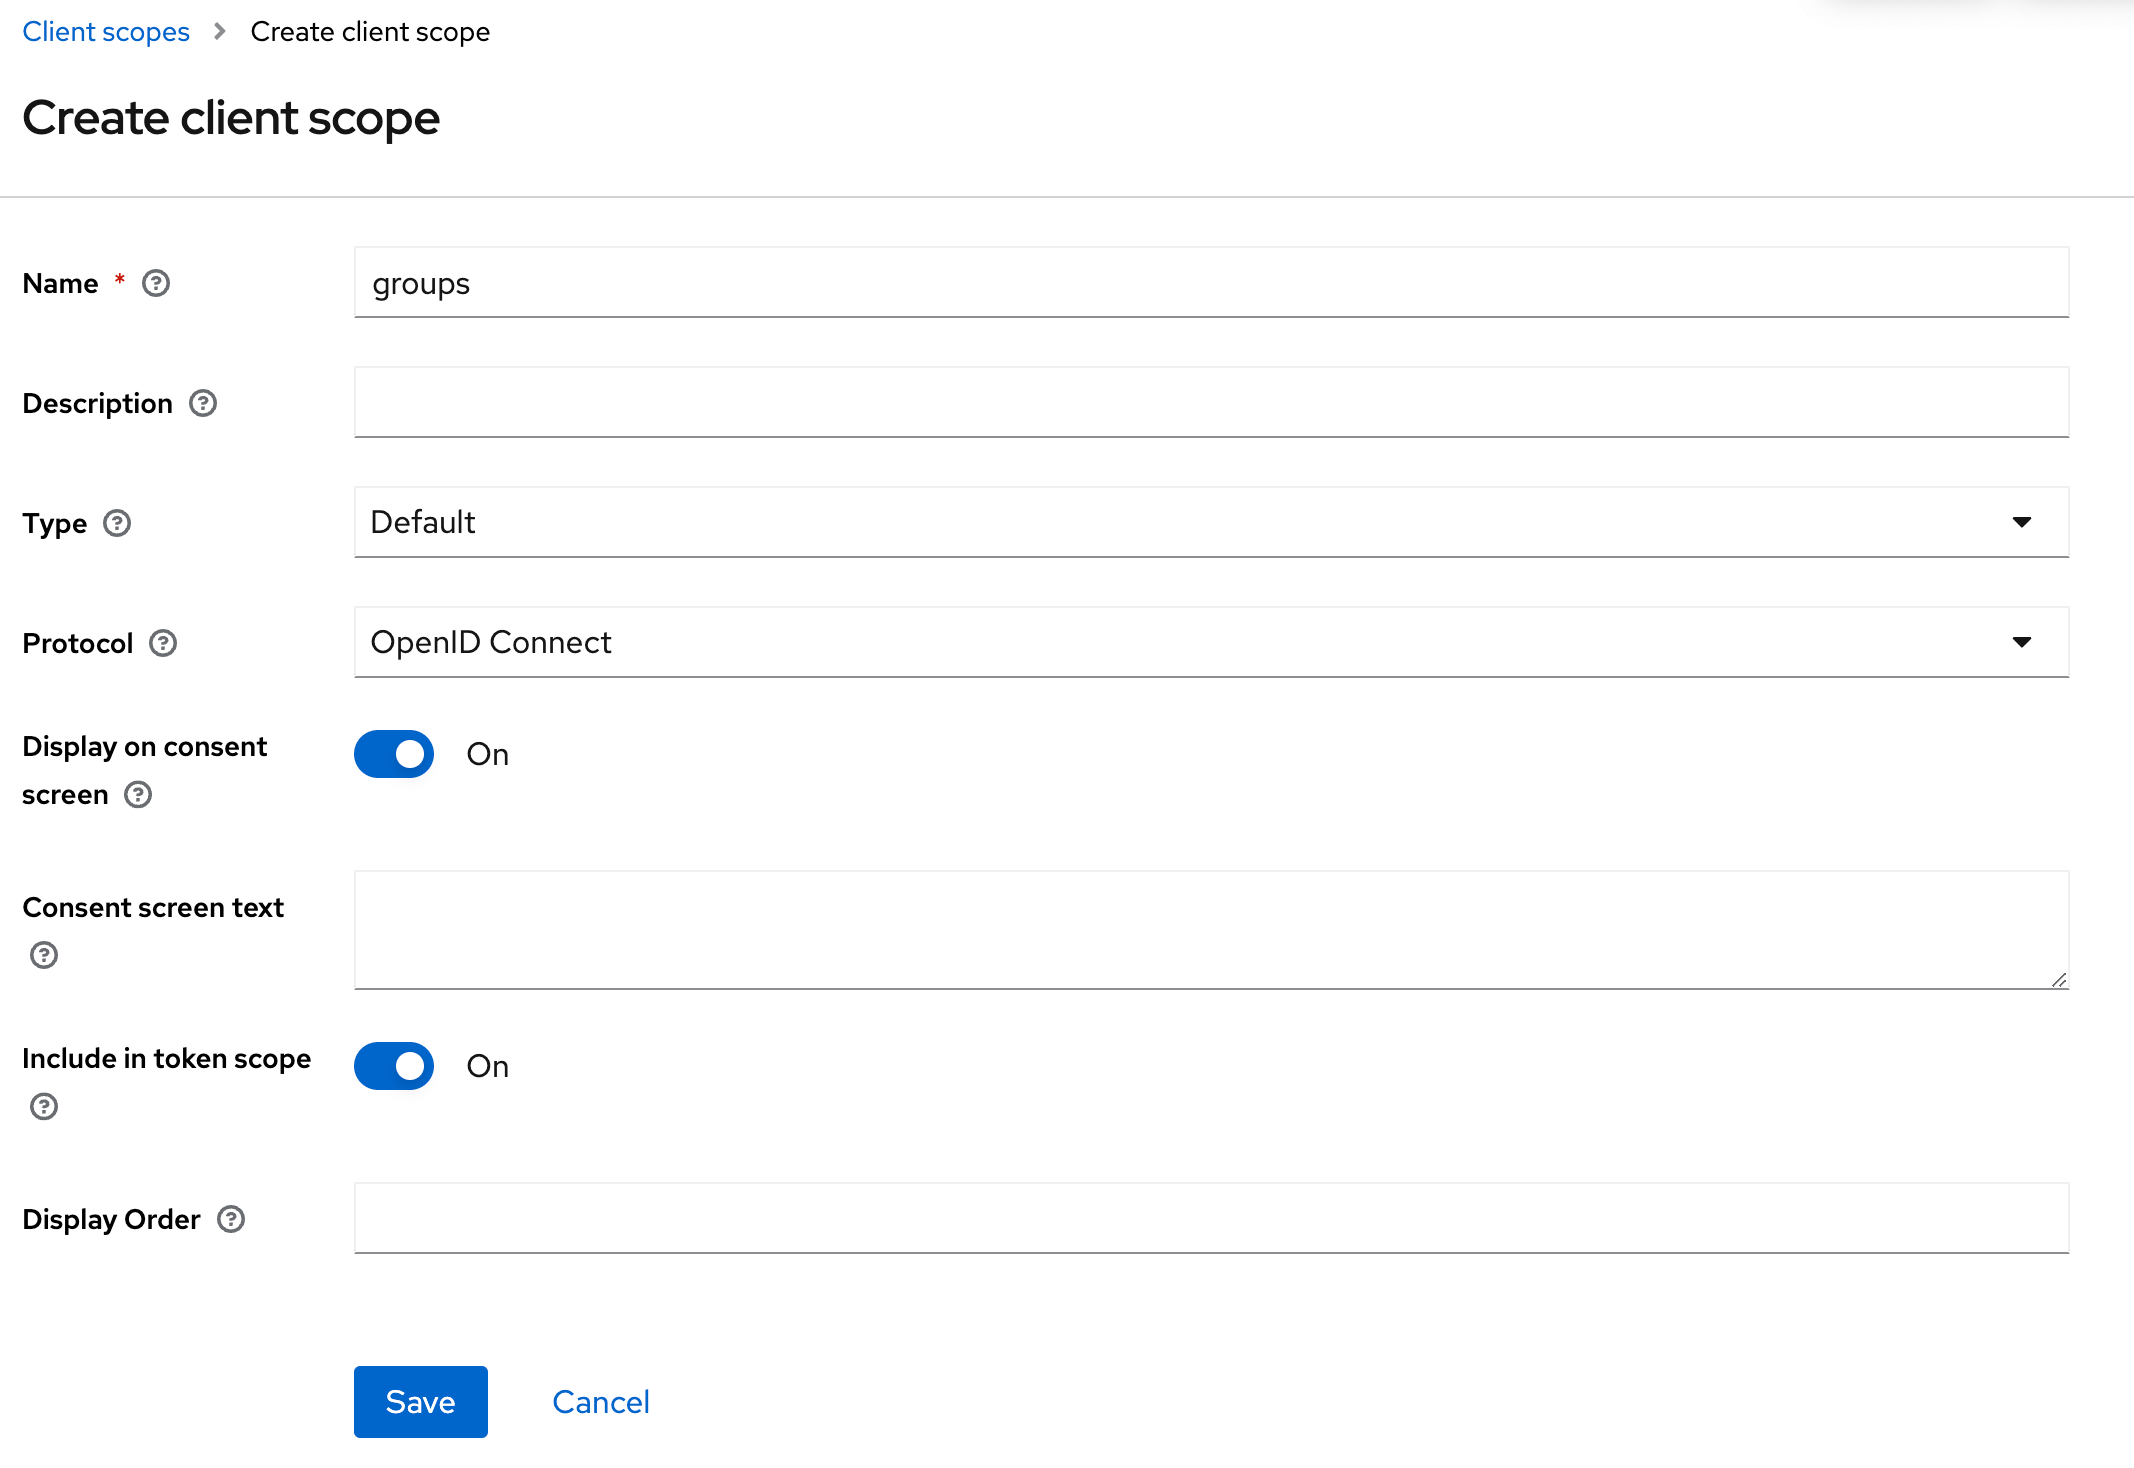
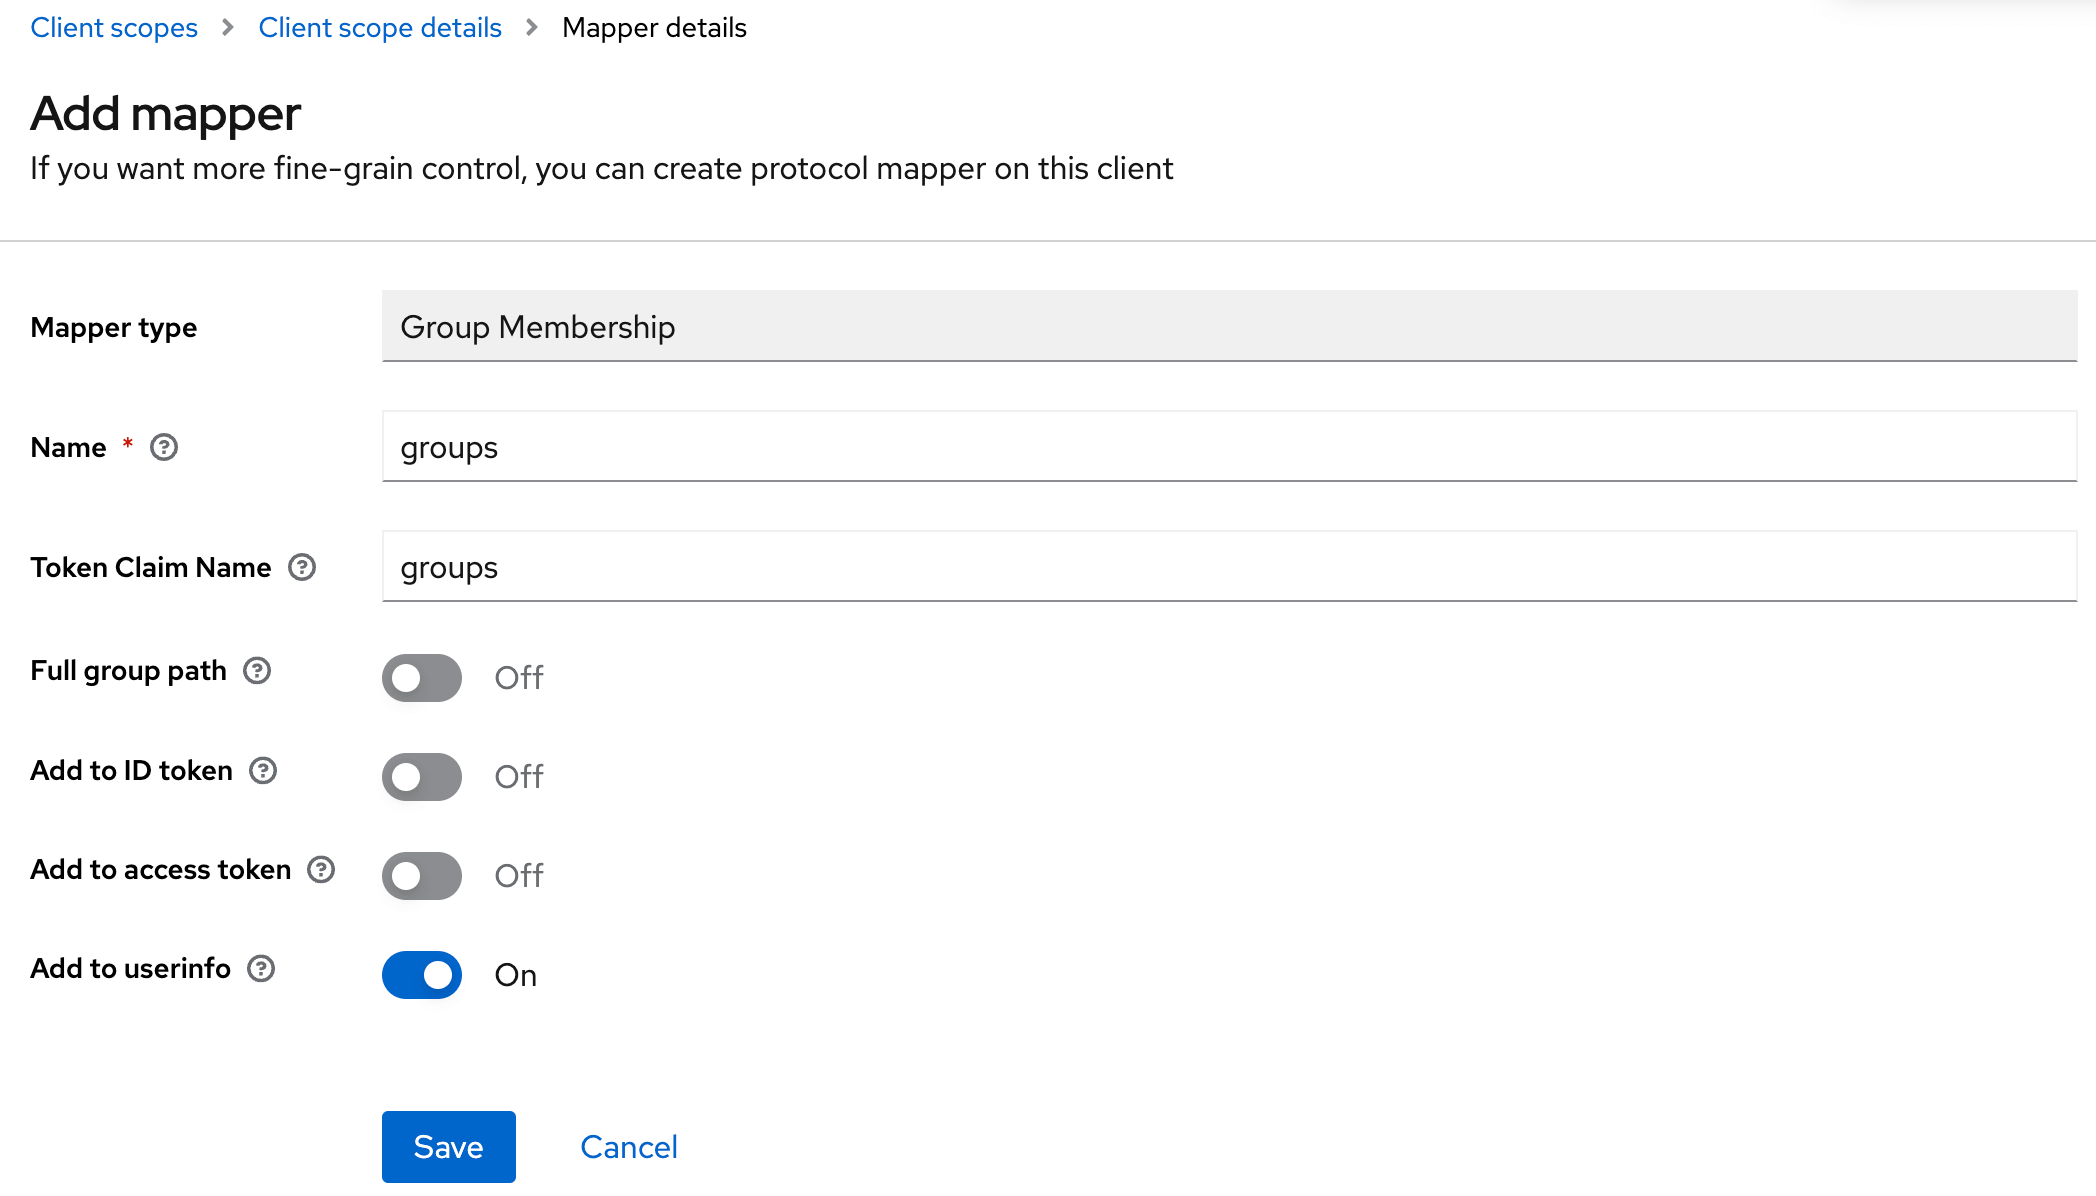 You can add the claim to the token you want. In this example, the **UserInfo**.
* **Step 2**: Add the scope to the application
You can add the claim to the token you want. In this example, the **UserInfo**.
* **Step 2**: Add the scope to the application
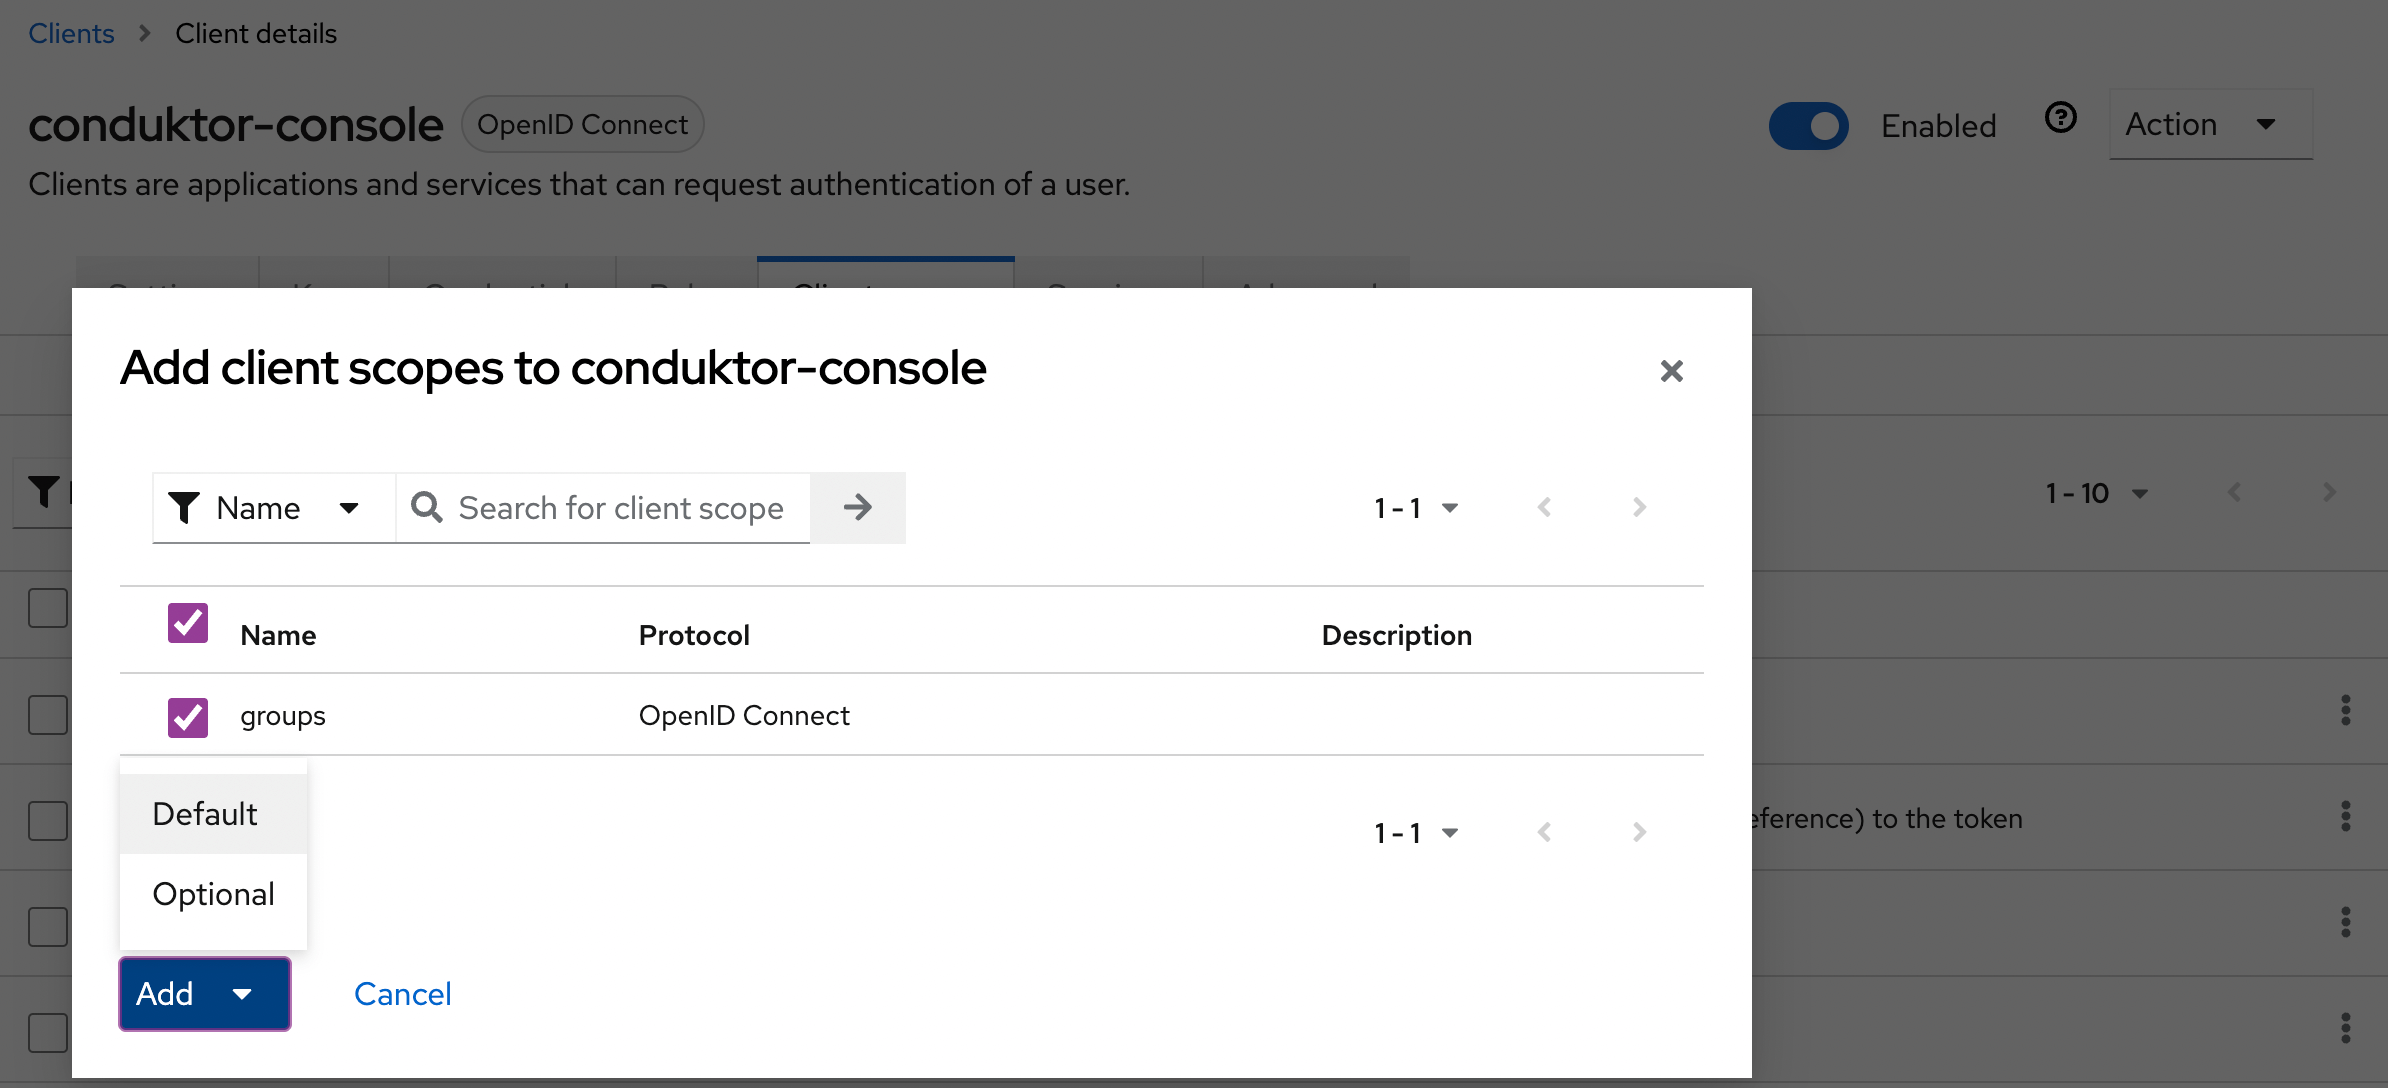 Then, you must set the property `groups-claim` to `"groups"` in the Console configuration file. Below is the full snippet for your configuration file:
```yaml title="platform-config.yaml" theme={null}
sso:
oauth2:
- name: "keycloak"
client-id: ""
client-secret: ""
groups-claim: "groups"
openid:
issuer: "http://:/realms/"
```
```json title=".env" theme={null}
CDK_SSO_OAUTH2_0_NAME="keycloak"
CDK_SSO_OAUTH2_0_DEFAULT=true
CDK_SSO_OAUTH2_0_CLIENT-ID=""
CDK_SSO_OAUTH2_0_CLIENT-SECRET=""
CDK_SSO_OAUTH2_0_GROUPS-CLAIM="groups"
CDK_SSO_OAUTH2_0_OPENID_ISSUER="http://:/realms/"
```
##### Map to external groups
Now that your configuration is finished, you can setup the mapping between Keycloak and Console groups. That way, when a user logs in, they will be automatically added to the corresponding Console groups, based on the groups they belong to in Keycloak.
The value you need to put as an external group is the name of the Keycloak group.
If you've selected `Full group path` in the mapper details of the scope, you will need to use the full path instead of the name of the group.
## Configure Okta as SSO
On Okta side, create a new application:
* **Step 1**: Create an **OpenID Connect web application**
Then, you must set the property `groups-claim` to `"groups"` in the Console configuration file. Below is the full snippet for your configuration file:
```yaml title="platform-config.yaml" theme={null}
sso:
oauth2:
- name: "keycloak"
client-id: ""
client-secret: ""
groups-claim: "groups"
openid:
issuer: "http://:/realms/"
```
```json title=".env" theme={null}
CDK_SSO_OAUTH2_0_NAME="keycloak"
CDK_SSO_OAUTH2_0_DEFAULT=true
CDK_SSO_OAUTH2_0_CLIENT-ID=""
CDK_SSO_OAUTH2_0_CLIENT-SECRET=""
CDK_SSO_OAUTH2_0_GROUPS-CLAIM="groups"
CDK_SSO_OAUTH2_0_OPENID_ISSUER="http://:/realms/"
```
##### Map to external groups
Now that your configuration is finished, you can setup the mapping between Keycloak and Console groups. That way, when a user logs in, they will be automatically added to the corresponding Console groups, based on the groups they belong to in Keycloak.
The value you need to put as an external group is the name of the Keycloak group.
If you've selected `Full group path` in the mapper details of the scope, you will need to use the full path instead of the name of the group.
## Configure Okta as SSO
On Okta side, create a new application:
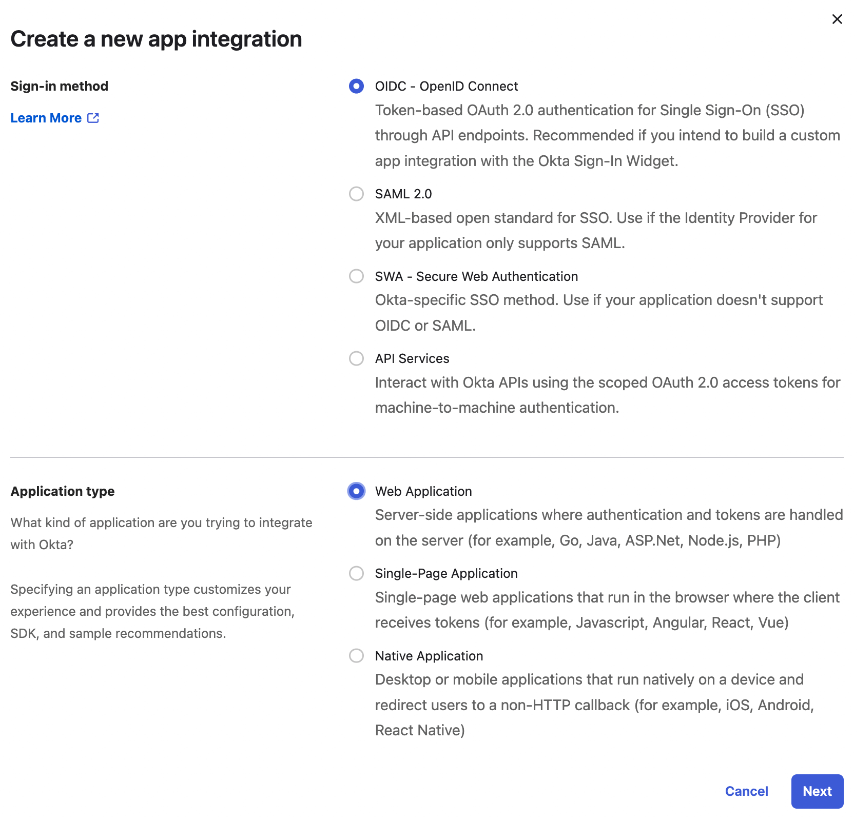
* **Step 1**: Create an **OpenID Connect web application**
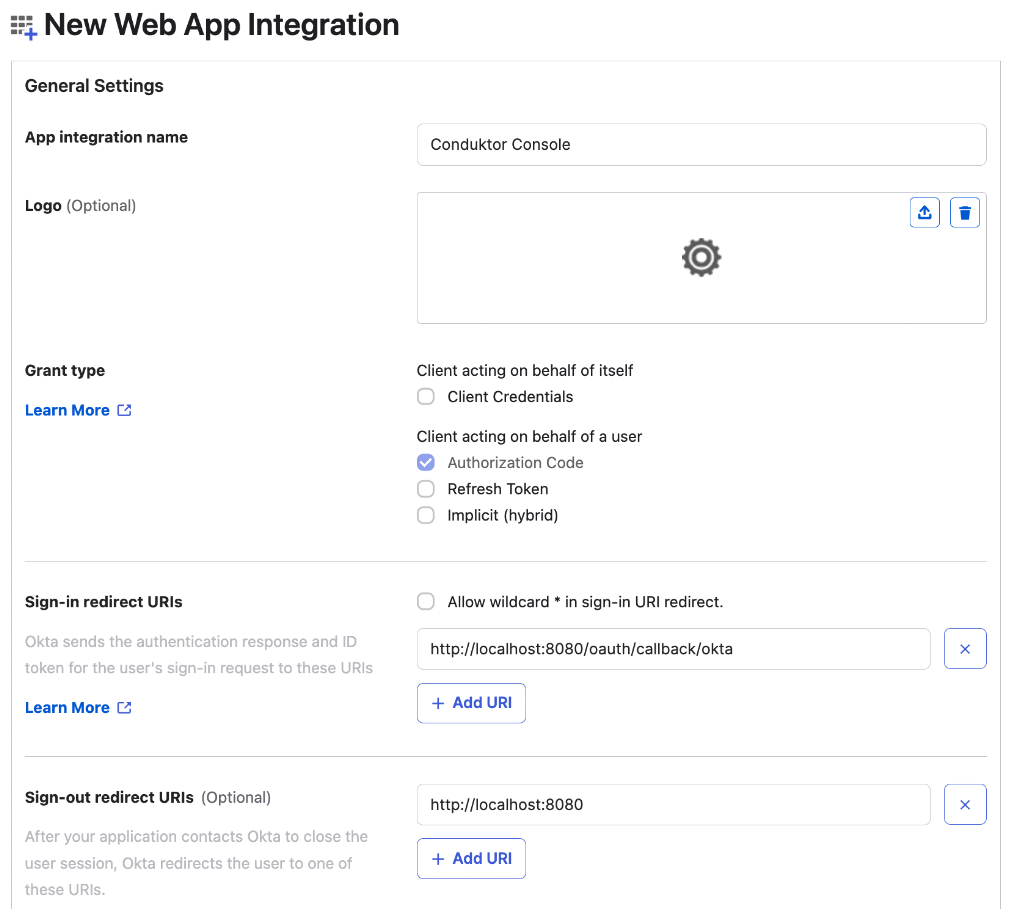
 * **Step 2**: Configure the callback URI
The redirect URI can be like: `http(s)://(:)/oauth/callback/`.
For example, if you deployed Console locally using the name `okta` in your configuration file, you can use `http://localhost:8080/oauth/callback/okta`, like in the screenshot below.
* **Step 2**: Configure the callback URI
The redirect URI can be like: `http(s)://(:)/oauth/callback/`.
For example, if you deployed Console locally using the name `okta` in your configuration file, you can use `http://localhost:8080/oauth/callback/okta`, like in the screenshot below.
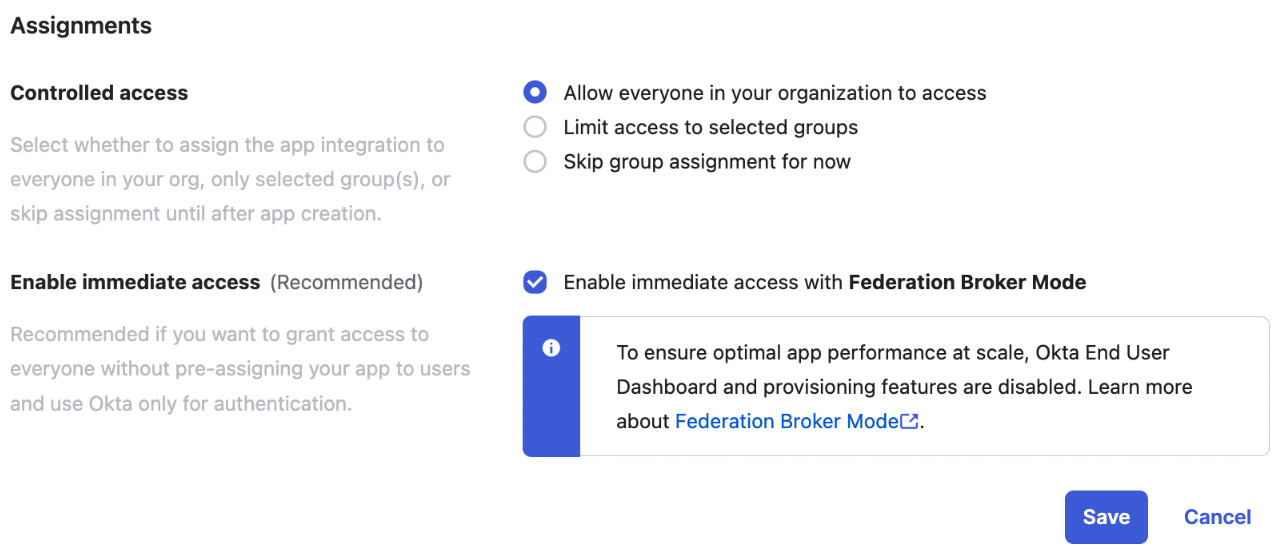
 * **Step 3**: Configure **app assignments**, and save changes
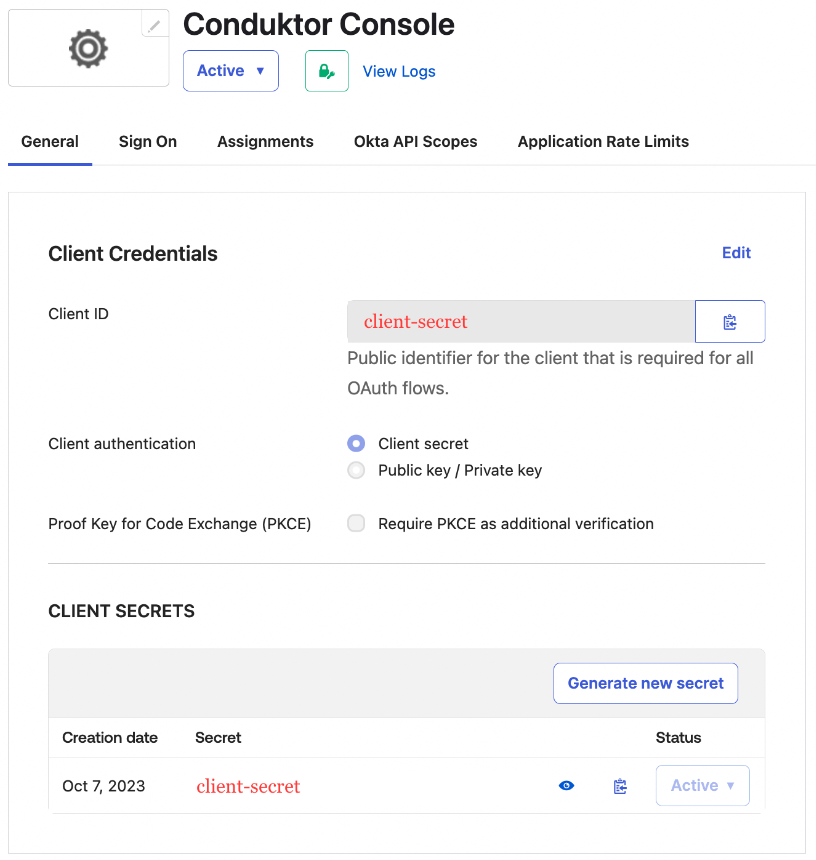
 * **Step 4**: Get `client ID` and `client secret`, that you'll use in the configuration file of Console
 * **Step 5**: Find the `issuer URL` in the **Sign On** tab of your application. It's made like `https://.okta.com`
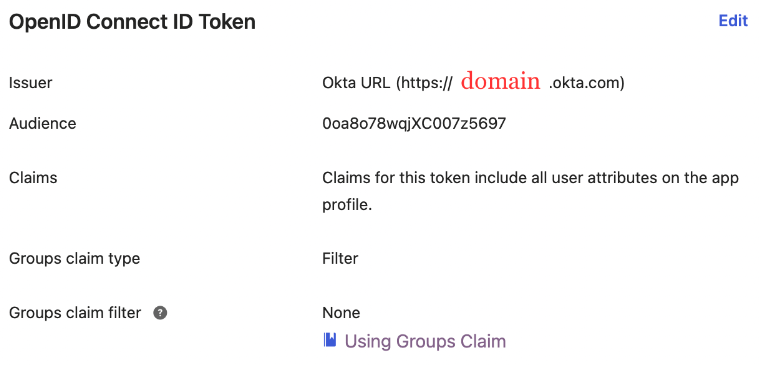 You can find the .well-known at: `https://.okta.com/.well-known/openid-configuration`.
### Configure Console
On the Console side, you can add the snippet below to your configuration file. You have to replace the `client ID`, `client secret` and `domain`, with what you got during steps 4 and 5.
```yaml title="platform-config.yaml" theme={null}
sso:
oauth2:
- name: "okta"
client-id: ""
client-secret: ""
openid:
issuer: "https://.okta.com"
```
Please note that if you are using a custom auth server in Okta, the OPENID\_ISSUER should be in the form `https:///oauth2//` rather than `https://.okta.com`. [Find out more about token customization](https://developer.okta.com/docs/guide/customize-tokens-returned-from-okta/main/) .
```json title=".env" theme={null}
CDK_SSO_OAUTH2_0_NAME="okta"
CDK_SSO_OAUTH2_0_DEFAULT=true
CDK_SSO_OAUTH2_0_CLIENT-ID=""
CDK_SSO_OAUTH2_0_CLIENT-SECRET=""
CDK_SSO_OAUTH2_0_OPENID_ISSUER="https://.okta.com"
```
## Configure WorkOS as SSO
On the WorkOS side, you have to create an OAuth application:
* **Step 1**: In the WorkOS dashboard, go to **AuthKit → Connect** and create a new Connect OAuth application
WorkOS exposes two application types that both produce a `client_xxx` ID. Conduktor Console only works with a **Connect OAuth Application** (AuthKit → Connect panel). The **SSO Application** in the Applications panel is intended for server-side integrations using the WorkOS SDKs and isn't a standards-compliant OIDC client.
* **Step 2**: Add the redirect URI on the application's **Redirects** tab
The redirect URI is: `http(s)://(:)/oauth/callback/`. For example, if you deployed Console using the name `WorkOS` in your configuration file, the redirect URI is `https:///oauth/callback/WorkOS`.
The literal value of the OAuth2 config name is appended as a path segment, so the URI registered in WorkOS has to match it exactly, including casing. WorkOS doesn't accept wildcards or path prefixes.
* **Step 3**: Get the `client ID` and `client secret` from the Connect OAuth application
* **Step 4**: Find your AuthKit domain in **Authentication → Features → Hosted UI**
Each WorkOS environment has its own AuthKit domain, in the form `https://.authkit.app`. Use this as the OpenID issuer.
You can find the .well-known at: `https:///.well-known/openid-configuration`.
Don't use the `https://api.workos.com/user_management//.well-known/openid-configuration` endpoint. It returns an incomplete discovery document missing the `subject_types_supported` and `id_token_signing_alg_values_supported` fields, both required by [OIDC Discovery 1.0 §3](https://openid.net/specs/openid-connect-discovery-1_0.html#ProviderMetadata) . Console's OIDC client rejects it with `ParseException: Missing JSON object member with key subject_types_supported`.
### Configure Console
On the Console side, you can add the snippet below to your configuration file. You have to replace the `client ID`, `client secret`, and `authkit-domain` with what you got during the previous steps.
```yaml title="platform-config.yaml" theme={null}
sso:
oauth2:
- name: "WorkOS"
client-id: ""
client-secret: ""
scopes: "openid,email,profile"
openid:
issuer: "https://"
```
```json title=".env" theme={null}
CDK_SSO_OAUTH2_0_NAME="WorkOS"
CDK_SSO_OAUTH2_0_DEFAULT=true
CDK_SSO_OAUTH2_0_CLIENT-ID=""
CDK_SSO_OAUTH2_0_CLIENT-SECRET=""
CDK_SSO_OAUTH2_0_SCOPES="openid,email,profile"
CDK_SSO_OAUTH2_0_OPENID_ISSUER="https://"
```
## Configure an OIDC provider as SSO
Conduktor supports various OIDC (OpenID Connect)/OAuth2 providers, including:
* [Entra ID](#configure-entra-id-as-sso)
* [Google](#configure-google-as-sso)
* [Amazon Cognito](#configure-amazon-cognito-as-sso)
* [Keycloak](#configure-keycloak-as-sso)
* [Okta](#configure-okta-as-sso)
* [Auth0](#configure-auth0-as-sso)
* [WorkOS](#configure-workos-as-sso)
For others, follow these generic steps.
1. Create an OIDC (OpenID Connect) application in your chosen provider. This [application should use standard OAuth2/OIDC authorization code flow](https://openid.net/specs/openid-connect-core-1_0.html#CodeFlowAuth) with `CLIENT_SECRET_BASIC` authentication method.
2. Set OAuth2 authorized redirect URI in your application
For the OAuth2 authorization code flow to work, the OAuth2 provider needs to know; and authorize; where to redirect the user after the authentication process.
This is called the `redirect URI` or `callback URI`.
The redirect URI will look like this:\
`http(s)://(:)/oauth/callback/`
Where `` and `` depend on the Console external URL used and/or configured, and `` is the name of the OAuth2 configuration in your Console configuration file see [Console configuration](#console-configuration) step.
### More details on Console external URL
When Console initiate the OAuth2 authorization code flow, it tells the OIDC provider where to redirect the user after the authentication process.
But to forge this redirect URI, Console has several choices:
#### Console external URL is configured
If the Console external URL is configured using environment variable `CDK_PLATFORM_EXTERNAL_URL` or configuration `platform.external.url`, it will be used.
**However, the SSO will only work if Console is accessed using this URL.**
If you try to log in from the second URL, you'll be redirected to the first URL and then lose browser authentication cookies which means the SSO will not work.
##### Context path deployments
If you deploy Console with a context path using `CDK_PLATFORM_EXTERNAL_URL` with a context path (e.g., `https://mycompany.com/console`), your SSO callback URLs must include the base path.
For example, if Console is deployed at `https://mycompany.com/console` with an OAuth2 configuration named `okta`, the callback URL would be:
```
https://mycompany.com/console/oauth/callback/okta
```
Make sure to update your identity provider's callback/redirect URI configuration accordingly.
##### Console external URL is NOT configured
When no external Console URL is enforced, Console will use requests headers to resolve this external URL.
This is recommended if Console is accessed using multiple URLs (internal, external, etc) and have SSO on each of them.
The resolution strategy is the following:
1. Use the [`Forwarded`](https://developer.mozilla.org/en-US/docs/Web/HTTP/Headers/Forwarded) header. This is the preferred method if you are using a **reverse proxy in front of Console**.
It uses the `host` and `proto` directives (if set) of `Forwarded` header to determine the external URL.
2. Use the `X-Forwarded-*` headers. Support for the non-standard forwarded headers coming from some **reverse proxy** implementations.
It uses the `X-Forwarded-Proto`, `X-Forwarded-Host` and `X-Forwarded-Port` headers to determine the external URL.
3. Use the `Host` header. Used if you access to Console directly, without a reverse proxy.
In this case, the `Host` header (generally set by the browser) will be used to determine the external URL.
**Port** will be guessed depending on the content of the `Host` header and fallback to Console configured port using environment variable `CDK_LISTENING_PORT` (default to `8080`).\
**Scheme** (http/https) will be guessed depending on the current TLS configuration of Console. (default to `http`).
4. Get the client ID and secret from application settings
#### Configure Console
On Console side, you need to configure several properties to enable OIDC SSO.
Required properties are:
* `sso.oauth2.name`: the name of the OAuth2 configuration. This name will be used in the redirect URI defined on your provider in the steps before. It must be unique.
* `sso.oauth2.client-id`: the client ID of your OAuth2 application.
* `sso.oauth2.client-secret`: the client secret of your OAuth2 application.
* `sso.oauth2.openid.issuer`: the issuer URL of your OpenID Connect provider. This url is used to discover the provider configuration using the `.well-known/openid-configuration` path.
Optionally, you can configure the following properties:
* `sso.oauth2.scopes`: the list of scopes to request during the authorization code flow. [See OAuth2 configuration for details](#configure-auth0-as-sso).
##### Example
The provider exposes its configuration using the well-known endpoint: `https:///.well-known/openid-configuration`. Here's an example of a configuration file for a generic OIDC provider.
```yaml title="platform-config.yaml" theme={null}
sso:
oauth2:
- name: "oidc-provider"
client-id: ""
client-secret: ""
openid:
issuer: "https:///"
```
```json title=".env" theme={null}
CDK_SSO_OAUTH2_0_NAME="oidc-provider"
CDK_SSO_OAUTH2_0_DEFAULT=true
CDK_SSO_OAUTH2_0_CLIENT-ID=""
CDK_SSO_OAUTH2_0_CLIENT-SECRET=""
CDK_SSO_OAUTH2_0_OPENID_ISSUER="https:///"
```
## SSO config properties
| Property | Description | Environment variable | Mandatory | Type | Default |
| -------------------------------- | ------------------------------------------------------------------------ | ------------------------------------ | --------- | ------- | ------- |
| `sso.ignoreUntrustedCertificate` | Disable SSL checks | `CDK_SSO_IGNOREUNTRUSTEDCERTIFICATE` | false | boolean | `false` |
| `sso.trustedCertificates` | SSL public certificates for SSO authentication (LDAPS and OAuth2) as PEM | `CDK_SSO_TRUSTEDCERTIFICATES` | false | string | ∅ |
### OAuth2 config properties
| Property | Description | Environment variable | Mandatory | Type | Default |
| --------------------------------------- | ------------------------------------------------------------------- | ---------------------------------------- | --------- | -------------------------------------------------------------------------------------------------------------------------------------------- | ------- |
| `sso.oauth2[].name` | OAuth2 connection name | `CDK_SSO_OAUTH2_0_NAME` | true | string | ∅ |
| `sso.oauth2[].default` | Use as default | `CDK_SSO_OAUTH2_0_DEFAULT` | true | boolean | ∅ |
| `sso.oauth2[].client-id` | OAuth2 client ID | `CDK_SSO_OAUTH2_0_CLIENTID` | true | string | ∅ |
| `sso.oauth2[].client-secret` | OAuth2 client secret | `CDK_SSO_OAUTH2_0_CLIENTSECRET` | true | string | ∅ |
| `sso.oauth2[].openid.issuer` | Issuer to check on token | `CDK_SSO_OAUTH2_0_OPENID_ISSUER` | true | string | ∅ |
| `sso.oauth2[].scopes` | Scopes to be requested in the client credentials request | `CDK_SSO_OAUTH2_0_SCOPES` | true | string | `[]` |
| `sso.oauth2[].groups-claim` | Group attribute from your identity provider | `CDK_SSO_OAUTH2_0_GROUPSCLAIM` | false | string | ∅ |
| `sso.oauth2[].username-claim` | Username attribute from your identity provider | `CDK_SSO_OAUTH2_0_USERNAMECLAIM` | false | string | `email` |
| `sso.oauth2[].email-claim` | Email attribute from your identity provider | `CDK_SSO_OAUTH2_0_EMAILCLAIM` | false | string | `email` |
| `sso.oauth2[].allow-unsigned-id-tokens` | Allow unsigned ID tokens | `CDK_SSO_OAUTH2_0_ALLOWUNSIGNEDIDTOKENS` | false | boolean | false |
| `sso.oauth2[].preferred-jws-algorithm` | Configure preferred JWS algorithm | `CDK_SSO_OAUTH2_0_PREFERREDJWSALGORITHM` | false | string one of: "HS256", "HS384", "HS512", "RS256", "RS384", "RS512", "ES256", "ES256K", "ES384", "ES512", "PS256", "PS384", "PS512", "EdDSA" | ∅ |
| `sso.oauth2[].pkce-method` | Configure PKCE method | `CDK_SSO_OAUTH2_0_PKCEMETHOD` | false | string one of: "plain", "S256" | ∅ |
| `sso.oauth2-logout` | Wether the central identity provider logout should be called or not | `CDK_SSO_OAUTH2LOGOUT` | false | boolean | true |
#### Nested group claim
`groups-claim` supports dot-notation to read groups from a nested JWT claim. Console first checks for an exact top-level key match (preserving backward compatibility with claim keys that contain dots), then treats the dot as a path separator.
**Flat claim** — groups returned as a top-level JWT claim:
```json theme={null}
{
"groups": ["admins", "developers"]
}
```
```yaml theme={null}
groups-claim: "groups"
```
**Nested claim** — groups inside a JSON object in the token:
```json theme={null}
{
"urn:spc:grant": {
"roles": ["admins", "developers"]
}
}
```
```yaml theme={null}
groups-claim: "urn:spc:grant.roles"
```
### LDAP config properties
| Property | Description | Environment variable | Mandatory | Type | Default |
| ------------------------------------ | -------------------------------------------------------------------------------------------------------------------------------------------------------------------------------------------------- | -------------------------------------- | --------- | ------------ | -------------------- |
| `sso.ldap[].name` | Ldap connection name | `CDK_SSO_LDAP_0_NAME` | true | string | ∅ |
| `sso.ldap[].server` | Ldap server host and port | `CDK_SSO_LDAP_0_SERVER` | true | string | ∅ |
| `sso.ldap[].managerDn` | Sets the manager DN | `CDK_SSO_LDAP_0_MANAGERDN` | true | string | ∅ |
| `sso.ldap[].managerPassword` | Sets the manager password | `CDK_SSO_LDAP_0_MANAGERPASSWORD` | true | string | ∅ |
| `sso.ldap[].search-subtree` | Sets if the subtree should be searched. | `CDK_SSO_LDAP_0_SEARCHSUBTREE` | false | boolean | `true` |
| `sso.ldap[].search-base` | Sets the base DN to search. | `CDK_SSO_LDAP_0_SEARCHBASE` | true | string | ∅ |
| `sso.ldap[].search-filter` | Sets the search filter. By default, the filter is set to `(uid={0})` for users using class type `InetOrgPerson`. | `CDK_SSO_LDAP_0_SEARCHFILTER` | false | string | `"(uid={0})"` |
| `sso.ldap[].search-attributes` | Sets the attributes list to return. By default, all attributes are returned. Platform search for `uid`, `cn`, `mail`, `email`, `givenName`, `sn`, `displayName` attributes to map into user token. | `CDK_SSO_LDAP_0_SEARCHATTRIBUTES` | false | string array | `[]` |
| `sso.ldap[].groups-enabled` | Sets if group search is enabled. | `CDK_SSO_LDAP_0_GROUPSENABLED` | false | boolean | `false` |
| `sso.ldap[].groups-subtree` | Sets if the subtree should be searched. | `CDK_SSO_LDAP_0_GROUPSSUBTREE` | false | boolean | `true` |
| `sso.ldap[].groups-base` | Sets the base DN to search from. | `CDK_SSO_LDAP_0_GROUPSBASE` | true | string | ∅ |
| `sso.ldap[].groups-filter` | Sets the group search filter. If using group class type `GroupOfUniqueNames` use the filter `"uniqueMember={0}"`. For group class `GroupOfNames` use `"member={0}"`. | `CDK_SSO_LDAP_0_GROUPSFILTER` | false | string | `"uniquemember={0}"` |
| `sso.ldap[].groups-filter-attribute` | Sets the name of the user attribute to bind to the group search filter. Defaults to the user’s DN. | `CDK_SSO_LDAP_0_GROUPSFILTERATTRIBUTE` | false | string | ∅ |
| `sso.ldap[].groups-attribute` | Sets the group attribute name. Defaults to `cn`. | `CDK_SSO_LDAP_0_GROUPSATTRIBUTE` | false | string | `"cn"` |
| `sso.ldap[].properties` | Additional properties that will be passed to identity provider context. | `CDK_SSO_LDAP_0_PROPERTIES` | false | dictionary | ∅ |
## Troubleshoot
Yes. We support any OIDC, Active Directory or LDAP standard identity provider. Moreover, this doesn't require a connection back to Conduktor - it integrates directly with your identify provider.
## Related resources
* [Map external groups](/guide/conduktor-in-production/admin/user-access/map-external-groups)
* [Set up RBAC](/guide/conduktor-in-production/admin/set-up-rbac)
* [Give us feedback/request a feature](https://conduktor.io/roadmap)
You can find the .well-known at: `https://.okta.com/.well-known/openid-configuration`.
### Configure Console
On the Console side, you can add the snippet below to your configuration file. You have to replace the `client ID`, `client secret` and `domain`, with what you got during steps 4 and 5.
```yaml title="platform-config.yaml" theme={null}
sso:
oauth2:
- name: "okta"
client-id: ""
client-secret: ""
openid:
issuer: "https://.okta.com"
```
Please note that if you are using a custom auth server in Okta, the OPENID\_ISSUER should be in the form `https:///oauth2//` rather than `https://.okta.com`. [Find out more about token customization](https://developer.okta.com/docs/guide/customize-tokens-returned-from-okta/main/) .
```json title=".env" theme={null}
CDK_SSO_OAUTH2_0_NAME="okta"
CDK_SSO_OAUTH2_0_DEFAULT=true
CDK_SSO_OAUTH2_0_CLIENT-ID=""
CDK_SSO_OAUTH2_0_CLIENT-SECRET=""
CDK_SSO_OAUTH2_0_OPENID_ISSUER="https://.okta.com"
```
## Configure WorkOS as SSO
On the WorkOS side, you have to create an OAuth application:
* **Step 1**: In the WorkOS dashboard, go to **AuthKit → Connect** and create a new Connect OAuth application
WorkOS exposes two application types that both produce a `client_xxx` ID. Conduktor Console only works with a **Connect OAuth Application** (AuthKit → Connect panel). The **SSO Application** in the Applications panel is intended for server-side integrations using the WorkOS SDKs and isn't a standards-compliant OIDC client.
* **Step 2**: Add the redirect URI on the application's **Redirects** tab
The redirect URI is: `http(s)://(:)/oauth/callback/`. For example, if you deployed Console using the name `WorkOS` in your configuration file, the redirect URI is `https:///oauth/callback/WorkOS`.
The literal value of the OAuth2 config name is appended as a path segment, so the URI registered in WorkOS has to match it exactly, including casing. WorkOS doesn't accept wildcards or path prefixes.
* **Step 3**: Get the `client ID` and `client secret` from the Connect OAuth application
* **Step 4**: Find your AuthKit domain in **Authentication → Features → Hosted UI**
Each WorkOS environment has its own AuthKit domain, in the form `https://.authkit.app`. Use this as the OpenID issuer.
You can find the .well-known at: `https:///.well-known/openid-configuration`.
Don't use the `https://api.workos.com/user_management//.well-known/openid-configuration` endpoint. It returns an incomplete discovery document missing the `subject_types_supported` and `id_token_signing_alg_values_supported` fields, both required by [OIDC Discovery 1.0 §3](https://openid.net/specs/openid-connect-discovery-1_0.html#ProviderMetadata) . Console's OIDC client rejects it with `ParseException: Missing JSON object member with key subject_types_supported`.
### Configure Console
On the Console side, you can add the snippet below to your configuration file. You have to replace the `client ID`, `client secret`, and `authkit-domain` with what you got during the previous steps.
```yaml title="platform-config.yaml" theme={null}
sso:
oauth2:
- name: "WorkOS"
client-id: ""
client-secret: ""
scopes: "openid,email,profile"
openid:
issuer: "https://"
```
```json title=".env" theme={null}
CDK_SSO_OAUTH2_0_NAME="WorkOS"
CDK_SSO_OAUTH2_0_DEFAULT=true
CDK_SSO_OAUTH2_0_CLIENT-ID=""
CDK_SSO_OAUTH2_0_CLIENT-SECRET=""
CDK_SSO_OAUTH2_0_SCOPES="openid,email,profile"
CDK_SSO_OAUTH2_0_OPENID_ISSUER="https://"
```
## Configure an OIDC provider as SSO
Conduktor supports various OIDC (OpenID Connect)/OAuth2 providers, including:
* [Entra ID](#configure-entra-id-as-sso)
* [Google](#configure-google-as-sso)
* [Amazon Cognito](#configure-amazon-cognito-as-sso)
* [Keycloak](#configure-keycloak-as-sso)
* [Okta](#configure-okta-as-sso)
* [Auth0](#configure-auth0-as-sso)
* [WorkOS](#configure-workos-as-sso)
For others, follow these generic steps.
1. Create an OIDC (OpenID Connect) application in your chosen provider. This [application should use standard OAuth2/OIDC authorization code flow](https://openid.net/specs/openid-connect-core-1_0.html#CodeFlowAuth) with `CLIENT_SECRET_BASIC` authentication method.
2. Set OAuth2 authorized redirect URI in your application
For the OAuth2 authorization code flow to work, the OAuth2 provider needs to know; and authorize; where to redirect the user after the authentication process.
This is called the `redirect URI` or `callback URI`.
The redirect URI will look like this:\
`http(s)://(:)/oauth/callback/`
Where `` and `` depend on the Console external URL used and/or configured, and `` is the name of the OAuth2 configuration in your Console configuration file see [Console configuration](#console-configuration) step.
### More details on Console external URL
When Console initiate the OAuth2 authorization code flow, it tells the OIDC provider where to redirect the user after the authentication process.
But to forge this redirect URI, Console has several choices:
#### Console external URL is configured
If the Console external URL is configured using environment variable `CDK_PLATFORM_EXTERNAL_URL` or configuration `platform.external.url`, it will be used.
**However, the SSO will only work if Console is accessed using this URL.**
If you try to log in from the second URL, you'll be redirected to the first URL and then lose browser authentication cookies which means the SSO will not work.
##### Context path deployments
If you deploy Console with a context path using `CDK_PLATFORM_EXTERNAL_URL` with a context path (e.g., `https://mycompany.com/console`), your SSO callback URLs must include the base path.
For example, if Console is deployed at `https://mycompany.com/console` with an OAuth2 configuration named `okta`, the callback URL would be:
```
https://mycompany.com/console/oauth/callback/okta
```
Make sure to update your identity provider's callback/redirect URI configuration accordingly.
##### Console external URL is NOT configured
When no external Console URL is enforced, Console will use requests headers to resolve this external URL.
This is recommended if Console is accessed using multiple URLs (internal, external, etc) and have SSO on each of them.
The resolution strategy is the following:
1. Use the [`Forwarded`](https://developer.mozilla.org/en-US/docs/Web/HTTP/Headers/Forwarded) header. This is the preferred method if you are using a **reverse proxy in front of Console**.
It uses the `host` and `proto` directives (if set) of `Forwarded` header to determine the external URL.
2. Use the `X-Forwarded-*` headers. Support for the non-standard forwarded headers coming from some **reverse proxy** implementations.
It uses the `X-Forwarded-Proto`, `X-Forwarded-Host` and `X-Forwarded-Port` headers to determine the external URL.
3. Use the `Host` header. Used if you access to Console directly, without a reverse proxy.
In this case, the `Host` header (generally set by the browser) will be used to determine the external URL.
**Port** will be guessed depending on the content of the `Host` header and fallback to Console configured port using environment variable `CDK_LISTENING_PORT` (default to `8080`).\
**Scheme** (http/https) will be guessed depending on the current TLS configuration of Console. (default to `http`).
4. Get the client ID and secret from application settings
#### Configure Console
On Console side, you need to configure several properties to enable OIDC SSO.
Required properties are:
* `sso.oauth2.name`: the name of the OAuth2 configuration. This name will be used in the redirect URI defined on your provider in the steps before. It must be unique.
* `sso.oauth2.client-id`: the client ID of your OAuth2 application.
* `sso.oauth2.client-secret`: the client secret of your OAuth2 application.
* `sso.oauth2.openid.issuer`: the issuer URL of your OpenID Connect provider. This url is used to discover the provider configuration using the `.well-known/openid-configuration` path.
Optionally, you can configure the following properties:
* `sso.oauth2.scopes`: the list of scopes to request during the authorization code flow. [See OAuth2 configuration for details](#configure-auth0-as-sso).
##### Example
The provider exposes its configuration using the well-known endpoint: `https:///.well-known/openid-configuration`. Here's an example of a configuration file for a generic OIDC provider.
```yaml title="platform-config.yaml" theme={null}
sso:
oauth2:
- name: "oidc-provider"
client-id: ""
client-secret: ""
openid:
issuer: "https:///"
```
```json title=".env" theme={null}
CDK_SSO_OAUTH2_0_NAME="oidc-provider"
CDK_SSO_OAUTH2_0_DEFAULT=true
CDK_SSO_OAUTH2_0_CLIENT-ID=""
CDK_SSO_OAUTH2_0_CLIENT-SECRET=""
CDK_SSO_OAUTH2_0_OPENID_ISSUER="https:///"
```
## SSO config properties
| Property | Description | Environment variable | Mandatory | Type | Default |
| -------------------------------- | ------------------------------------------------------------------------ | ------------------------------------ | --------- | ------- | ------- |
| `sso.ignoreUntrustedCertificate` | Disable SSL checks | `CDK_SSO_IGNOREUNTRUSTEDCERTIFICATE` | false | boolean | `false` |
| `sso.trustedCertificates` | SSL public certificates for SSO authentication (LDAPS and OAuth2) as PEM | `CDK_SSO_TRUSTEDCERTIFICATES` | false | string | ∅ |
### OAuth2 config properties
| Property | Description | Environment variable | Mandatory | Type | Default |
| --------------------------------------- | ------------------------------------------------------------------- | ---------------------------------------- | --------- | -------------------------------------------------------------------------------------------------------------------------------------------- | ------- |
| `sso.oauth2[].name` | OAuth2 connection name | `CDK_SSO_OAUTH2_0_NAME` | true | string | ∅ |
| `sso.oauth2[].default` | Use as default | `CDK_SSO_OAUTH2_0_DEFAULT` | true | boolean | ∅ |
| `sso.oauth2[].client-id` | OAuth2 client ID | `CDK_SSO_OAUTH2_0_CLIENTID` | true | string | ∅ |
| `sso.oauth2[].client-secret` | OAuth2 client secret | `CDK_SSO_OAUTH2_0_CLIENTSECRET` | true | string | ∅ |
| `sso.oauth2[].openid.issuer` | Issuer to check on token | `CDK_SSO_OAUTH2_0_OPENID_ISSUER` | true | string | ∅ |
| `sso.oauth2[].scopes` | Scopes to be requested in the client credentials request | `CDK_SSO_OAUTH2_0_SCOPES` | true | string | `[]` |
| `sso.oauth2[].groups-claim` | Group attribute from your identity provider | `CDK_SSO_OAUTH2_0_GROUPSCLAIM` | false | string | ∅ |
| `sso.oauth2[].username-claim` | Username attribute from your identity provider | `CDK_SSO_OAUTH2_0_USERNAMECLAIM` | false | string | `email` |
| `sso.oauth2[].email-claim` | Email attribute from your identity provider | `CDK_SSO_OAUTH2_0_EMAILCLAIM` | false | string | `email` |
| `sso.oauth2[].allow-unsigned-id-tokens` | Allow unsigned ID tokens | `CDK_SSO_OAUTH2_0_ALLOWUNSIGNEDIDTOKENS` | false | boolean | false |
| `sso.oauth2[].preferred-jws-algorithm` | Configure preferred JWS algorithm | `CDK_SSO_OAUTH2_0_PREFERREDJWSALGORITHM` | false | string one of: "HS256", "HS384", "HS512", "RS256", "RS384", "RS512", "ES256", "ES256K", "ES384", "ES512", "PS256", "PS384", "PS512", "EdDSA" | ∅ |
| `sso.oauth2[].pkce-method` | Configure PKCE method | `CDK_SSO_OAUTH2_0_PKCEMETHOD` | false | string one of: "plain", "S256" | ∅ |
| `sso.oauth2-logout` | Wether the central identity provider logout should be called or not | `CDK_SSO_OAUTH2LOGOUT` | false | boolean | true |
#### Nested group claim
`groups-claim` supports dot-notation to read groups from a nested JWT claim. Console first checks for an exact top-level key match (preserving backward compatibility with claim keys that contain dots), then treats the dot as a path separator.
**Flat claim** — groups returned as a top-level JWT claim:
```json theme={null}
{
"groups": ["admins", "developers"]
}
```
```yaml theme={null}
groups-claim: "groups"
```
**Nested claim** — groups inside a JSON object in the token:
```json theme={null}
{
"urn:spc:grant": {
"roles": ["admins", "developers"]
}
}
```
```yaml theme={null}
groups-claim: "urn:spc:grant.roles"
```
### LDAP config properties
| Property | Description | Environment variable | Mandatory | Type | Default |
| ------------------------------------ | -------------------------------------------------------------------------------------------------------------------------------------------------------------------------------------------------- | -------------------------------------- | --------- | ------------ | -------------------- |
| `sso.ldap[].name` | Ldap connection name | `CDK_SSO_LDAP_0_NAME` | true | string | ∅ |
| `sso.ldap[].server` | Ldap server host and port | `CDK_SSO_LDAP_0_SERVER` | true | string | ∅ |
| `sso.ldap[].managerDn` | Sets the manager DN | `CDK_SSO_LDAP_0_MANAGERDN` | true | string | ∅ |
| `sso.ldap[].managerPassword` | Sets the manager password | `CDK_SSO_LDAP_0_MANAGERPASSWORD` | true | string | ∅ |
| `sso.ldap[].search-subtree` | Sets if the subtree should be searched. | `CDK_SSO_LDAP_0_SEARCHSUBTREE` | false | boolean | `true` |
| `sso.ldap[].search-base` | Sets the base DN to search. | `CDK_SSO_LDAP_0_SEARCHBASE` | true | string | ∅ |
| `sso.ldap[].search-filter` | Sets the search filter. By default, the filter is set to `(uid={0})` for users using class type `InetOrgPerson`. | `CDK_SSO_LDAP_0_SEARCHFILTER` | false | string | `"(uid={0})"` |
| `sso.ldap[].search-attributes` | Sets the attributes list to return. By default, all attributes are returned. Platform search for `uid`, `cn`, `mail`, `email`, `givenName`, `sn`, `displayName` attributes to map into user token. | `CDK_SSO_LDAP_0_SEARCHATTRIBUTES` | false | string array | `[]` |
| `sso.ldap[].groups-enabled` | Sets if group search is enabled. | `CDK_SSO_LDAP_0_GROUPSENABLED` | false | boolean | `false` |
| `sso.ldap[].groups-subtree` | Sets if the subtree should be searched. | `CDK_SSO_LDAP_0_GROUPSSUBTREE` | false | boolean | `true` |
| `sso.ldap[].groups-base` | Sets the base DN to search from. | `CDK_SSO_LDAP_0_GROUPSBASE` | true | string | ∅ |
| `sso.ldap[].groups-filter` | Sets the group search filter. If using group class type `GroupOfUniqueNames` use the filter `"uniqueMember={0}"`. For group class `GroupOfNames` use `"member={0}"`. | `CDK_SSO_LDAP_0_GROUPSFILTER` | false | string | `"uniquemember={0}"` |
| `sso.ldap[].groups-filter-attribute` | Sets the name of the user attribute to bind to the group search filter. Defaults to the user’s DN. | `CDK_SSO_LDAP_0_GROUPSFILTERATTRIBUTE` | false | string | ∅ |
| `sso.ldap[].groups-attribute` | Sets the group attribute name. Defaults to `cn`. | `CDK_SSO_LDAP_0_GROUPSATTRIBUTE` | false | string | `"cn"` |
| `sso.ldap[].properties` | Additional properties that will be passed to identity provider context. | `CDK_SSO_LDAP_0_PROPERTIES` | false | dictionary | ∅ |
## Troubleshoot
Yes. We support any OIDC, Active Directory or LDAP standard identity provider. Moreover, this doesn't require a connection back to Conduktor - it integrates directly with your identify provider.
## Related resources
* [Map external groups](/guide/conduktor-in-production/admin/user-access/map-external-groups)
* [Set up RBAC](/guide/conduktor-in-production/admin/set-up-rbac)
* [Give us feedback/request a feature](https://conduktor.io/roadmap)