> ## Documentation Index
> Fetch the complete documentation index at: https://docs.conduktor.io/llms.txt
> Use this file to discover all available pages before exploring further.
# Conduktor CLI — automate Kafka with command line
> Manage Conduktor Console and Gateway resources from the CLI or CI/CD pipelines. Apply, get, and delete Kafka resources declaratively with the Conduktor CLI.
## Conduktor CLI overview
Conduktor CLI (Command Line Interface) helps you to manage your [Console and Gateway resources](/guide/reference) via commands or CI/CD pipelines.
**From our blog:** [Houston, we have 7 CLI tools and zero answers](https://conduktor.io/blog/houston-we-have-7-cli-tools-and-zero-answers) The CLI fragmentation problem for Kafka teams and how a unified toolchain changes the game.
## Install
You have three options to install Conduktor CLI:
* [Native binary](#native-binary) - for individual use and testing
* [Homebrew](#homebrew) - for individual use and testing on MacOS
* [Docker](#docker) - for integration in CI/CD pipelines
### Native binary
[Download the latest binary from GitHub](https://github.com/conduktor/ctl/releases) on Windows, Linux or MacOS.
In the **Assets** list, download the build that corresponds to your machine (for Apple Silicon use `darwin-arm64`).
### Homebrew
Use the [Homebrew package manager](https://brew.sh/) to install our CLI:
```bash theme={null}
brew install conduktor/brew/conduktor-cli
```
### Docker
Pull the [latest Dockerhub version](https://hub.docker.com/r/conduktor/conduktor-ctl) of the CLI using the following command line:
```bash theme={null}
docker pull conduktor/conduktor-ctl
```
## Upgrade
### Homebrew
To upgrade to the latest version of the CLI:
```bash theme={null}
brew upgrade conduktor/brew/conduktor-cli
```
### Native binary
[Download the latest binary from GitHub](https://github.com/conduktor/ctl/releases) and replace your existing installation.
### Docker
Pull the latest version:
```bash theme={null}
docker pull conduktor/conduktor-ctl
```
## Configure
To use the Conduktor CLI, you need to set:
* the URL of your Conduktor Console and/or Gateway API
* the authentication mechanism: either by using an API key, or user credentials
### Authenticate to Console using API keys
These are the necessary environment variables for this authentication method::
```bash theme={null}
export CDK_BASE_URL=http://localhost:8080
export CDK_API_KEY=
```
There are two types of API keys: **admin** and **Self-service application**.
Admin API keys grant the maximum permissions in Console.
```bash title="Generate an admin key named 'my-admin-key'" theme={null}
conduktor token create admin my-admin-key
```
Go to **Settings** > **API Keys** and select **New API Key**:
 Self-service Application API key permissions are **limited to the scope of the ApplicationInstance** for which they have been generated. [Find out more about Self-service](/guide/use-cases/self-service).
```bash title="Generate an application API key named 'my-admin-key' for the application 'my-app-instance'" theme={null}
conduktor token create application-instance -i=my-app-instance my-app-instance-key
```
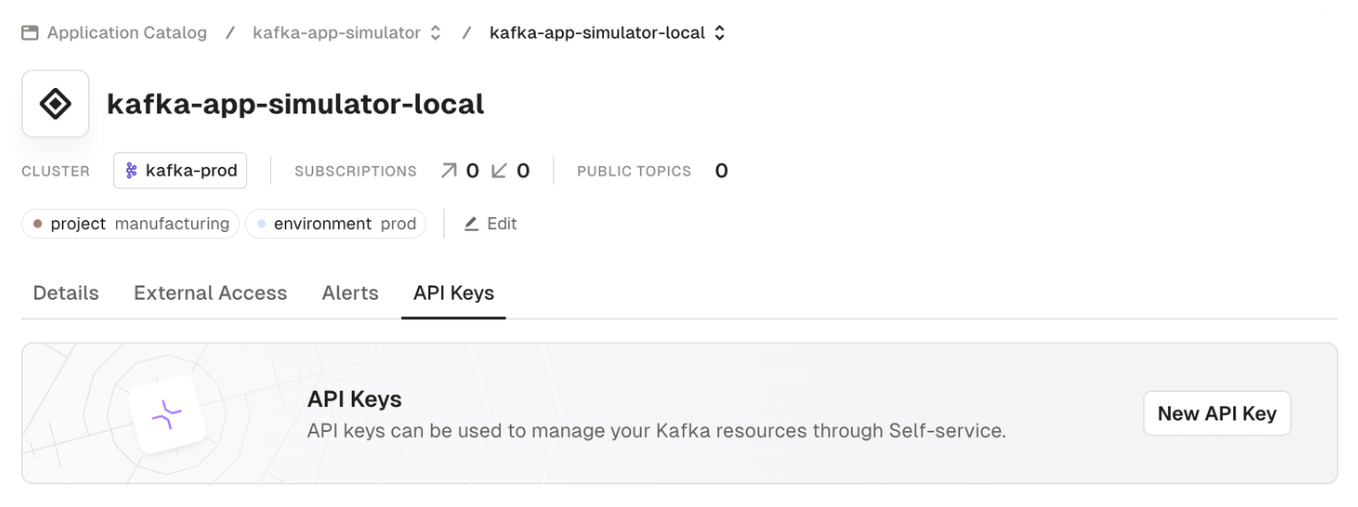
Go to **Applications**, pick your **Application** and **Application Instance**, then go to the **API Keys** tab and click **New API Key**:
Self-service Application API key permissions are **limited to the scope of the ApplicationInstance** for which they have been generated. [Find out more about Self-service](/guide/use-cases/self-service).
```bash title="Generate an application API key named 'my-admin-key' for the application 'my-app-instance'" theme={null}
conduktor token create application-instance -i=my-app-instance my-app-instance-key
```
Go to **Applications**, pick your **Application** and **Application Instance**, then go to the **API Keys** tab and click **New API Key**:
 ### Authenticate to Console using user credentials
You can simply set the username and password of the **local** or **LDAP** user and use the CLI, or create an associated short-lived API key. This type of API key will have the permissions of the user who created it.
This kind of authentication will be valid for the same duration as the configured [session timeout](/guide/conduktor-in-production/admin/user-access/session-lifetime).
```bash theme={null}
export CDK_BASE_URL=http://localhost:8080
export CDK_USER=admin@company.io
export CDK_PASSWORD=adminP4ss!
```
```bash title="Generate a short-lived API key" theme={null}
conduktor login
```
### Authenticate to Console using external authentication
By default, the Conduktor CLI authenticates with Console using a Console API key, or generates one based on the given credentials. This is the `console` authentication mode (`CDK_AUTH_MODE` is `console` or empty).
Alternatively, you can use the external authentication mode to bypass token generation and use credentials from your identity provider or the API proxy instead. For that, set the `CDK_AUTH_MODE` environment variable to `external`:
```bash title="Set up external authentication with a bearer token" theme={null}
export CDK_AUTH_MODE="external"
export CDK_API_KEY=
```
```bash title="Set up external authentication with client credentials" theme={null}
export CDK_AUTH_MODE="external"
export CDK_USER=
export CDK_PASSWORD=
```
### Authenticate to Gateway using API credentials
To use the CLI to manage Gateway objects, you need to set the URL of the Gateway API and the API credentials.
```bash theme={null}
export CDK_GATEWAY_BASE_URL=http://localhost:8888
export CDK_GATEWAY_USER=admin
export CDK_GATEWAY_PASSWORD=conduktor
```
### Environment variables
This is the list of the supported environment variables:
| Environment variables | Description |
| ---------------------- | ------------------------------------------------------------------------ |
| **Console** | |
| `CDK_BASE_URL` | Console base URL, e.g. `http://localhost:8080` |
| `CDK_API_KEY` | Console API key (admin or application key) |
| `CDK_USER` | Console local or LDAP user username |
| `CDK_PASSWORD` | Console local or LDAP user password |
| `CDK_AUTH_MODE` | Authentication mode (`external`, `console` or empty (default)) |
| **Gateway** | |
| `CDK_GATEWAY_BASE_URL` | Gateway base URL, e.g. `http://localhost:8888` |
| `CDK_GATEWAY_USER` | Gateway user login email |
| `CDK_GATEWAY_PASSWORD` | Gateway user login password |
| **TLS and mTLS** | |
| `CDK_CACERT` | Root CA certificate to verify the Conduktor Console certificate (.pem) |
| `CDK_INSECURE` | Skip the TLS verification of the Conduktor Console. Defaults to `false`. |
| `CDK_CERT` | Certificate to authenticate the CLI (.pem) |
| `CDK_KEY` | Key to authenticate the CLI (.pem) |
## CLI commands
The CLI offers a set of commands to manage Conduktor resources. You can use it to create, update, delete and get resources.
```
Usage:
conduktor [flags]
conduktor [command]
Available commands:
apply Upsert a resource on Conduktor
completion Generate the autocompletion script for the specified shell
delete Delete resource of a given kind and name
get Get resource of a given kind
help Help about any command
login Login user using username password to get a JWT token
run run an action
sql
template Get a .yaml example for a given kind
token Manage Admin and Application Instance tokens
version Display the version of Conduktor
Flags:
-h, --help help for Conduktor
--permissive permissive mode, allow undefined environment variables
-v, --verbose show more information for debugging
Use "conduktor [command] --help" for more information about a command.
```
### Apply
The `apply` command allows you to deploy any resource.
```
Usage:
conduktor apply [flags]
Flags:
--dry-run Test potential changes without the effects being applied
-f, --file stringArray Specify the files or folders to apply. For folders, all .yaml or .yml files within the folder will be applied, while files in subfolders will be ignored.
-h, --help help for apply
--parallelism int Run each apply in parallel, useful when applying a large number of resources. Must be less than 100. (default 1)
-r, --recursive Apply all .yaml or .yml files in the specified folder and its subfolders. If not set, only files in the specified folder will be applied.
Global Flags:
--permissive Permissive mode, allow undefined environment variables
-v, --verbose Show more information for debugging
```
The `--parallelism` flag allows you to run multiple applies at the same time, in parallel. This is useful when applying a large number of resources. Be careful not to set it too high, as it may overload the Console/Gateway API.
Examples:
```bash title="Apply all resources in multiple directories" theme={null}
conduktor apply -f ./directory1 -f ./directory2
```
```bash title="Apply a specific file" theme={null}
conduktor apply -f file.yaml
```
```bash title="Apply all resources in the current directory and its subfolders" theme={null}
conduktor apply -f . -r
```
### Template
The `template` command allows you to get an example of a resource definition:
```bash theme={null}
conduktor template topic
---
apiVersion: v2
kind: Topic
metadata:
name: my-topic
cluster: my-cluster
labels:
conduktor.io/application: application-a
conduktor.io/application-instance: staging
user-labels: I am a user label
catalogVisibility: PUBLIC
descriptionIsEditable: true
description: This is a topic description
sqlStorage:
retentionTimeInSecond: 42
spec:
partitions: 1
replicationFactor: 1
configs:
cleanup.policy: delete
retention.ms: '86400000'
```
You can also save the output in a file, in order to edit it before applying it:
```bash theme={null}
conduktor template KafkaCluster -o definition.yml
conduktor template Topic >> definition.yml #Appending to an existing file
vim definition.yml
conduktor apply -f definition.yml
```
### Delete
The `delete` command allows you to delete a resource. It works the same way as the `apply`.
Resources are deleted instantly and can't be recovered. Any data or access associated with the resource is permanently lost.
Examples:
```bash title="Delete all resources in multiple directories" theme={null}
conduktor delete -f ./directory1 -f ./directory2
```
```bash title="Delete a specific file" theme={null}
conduktor delete -f file.yaml
```
```bash title="Delete all resources in the current directory and its subfolders" theme={null}
conduktor delete -f . -r
```
### Get
The `get` command allows you to retrieve resources. You can specify a kind, a name, or list all the resources.
```
conduktor get user --help
If name not provided it will list all resource
Usage:
conduktor get User [name] [flags]
Aliases:
User, user
Flags:
-h, --help help for User
Global Flags:
-o, --output output Output format. One of: json|yaml|name (default yaml)
--permissive Permissive mode, allow undefined environment variables
-v, --verbose Show more information for debugging
```
Examples:
```bash title="Get all users" theme={null}
conduktor get user
```
```bash title="Get a specific Kafka connect cluster" theme={null}
conduktor get KafkaConnectCluster --cluster my-kafka-cluster
```
```bash title="Get all the Console resources with a 'name' output format" theme={null}
conduktor get all --console -o name
```
### Token
To run your CI/CD pipelines, you can use the `token` command to manage your API keys.
```bash title="Create an admin API keys" theme={null}
conduktor token create admin my_first_admin_token
```
```bash title="List Console admin API keys" theme={null}
conduktor token list admin
```
```bash title="Create an application instance API key" theme={null}
conduktor token create application-instance -i=my_instance my_token_for_my_instance
```
```bash title="List API keys of an application instance" theme={null}
conduktor token list application-instance -i=my_instance
```
```bash title="Delete an API key" theme={null}
conduktor token delete 1233ff18-0e95-4638-b3fc-f55e20088b8d
```
### Run
The `run` command allows you to run a few actions:
```
Usage:
conduktor run [flags]
conduktor run [command]
Available Commands:
generateServiceAccountToken Generate a token for a service account on a virtual cluster
partnerZoneGenerateCredentials generate a token for a partner zone service account
whoami Return information about the credentials configured in the CLI
Flags:
-h, --help help for run
Global Flags:
--permissive Permissive mode, allow undefined environment variables
-v, --verbose Show more information for debugging
```
Examples:
```bash title="Generate a service account password for a virtual cluster" theme={null}
conduktor run generateServiceAccountToken --v-cluster my-vcluster --username my-service-account
```
```bash title="Generate a Partner Zone service account password" theme={null}
conduktor run partnerZoneGenerateCredentials --partner-zone-name my-partner-zone
```
```bash title="Get information about the credentials configured in the CLI" theme={null}
conduktor run whoami
```
### Manage state
State management is available in CLI v0.7.0 and above.
State management is an optional feature that tracks resources applied via the CLI. It helps detect orphaned resources (resources in state but no longer in your configuration files) and automatically removes them.
Enable state management with the `--enable-state` flag:
```bash title="Apply with local state tracking" theme={null}
conduktor apply -f resources.yaml --enable-state
```
#### Local state
By default, the state file is stored locally at:
| Platform | Default location |
| -------- | ------------------------------------------------------------ |
| Linux | `$XDG_DATA_HOME/.local/share/conduktor/cli-state.json` |
| macOS | `$HOME/Library/Application Support/conduktor/cli-state.json` |
| Windows | `$APPDATA/conduktor/cli-state.json` |
Use `--state-file` to specify a custom path:
```bash theme={null}
conduktor apply -f resources.yaml --enable-state --state-file ./my-state.json
```
The state file is a JSON document containing metadata about tracked resources:
```json theme={null}
{
"version": "v1",
"lastUpdated": "2024-12-05T10:30:00Z",
"resources": [
{
"apiVersion": "v1",
"kind": "Topic",
"metadata": { "name": "my-topic", "cluster": "my-cluster" }
}
]
}
```
#### Remote state
For team collaboration and CI/CD pipelines, store state in remote object storage using `--state-remote-uri`:
```bash theme={null}
# Set AWS credentials
export AWS_ACCESS_KEY_ID=
export AWS_SECRET_ACCESS_KEY=
# Apply with S3 remote state
conduktor apply -f resources.yaml \
--enable-state \
--state-remote-uri "s3://my-bucket/conduktor/state/?region=us-east-1"
```
Also supports S3-compatible services like MinIO or DigitalOcean Spaces.
See [S3 URI options](https://github.com/conduktor/ctl/blob/main/docs/state_management.md#s3-uri-query-parameters) and [authentication methods](https://github.com/conduktor/ctl/blob/main/docs/state_management.md#s3-authentication).
```bash theme={null}
# Set GCP credentials
export GOOGLE_APPLICATION_CREDENTIALS=/path/to/service-account.json
# Apply with GCS remote state
conduktor apply -f resources.yaml \
--enable-state \
--state-remote-uri "gs://my-bucket/conduktor/state/"
```
See [GCS URI options](https://github.com/conduktor/ctl/blob/main/docs/state_management.md#gcs-uri-query-parameters) and [authentication methods](https://github.com/conduktor/ctl/blob/main/docs/state_management.md#gcs-authentication).
```bash theme={null}
# Set Azure credentials
export AZURE_STORAGE_ACCOUNT=
export AZURE_STORAGE_KEY=
# Apply with Azure Blob remote state
conduktor apply -f resources.yaml \
--enable-state \
--state-remote-uri "azblob://my-container/conduktor/state/"
```
See [Azure URI options](https://github.com/conduktor/ctl/blob/main/docs/state_management.md#azure-blob-uri-query-parameters) and [authentication methods](https://github.com/conduktor/ctl/blob/main/docs/state_management.md#azure-blob-authentication).
#### Environment variables
You can enable state management globally using environment variables:
| Environment variable | Description |
| ---------------------- | ---------------------------------------- |
| `CDK_STATE_ENABLED` | Enable state tracking globally |
| `CDK_STATE_FILE` | Custom local state file path |
| `CDK_STATE_REMOTE_URI` | Remote storage URI (S3, GCS, Azure Blob) |
[See detailed URI options, authentication methods and best practices](https://github.com/conduktor/ctl/blob/main/docs/state_management.md).
### Version
Check the current version of your CLI:
```bash title="Check CLI version" theme={null}
conduktor version
```
### CI/CD pipeline integration example
Conduktor CLI can be easily integrated to a CI/CD pipeline. This example presents two pipelines:
* The first one triggers on each new PR and launches the CLI using the `--dry-run` flag, generating a report confirming that the resources can be successfully created or modified.
* The second one triggers on a push to the `main` branch, making the changes live.
For a fuller, production-ready Self-service example — splitting platform and application resources, using scope-based tokens, isolating remote state per workflow, and enforcing review with CODEOWNERS — start from the [conduktor/self-service-template](https://github.com/conduktor/self-service-template) reference repository.
Consider the following folder structure:
```
├── resources/
├── topics.yml # Your topics are there
├── permissions.yml # Your permissions to other apps are there
```
```yaml title=".github/workflows/on-pr.yml" theme={null}
name: Check PR Validity
on:
pull_request:
branches: [ "main" ]
workflow_dispatch:
jobs:
build:
runs-on: ubuntu-latest
container: conduktor/conduktor-ctl
steps:
- uses: actions/checkout@v3
- run: /bin/conduktor apply -f resources/ --dry-run
env:
CDK_BASE_URL: https://conduktor.domain.com
CDK_API_KEY: ${{ secrets.CONDUKTOR_TOKEN }}
```
```yaml title=".github/workflows/on-push.yml" theme={null}
name: Execute committed changes
on:
push:
branches: [ "main" ]
jobs:
build:
runs-on: ubuntu-latest
container: conduktor/conduktor-ctl
steps:
- uses: actions/checkout@v3
- run: /bin/conduktor apply -f resources/
env:
CDK_BASE_URL: https://conduktor.domain.com
CDK_API_KEY: ${{ secrets.CONDUKTOR_TOKEN }}
```
```yaml title=".gitlab-ci.yml" theme={null}
conduktor-pr:
only:
- merge_requests
stage: deploy
image:
name: conduktor/conduktor-ctl
entrypoint: [""]
variables:
- export CDK_BASE_URL=https://conduktor.domain.com
- export CDK_API_KEY=${CONDUKTOR_TOKEN}
script:
- /bin/conduktor apply -f resources/ --dry-run
conduktor-main:
only:
refs:
- main
stage: deploy
image:
name: conduktor/conduktor-ctl
entrypoint: [""]
variables:
- export CDK_BASE_URL=https://conduktor.domain.com
- export CDK_API_KEY=${CONDUKTOR_TOKEN}
script:
- /bin/conduktor apply -f resources/
```
### Environment variables for secrets
The Conduktor CLI automatically substitutes environment variables in YAML manifests using `${ENV_VAR}` patterns. This keeps sensitive data like credentials out of configuration files.
You can set a default value using POSIX notation `${ENV:-default}`.
By default, the CLI fails if an environment variable is undefined or empty, ensuring all required variables are properly configured.
Use the `--permissive` flag to replace missing or empty variables with empty strings instead of failing.
#### Escape sequences for Interceptor configs
When you use environment variables in Gateway Interceptor configurations, you have to escape dollar signs with double dollar signs `$$` for secured templates.
This applies to:
* Encryption keys
* Passwords
* API tokens
* Any secret values in Interceptor config blocks
**Example:**
```yaml theme={null}
apiVersion: gateway/v2
kind: Interceptor
metadata:
name: my-encryption-interceptor
spec:
pluginClass: io.conduktor.gateway.interceptor.EncryptPlugin
config:
# Use $$ to escape environment variables in Interceptor configs
encryptionKey: $${ENCRYPTION_KEY}
apiToken: $${API_TOKEN}
```
Without the `$$` escape sequence, the CLI will not correctly substitute the environment variable in the Interceptor configuration.
#### Kafka cluster example
The example below shows a Conduktor cluster configuration with credentials secured using environment variables:
```yaml theme={null}
---
apiVersion: console/v2
kind: KafkaCluster
metadata:
name: my-cluster
spec:
displayName: "My Kafka Cluster"
icon: "kafka"
color: "#000000"
bootstrapServers: "localhost:9092"
ignoreUntrustedCertificate: false
properties:
sasl.jaas.config: org.apache.kafka.common.security.plain.PlainLoginModule required username="${ENV_VAR_FOR_USER}" password="${ENV_VAR_FOR_PASSWORD}";
security.protocol: SASL_SSL
sasl.mechanism: PLAIN
schemaRegistry:
type: "ConfluentLike"
url: http://localhost:8080
security:
type: BasicAuth
username: ${ENV_VAR_FOR_USER}
password: ${ENV_VAR_FOR_PASSWORD}
ignoreUntrustedCertificate: false
kafkaFlavor:
type: "Confluent"
key: "${ENV_VAR_CONFLUENT_KEY}"
secret: "${ENV_VAR_CONFLUENT_SECRET}"
confluentEnvironmentId: "${ENV_VAR_CONFLUENT_ENV_ID:-dev}"
confluentClusterId: "${ENV_VAR_CONFLUENT_CLUSTER_ID:-main}"
```
## Related resources
* [Automate with API](/guide/conduktor-in-production/automate/api-automation)
* [View Console resource reference](/guide/reference/console-reference)
* [Give us feedback/request a feature](https://conduktor.io/roadmap)
### Authenticate to Console using user credentials
You can simply set the username and password of the **local** or **LDAP** user and use the CLI, or create an associated short-lived API key. This type of API key will have the permissions of the user who created it.
This kind of authentication will be valid for the same duration as the configured [session timeout](/guide/conduktor-in-production/admin/user-access/session-lifetime).
```bash theme={null}
export CDK_BASE_URL=http://localhost:8080
export CDK_USER=admin@company.io
export CDK_PASSWORD=adminP4ss!
```
```bash title="Generate a short-lived API key" theme={null}
conduktor login
```
### Authenticate to Console using external authentication
By default, the Conduktor CLI authenticates with Console using a Console API key, or generates one based on the given credentials. This is the `console` authentication mode (`CDK_AUTH_MODE` is `console` or empty).
Alternatively, you can use the external authentication mode to bypass token generation and use credentials from your identity provider or the API proxy instead. For that, set the `CDK_AUTH_MODE` environment variable to `external`:
```bash title="Set up external authentication with a bearer token" theme={null}
export CDK_AUTH_MODE="external"
export CDK_API_KEY=
```
```bash title="Set up external authentication with client credentials" theme={null}
export CDK_AUTH_MODE="external"
export CDK_USER=
export CDK_PASSWORD=
```
### Authenticate to Gateway using API credentials
To use the CLI to manage Gateway objects, you need to set the URL of the Gateway API and the API credentials.
```bash theme={null}
export CDK_GATEWAY_BASE_URL=http://localhost:8888
export CDK_GATEWAY_USER=admin
export CDK_GATEWAY_PASSWORD=conduktor
```
### Environment variables
This is the list of the supported environment variables:
| Environment variables | Description |
| ---------------------- | ------------------------------------------------------------------------ |
| **Console** | |
| `CDK_BASE_URL` | Console base URL, e.g. `http://localhost:8080` |
| `CDK_API_KEY` | Console API key (admin or application key) |
| `CDK_USER` | Console local or LDAP user username |
| `CDK_PASSWORD` | Console local or LDAP user password |
| `CDK_AUTH_MODE` | Authentication mode (`external`, `console` or empty (default)) |
| **Gateway** | |
| `CDK_GATEWAY_BASE_URL` | Gateway base URL, e.g. `http://localhost:8888` |
| `CDK_GATEWAY_USER` | Gateway user login email |
| `CDK_GATEWAY_PASSWORD` | Gateway user login password |
| **TLS and mTLS** | |
| `CDK_CACERT` | Root CA certificate to verify the Conduktor Console certificate (.pem) |
| `CDK_INSECURE` | Skip the TLS verification of the Conduktor Console. Defaults to `false`. |
| `CDK_CERT` | Certificate to authenticate the CLI (.pem) |
| `CDK_KEY` | Key to authenticate the CLI (.pem) |
## CLI commands
The CLI offers a set of commands to manage Conduktor resources. You can use it to create, update, delete and get resources.
```
Usage:
conduktor [flags]
conduktor [command]
Available commands:
apply Upsert a resource on Conduktor
completion Generate the autocompletion script for the specified shell
delete Delete resource of a given kind and name
get Get resource of a given kind
help Help about any command
login Login user using username password to get a JWT token
run run an action
sql
template Get a .yaml example for a given kind
token Manage Admin and Application Instance tokens
version Display the version of Conduktor
Flags:
-h, --help help for Conduktor
--permissive permissive mode, allow undefined environment variables
-v, --verbose show more information for debugging
Use "conduktor [command] --help" for more information about a command.
```
### Apply
The `apply` command allows you to deploy any resource.
```
Usage:
conduktor apply [flags]
Flags:
--dry-run Test potential changes without the effects being applied
-f, --file stringArray Specify the files or folders to apply. For folders, all .yaml or .yml files within the folder will be applied, while files in subfolders will be ignored.
-h, --help help for apply
--parallelism int Run each apply in parallel, useful when applying a large number of resources. Must be less than 100. (default 1)
-r, --recursive Apply all .yaml or .yml files in the specified folder and its subfolders. If not set, only files in the specified folder will be applied.
Global Flags:
--permissive Permissive mode, allow undefined environment variables
-v, --verbose Show more information for debugging
```
The `--parallelism` flag allows you to run multiple applies at the same time, in parallel. This is useful when applying a large number of resources. Be careful not to set it too high, as it may overload the Console/Gateway API.
Examples:
```bash title="Apply all resources in multiple directories" theme={null}
conduktor apply -f ./directory1 -f ./directory2
```
```bash title="Apply a specific file" theme={null}
conduktor apply -f file.yaml
```
```bash title="Apply all resources in the current directory and its subfolders" theme={null}
conduktor apply -f . -r
```
### Template
The `template` command allows you to get an example of a resource definition:
```bash theme={null}
conduktor template topic
---
apiVersion: v2
kind: Topic
metadata:
name: my-topic
cluster: my-cluster
labels:
conduktor.io/application: application-a
conduktor.io/application-instance: staging
user-labels: I am a user label
catalogVisibility: PUBLIC
descriptionIsEditable: true
description: This is a topic description
sqlStorage:
retentionTimeInSecond: 42
spec:
partitions: 1
replicationFactor: 1
configs:
cleanup.policy: delete
retention.ms: '86400000'
```
You can also save the output in a file, in order to edit it before applying it:
```bash theme={null}
conduktor template KafkaCluster -o definition.yml
conduktor template Topic >> definition.yml #Appending to an existing file
vim definition.yml
conduktor apply -f definition.yml
```
### Delete
The `delete` command allows you to delete a resource. It works the same way as the `apply`.
Resources are deleted instantly and can't be recovered. Any data or access associated with the resource is permanently lost.
Examples:
```bash title="Delete all resources in multiple directories" theme={null}
conduktor delete -f ./directory1 -f ./directory2
```
```bash title="Delete a specific file" theme={null}
conduktor delete -f file.yaml
```
```bash title="Delete all resources in the current directory and its subfolders" theme={null}
conduktor delete -f . -r
```
### Get
The `get` command allows you to retrieve resources. You can specify a kind, a name, or list all the resources.
```
conduktor get user --help
If name not provided it will list all resource
Usage:
conduktor get User [name] [flags]
Aliases:
User, user
Flags:
-h, --help help for User
Global Flags:
-o, --output output Output format. One of: json|yaml|name (default yaml)
--permissive Permissive mode, allow undefined environment variables
-v, --verbose Show more information for debugging
```
Examples:
```bash title="Get all users" theme={null}
conduktor get user
```
```bash title="Get a specific Kafka connect cluster" theme={null}
conduktor get KafkaConnectCluster --cluster my-kafka-cluster
```
```bash title="Get all the Console resources with a 'name' output format" theme={null}
conduktor get all --console -o name
```
### Token
To run your CI/CD pipelines, you can use the `token` command to manage your API keys.
```bash title="Create an admin API keys" theme={null}
conduktor token create admin my_first_admin_token
```
```bash title="List Console admin API keys" theme={null}
conduktor token list admin
```
```bash title="Create an application instance API key" theme={null}
conduktor token create application-instance -i=my_instance my_token_for_my_instance
```
```bash title="List API keys of an application instance" theme={null}
conduktor token list application-instance -i=my_instance
```
```bash title="Delete an API key" theme={null}
conduktor token delete 1233ff18-0e95-4638-b3fc-f55e20088b8d
```
### Run
The `run` command allows you to run a few actions:
```
Usage:
conduktor run [flags]
conduktor run [command]
Available Commands:
generateServiceAccountToken Generate a token for a service account on a virtual cluster
partnerZoneGenerateCredentials generate a token for a partner zone service account
whoami Return information about the credentials configured in the CLI
Flags:
-h, --help help for run
Global Flags:
--permissive Permissive mode, allow undefined environment variables
-v, --verbose Show more information for debugging
```
Examples:
```bash title="Generate a service account password for a virtual cluster" theme={null}
conduktor run generateServiceAccountToken --v-cluster my-vcluster --username my-service-account
```
```bash title="Generate a Partner Zone service account password" theme={null}
conduktor run partnerZoneGenerateCredentials --partner-zone-name my-partner-zone
```
```bash title="Get information about the credentials configured in the CLI" theme={null}
conduktor run whoami
```
### Manage state
State management is available in CLI v0.7.0 and above.
State management is an optional feature that tracks resources applied via the CLI. It helps detect orphaned resources (resources in state but no longer in your configuration files) and automatically removes them.
Enable state management with the `--enable-state` flag:
```bash title="Apply with local state tracking" theme={null}
conduktor apply -f resources.yaml --enable-state
```
#### Local state
By default, the state file is stored locally at:
| Platform | Default location |
| -------- | ------------------------------------------------------------ |
| Linux | `$XDG_DATA_HOME/.local/share/conduktor/cli-state.json` |
| macOS | `$HOME/Library/Application Support/conduktor/cli-state.json` |
| Windows | `$APPDATA/conduktor/cli-state.json` |
Use `--state-file` to specify a custom path:
```bash theme={null}
conduktor apply -f resources.yaml --enable-state --state-file ./my-state.json
```
The state file is a JSON document containing metadata about tracked resources:
```json theme={null}
{
"version": "v1",
"lastUpdated": "2024-12-05T10:30:00Z",
"resources": [
{
"apiVersion": "v1",
"kind": "Topic",
"metadata": { "name": "my-topic", "cluster": "my-cluster" }
}
]
}
```
#### Remote state
For team collaboration and CI/CD pipelines, store state in remote object storage using `--state-remote-uri`:
```bash theme={null}
# Set AWS credentials
export AWS_ACCESS_KEY_ID=
export AWS_SECRET_ACCESS_KEY=
# Apply with S3 remote state
conduktor apply -f resources.yaml \
--enable-state \
--state-remote-uri "s3://my-bucket/conduktor/state/?region=us-east-1"
```
Also supports S3-compatible services like MinIO or DigitalOcean Spaces.
See [S3 URI options](https://github.com/conduktor/ctl/blob/main/docs/state_management.md#s3-uri-query-parameters) and [authentication methods](https://github.com/conduktor/ctl/blob/main/docs/state_management.md#s3-authentication).
```bash theme={null}
# Set GCP credentials
export GOOGLE_APPLICATION_CREDENTIALS=/path/to/service-account.json
# Apply with GCS remote state
conduktor apply -f resources.yaml \
--enable-state \
--state-remote-uri "gs://my-bucket/conduktor/state/"
```
See [GCS URI options](https://github.com/conduktor/ctl/blob/main/docs/state_management.md#gcs-uri-query-parameters) and [authentication methods](https://github.com/conduktor/ctl/blob/main/docs/state_management.md#gcs-authentication).
```bash theme={null}
# Set Azure credentials
export AZURE_STORAGE_ACCOUNT=
export AZURE_STORAGE_KEY=
# Apply with Azure Blob remote state
conduktor apply -f resources.yaml \
--enable-state \
--state-remote-uri "azblob://my-container/conduktor/state/"
```
See [Azure URI options](https://github.com/conduktor/ctl/blob/main/docs/state_management.md#azure-blob-uri-query-parameters) and [authentication methods](https://github.com/conduktor/ctl/blob/main/docs/state_management.md#azure-blob-authentication).
#### Environment variables
You can enable state management globally using environment variables:
| Environment variable | Description |
| ---------------------- | ---------------------------------------- |
| `CDK_STATE_ENABLED` | Enable state tracking globally |
| `CDK_STATE_FILE` | Custom local state file path |
| `CDK_STATE_REMOTE_URI` | Remote storage URI (S3, GCS, Azure Blob) |
[See detailed URI options, authentication methods and best practices](https://github.com/conduktor/ctl/blob/main/docs/state_management.md).
### Version
Check the current version of your CLI:
```bash title="Check CLI version" theme={null}
conduktor version
```
### CI/CD pipeline integration example
Conduktor CLI can be easily integrated to a CI/CD pipeline. This example presents two pipelines:
* The first one triggers on each new PR and launches the CLI using the `--dry-run` flag, generating a report confirming that the resources can be successfully created or modified.
* The second one triggers on a push to the `main` branch, making the changes live.
For a fuller, production-ready Self-service example — splitting platform and application resources, using scope-based tokens, isolating remote state per workflow, and enforcing review with CODEOWNERS — start from the [conduktor/self-service-template](https://github.com/conduktor/self-service-template) reference repository.
Consider the following folder structure:
```
├── resources/
├── topics.yml # Your topics are there
├── permissions.yml # Your permissions to other apps are there
```
```yaml title=".github/workflows/on-pr.yml" theme={null}
name: Check PR Validity
on:
pull_request:
branches: [ "main" ]
workflow_dispatch:
jobs:
build:
runs-on: ubuntu-latest
container: conduktor/conduktor-ctl
steps:
- uses: actions/checkout@v3
- run: /bin/conduktor apply -f resources/ --dry-run
env:
CDK_BASE_URL: https://conduktor.domain.com
CDK_API_KEY: ${{ secrets.CONDUKTOR_TOKEN }}
```
```yaml title=".github/workflows/on-push.yml" theme={null}
name: Execute committed changes
on:
push:
branches: [ "main" ]
jobs:
build:
runs-on: ubuntu-latest
container: conduktor/conduktor-ctl
steps:
- uses: actions/checkout@v3
- run: /bin/conduktor apply -f resources/
env:
CDK_BASE_URL: https://conduktor.domain.com
CDK_API_KEY: ${{ secrets.CONDUKTOR_TOKEN }}
```
```yaml title=".gitlab-ci.yml" theme={null}
conduktor-pr:
only:
- merge_requests
stage: deploy
image:
name: conduktor/conduktor-ctl
entrypoint: [""]
variables:
- export CDK_BASE_URL=https://conduktor.domain.com
- export CDK_API_KEY=${CONDUKTOR_TOKEN}
script:
- /bin/conduktor apply -f resources/ --dry-run
conduktor-main:
only:
refs:
- main
stage: deploy
image:
name: conduktor/conduktor-ctl
entrypoint: [""]
variables:
- export CDK_BASE_URL=https://conduktor.domain.com
- export CDK_API_KEY=${CONDUKTOR_TOKEN}
script:
- /bin/conduktor apply -f resources/
```
### Environment variables for secrets
The Conduktor CLI automatically substitutes environment variables in YAML manifests using `${ENV_VAR}` patterns. This keeps sensitive data like credentials out of configuration files.
You can set a default value using POSIX notation `${ENV:-default}`.
By default, the CLI fails if an environment variable is undefined or empty, ensuring all required variables are properly configured.
Use the `--permissive` flag to replace missing or empty variables with empty strings instead of failing.
#### Escape sequences for Interceptor configs
When you use environment variables in Gateway Interceptor configurations, you have to escape dollar signs with double dollar signs `$$` for secured templates.
This applies to:
* Encryption keys
* Passwords
* API tokens
* Any secret values in Interceptor config blocks
**Example:**
```yaml theme={null}
apiVersion: gateway/v2
kind: Interceptor
metadata:
name: my-encryption-interceptor
spec:
pluginClass: io.conduktor.gateway.interceptor.EncryptPlugin
config:
# Use $$ to escape environment variables in Interceptor configs
encryptionKey: $${ENCRYPTION_KEY}
apiToken: $${API_TOKEN}
```
Without the `$$` escape sequence, the CLI will not correctly substitute the environment variable in the Interceptor configuration.
#### Kafka cluster example
The example below shows a Conduktor cluster configuration with credentials secured using environment variables:
```yaml theme={null}
---
apiVersion: console/v2
kind: KafkaCluster
metadata:
name: my-cluster
spec:
displayName: "My Kafka Cluster"
icon: "kafka"
color: "#000000"
bootstrapServers: "localhost:9092"
ignoreUntrustedCertificate: false
properties:
sasl.jaas.config: org.apache.kafka.common.security.plain.PlainLoginModule required username="${ENV_VAR_FOR_USER}" password="${ENV_VAR_FOR_PASSWORD}";
security.protocol: SASL_SSL
sasl.mechanism: PLAIN
schemaRegistry:
type: "ConfluentLike"
url: http://localhost:8080
security:
type: BasicAuth
username: ${ENV_VAR_FOR_USER}
password: ${ENV_VAR_FOR_PASSWORD}
ignoreUntrustedCertificate: false
kafkaFlavor:
type: "Confluent"
key: "${ENV_VAR_CONFLUENT_KEY}"
secret: "${ENV_VAR_CONFLUENT_SECRET}"
confluentEnvironmentId: "${ENV_VAR_CONFLUENT_ENV_ID:-dev}"
confluentClusterId: "${ENV_VAR_CONFLUENT_CLUSTER_ID:-main}"
```
## Related resources
* [Automate with API](/guide/conduktor-in-production/automate/api-automation)
* [View Console resource reference](/guide/reference/console-reference)
* [Give us feedback/request a feature](https://conduktor.io/roadmap)