Topic list
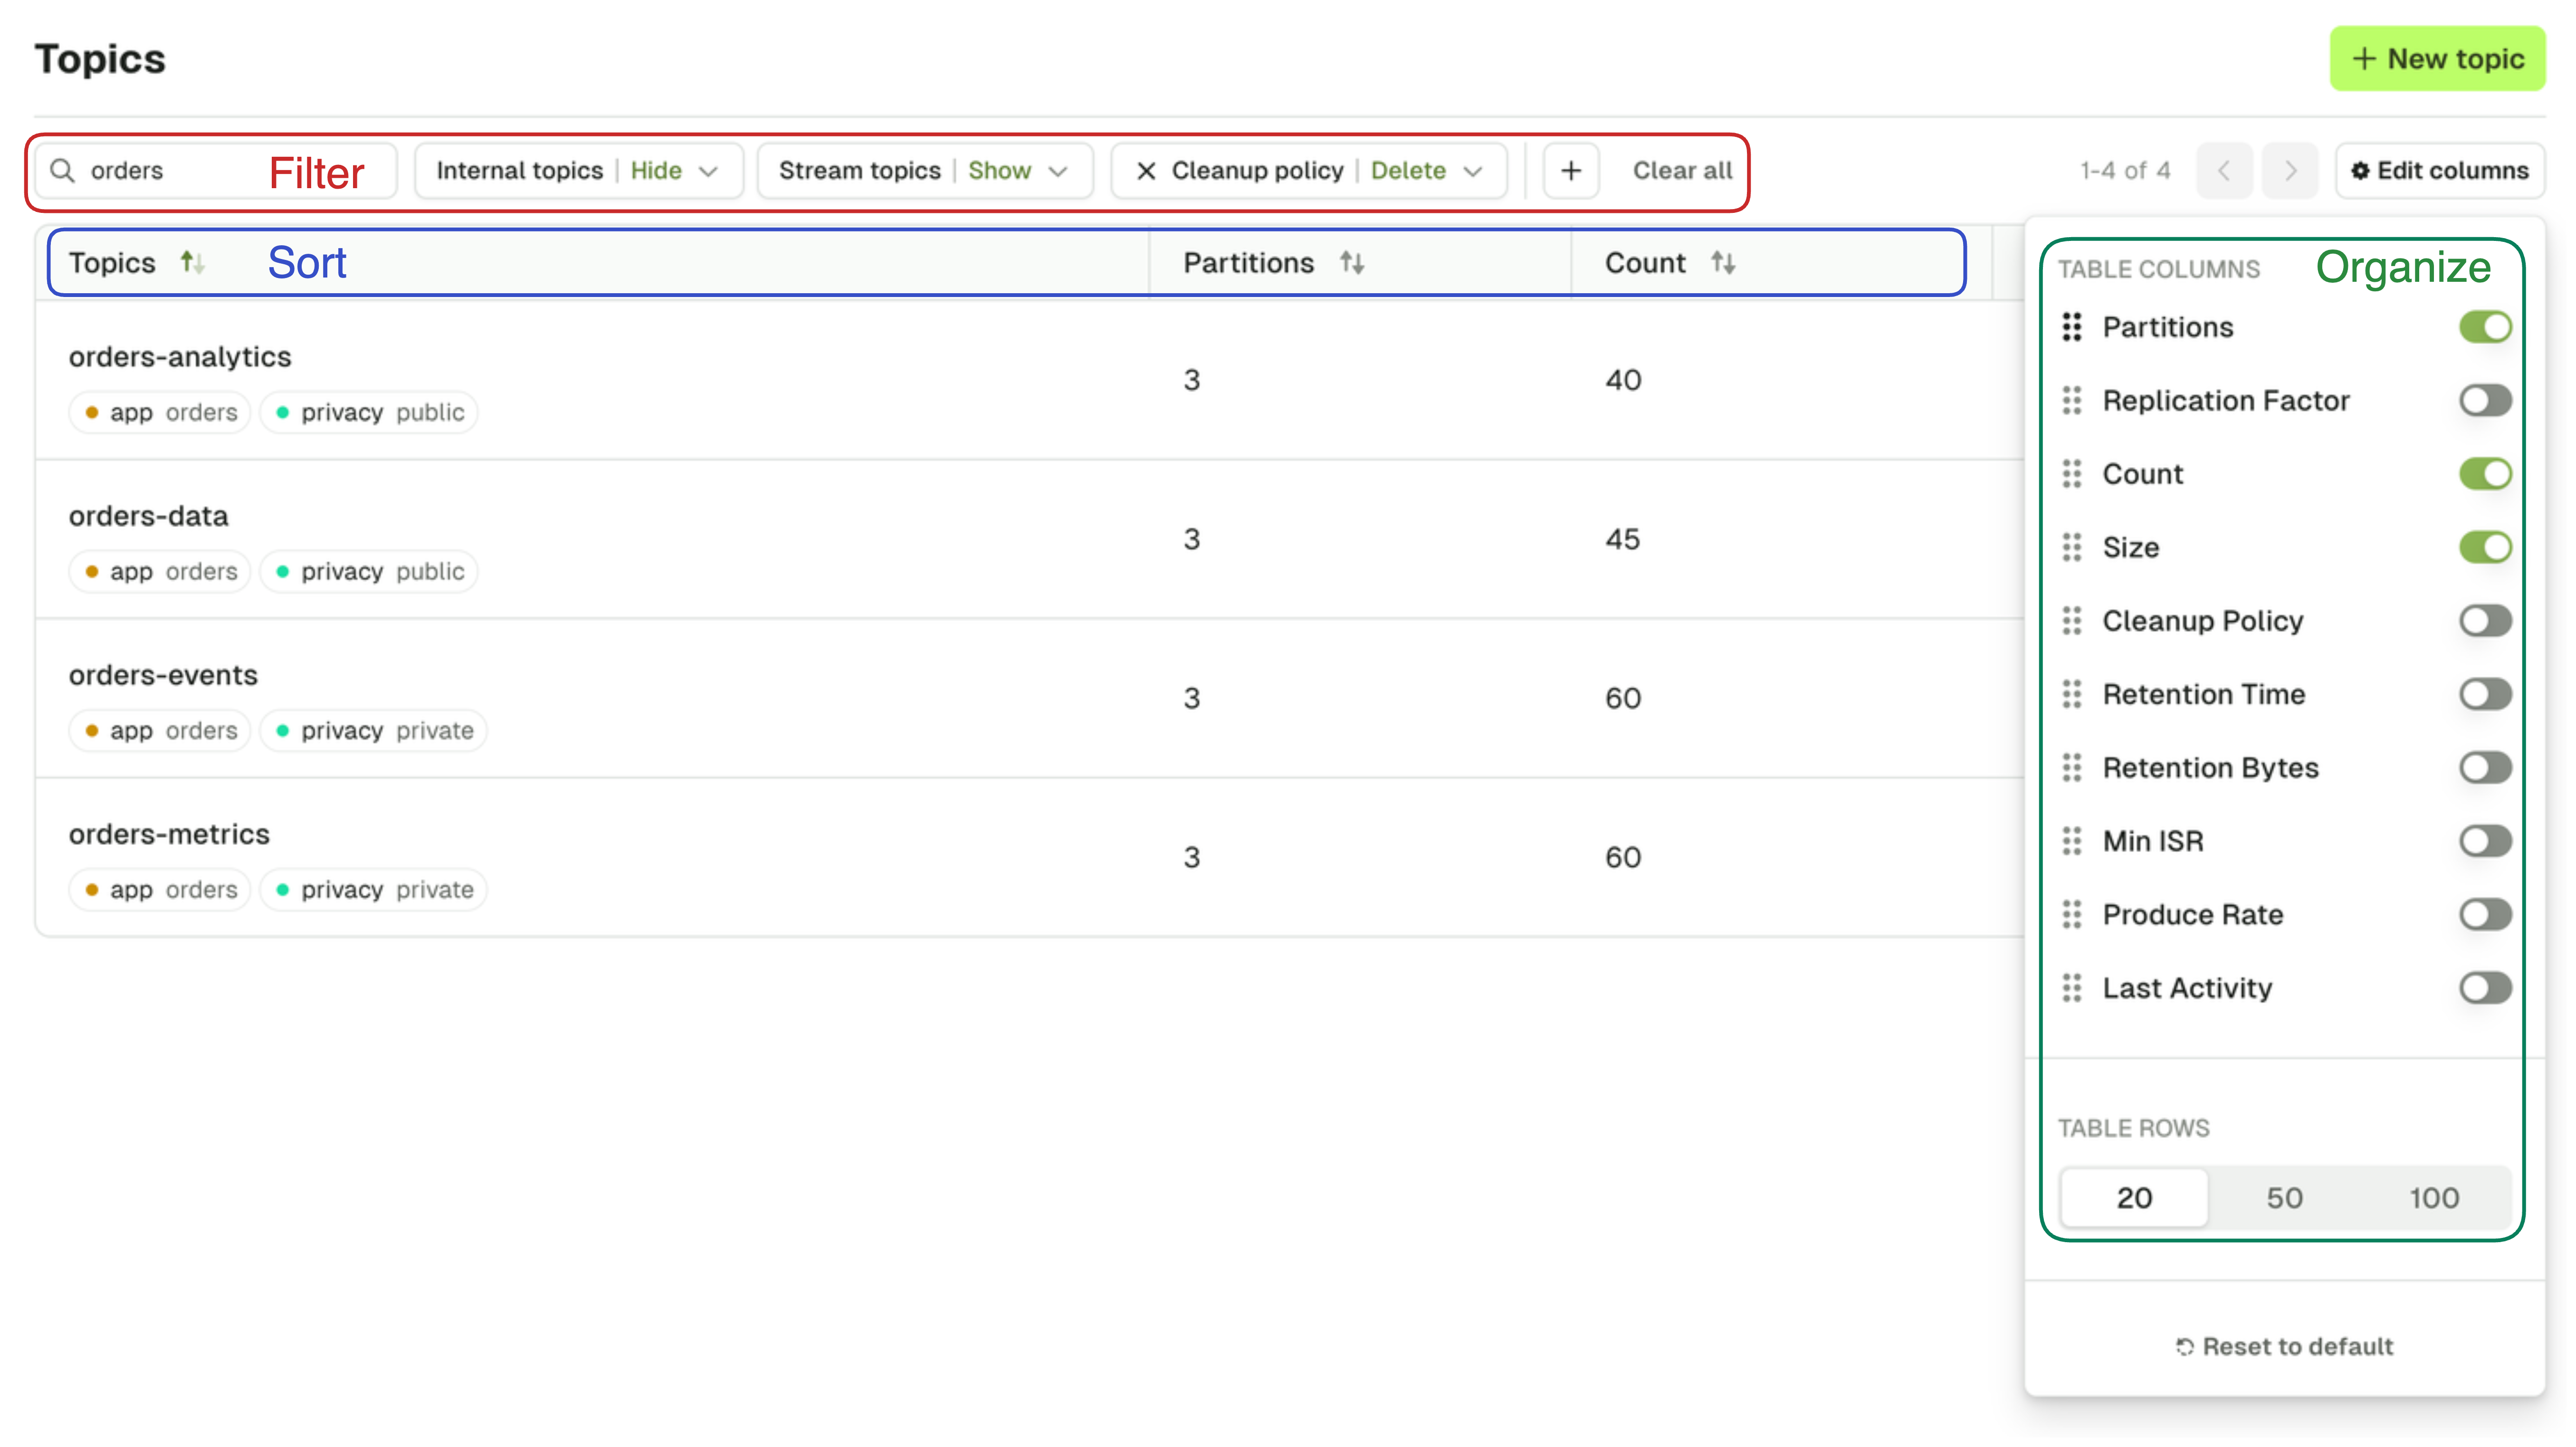
The Topic page lets you search for any topic on your currently selected Kafka cluster.To restrict user/group access to view or manage certain topics, configure RBAC.
- Topic name
- Show/Hide Internal topics (starts with
_) - Show/Hide Kafka stream topics (ends with
-repartitionor-changelog) - Cleanup policy
- Labels (click on a label to add/remove it from the filters. Find out about managing topic labels).
Your current filters, active sort, and visible columns are stored in your browser’s local storage for each Kafka cluster and persist across sessions.
Operations
Several actions are also available from the topic List: create, empty or delete topics and add partitions.Create topic
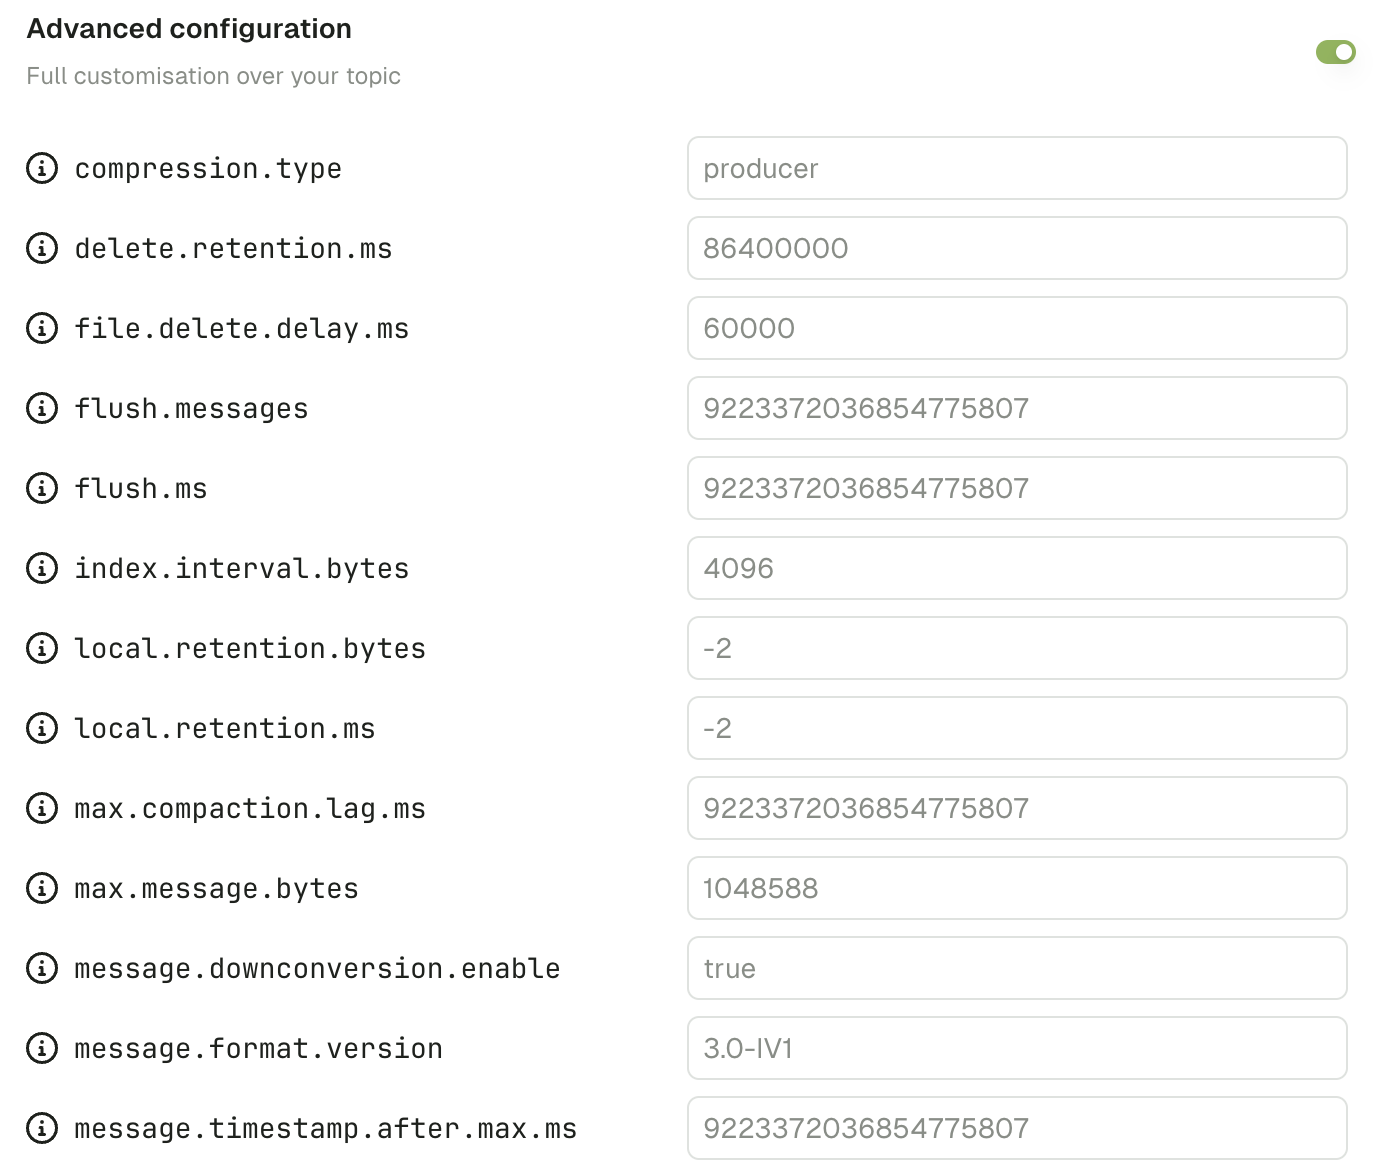
In the Create Topic page, you can provide all the necessary information to create a topic.The default choices made by are generally safe for most typical Kafka production deployments. Find out about choosing the replication factor and partition count and Kafka cleanup policies .
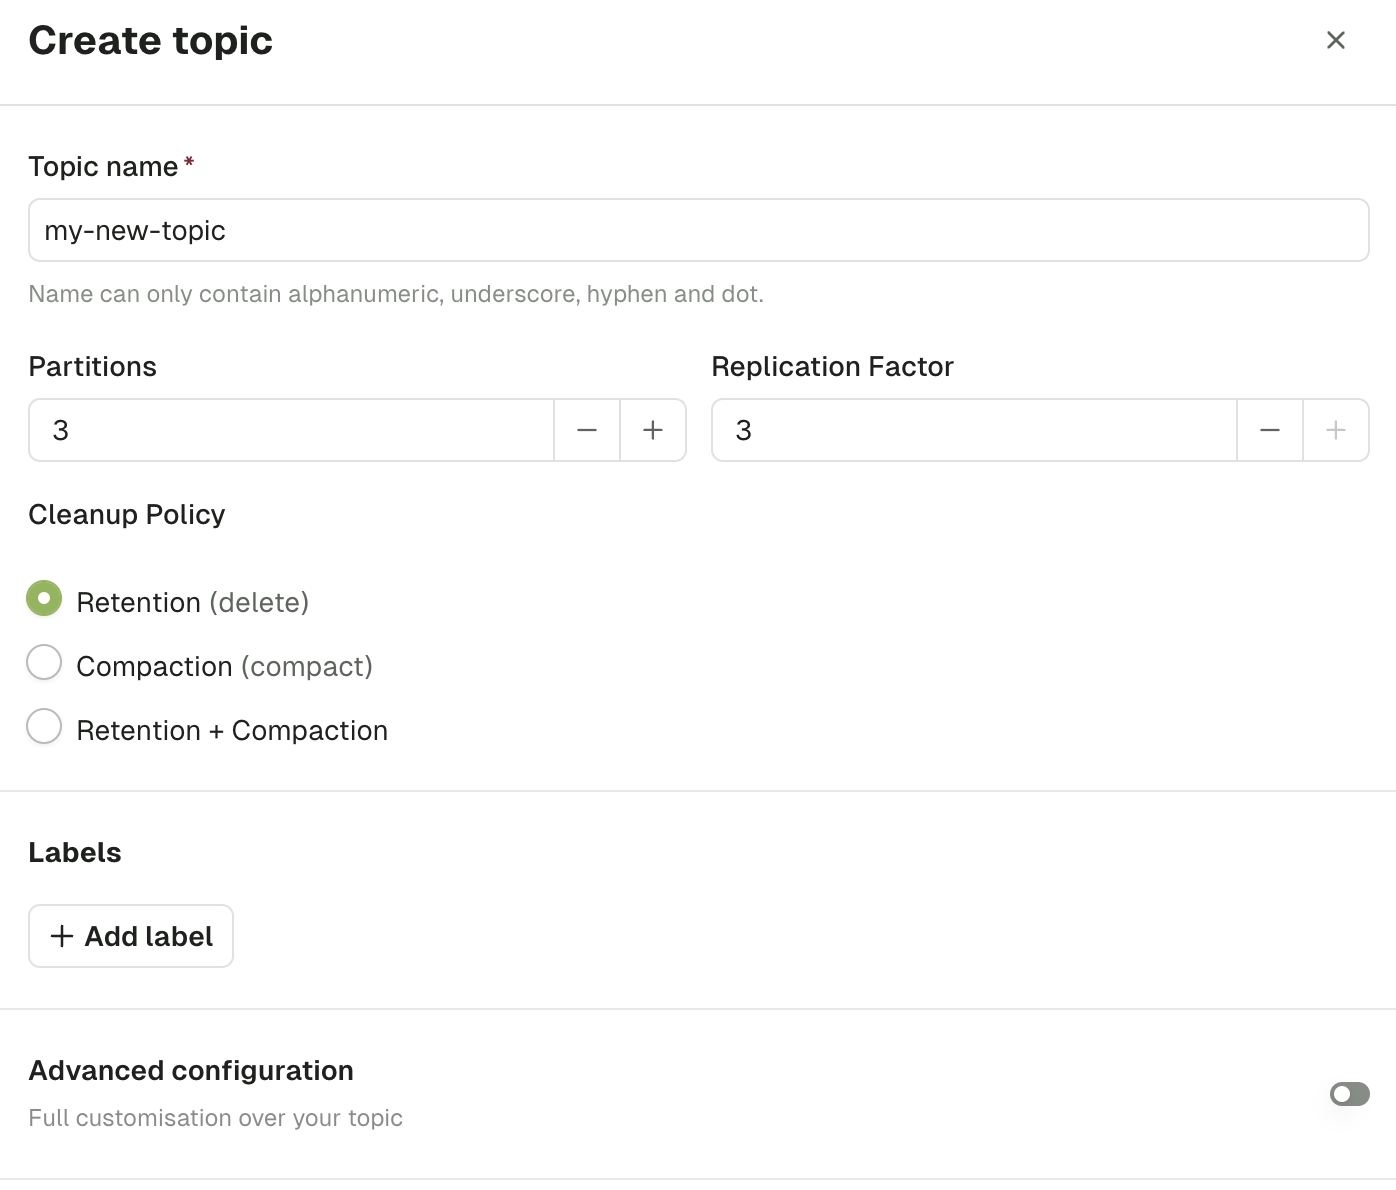
{{placeholder}} values, such as a team name — replace them before you submit.
Topic name
As per Kafka specification , topic name must only contain the following characters [a-zA-Z0-9._-] and not exceed 249 characters.
Partitions
This lets you define how scalable your topic will be for your consumers. In general you want a multiple of your number of brokers.
Default: 3
Replication factor
This configuration helps prevent data loss by writing the same data to more than one broker.
Default: min (3, number of brokers)
Use the Insights dashboard to identify topics with low replication factors or partition distribution issues that may pose risks to your infrastructure.
Add partitions
Increase the number of partitions for your topic. Number of partitions cannot be decreased.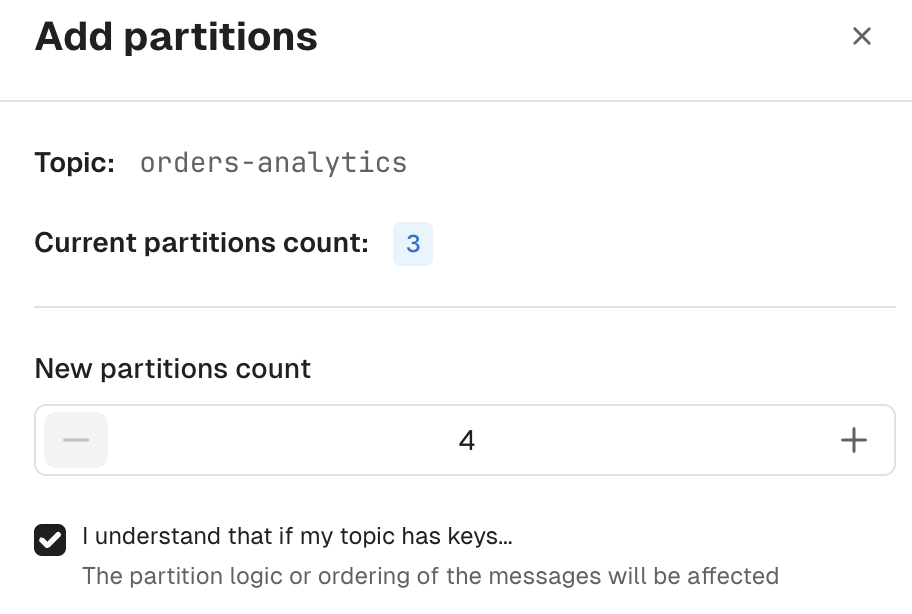
Empty topic
This lets you delete all records from a topic. This operation is permanent and irreversible. If you want to only delete all records from given partition, there’s a dedicated operation on the partitions tab of the topic detail.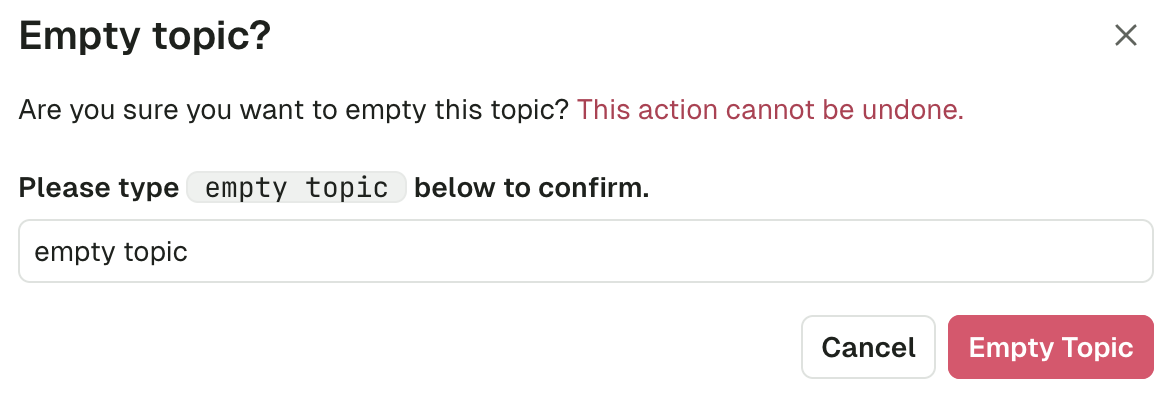
Delete topic
This lets you delete the topic from Kafka. This operation is permanent and irreversible.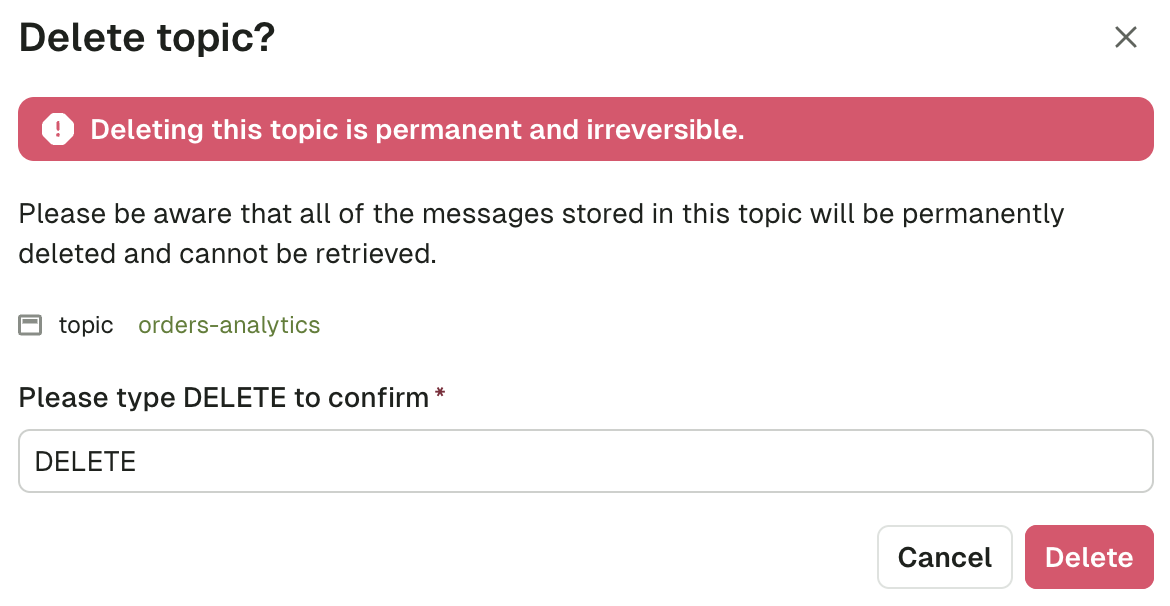
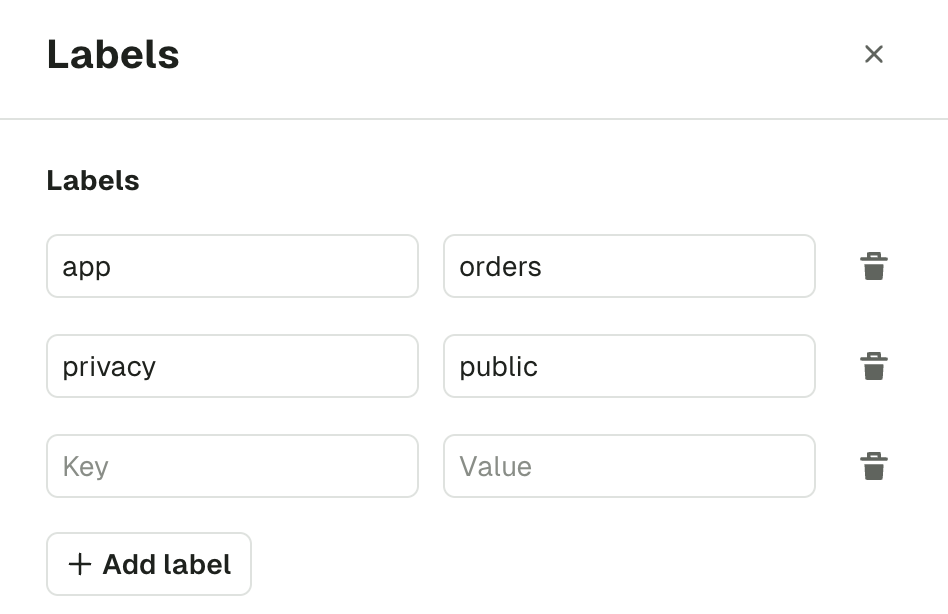
Manage topic labels
You can help categorize your topics further using key-value pairs called labels. To manage your topic’s labels via the UI, click on the topic and Edit from the topic details view.
Topic produce overview
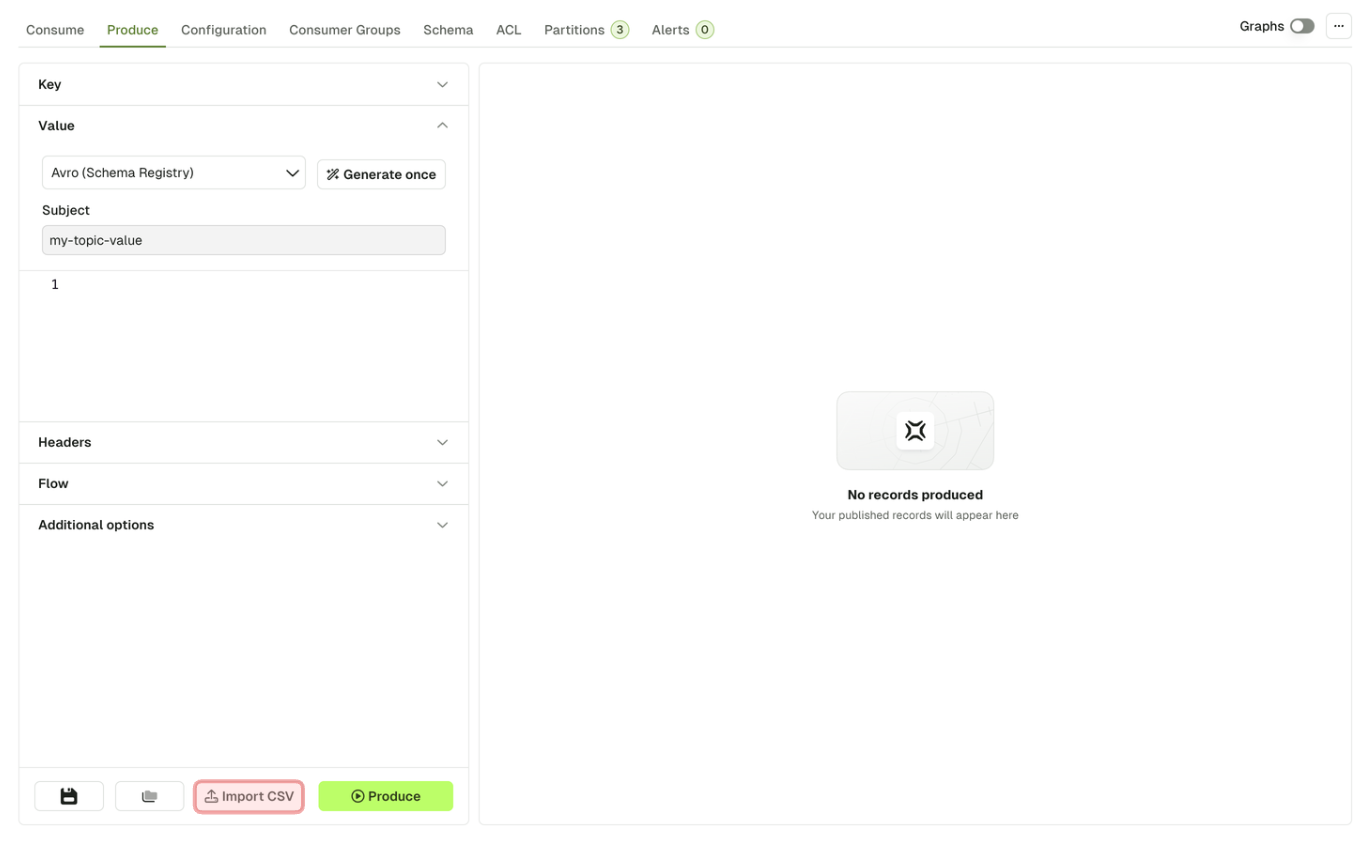
The produce page lets you configure all the details necessary to produce a record in your current Kafka topic. It is already configured with sensible defaults that you can customize if necessary.Configure producer
Each section from the accordion menu will allow you to configure the Kafka producer further: key, value, headers, flow and additional options.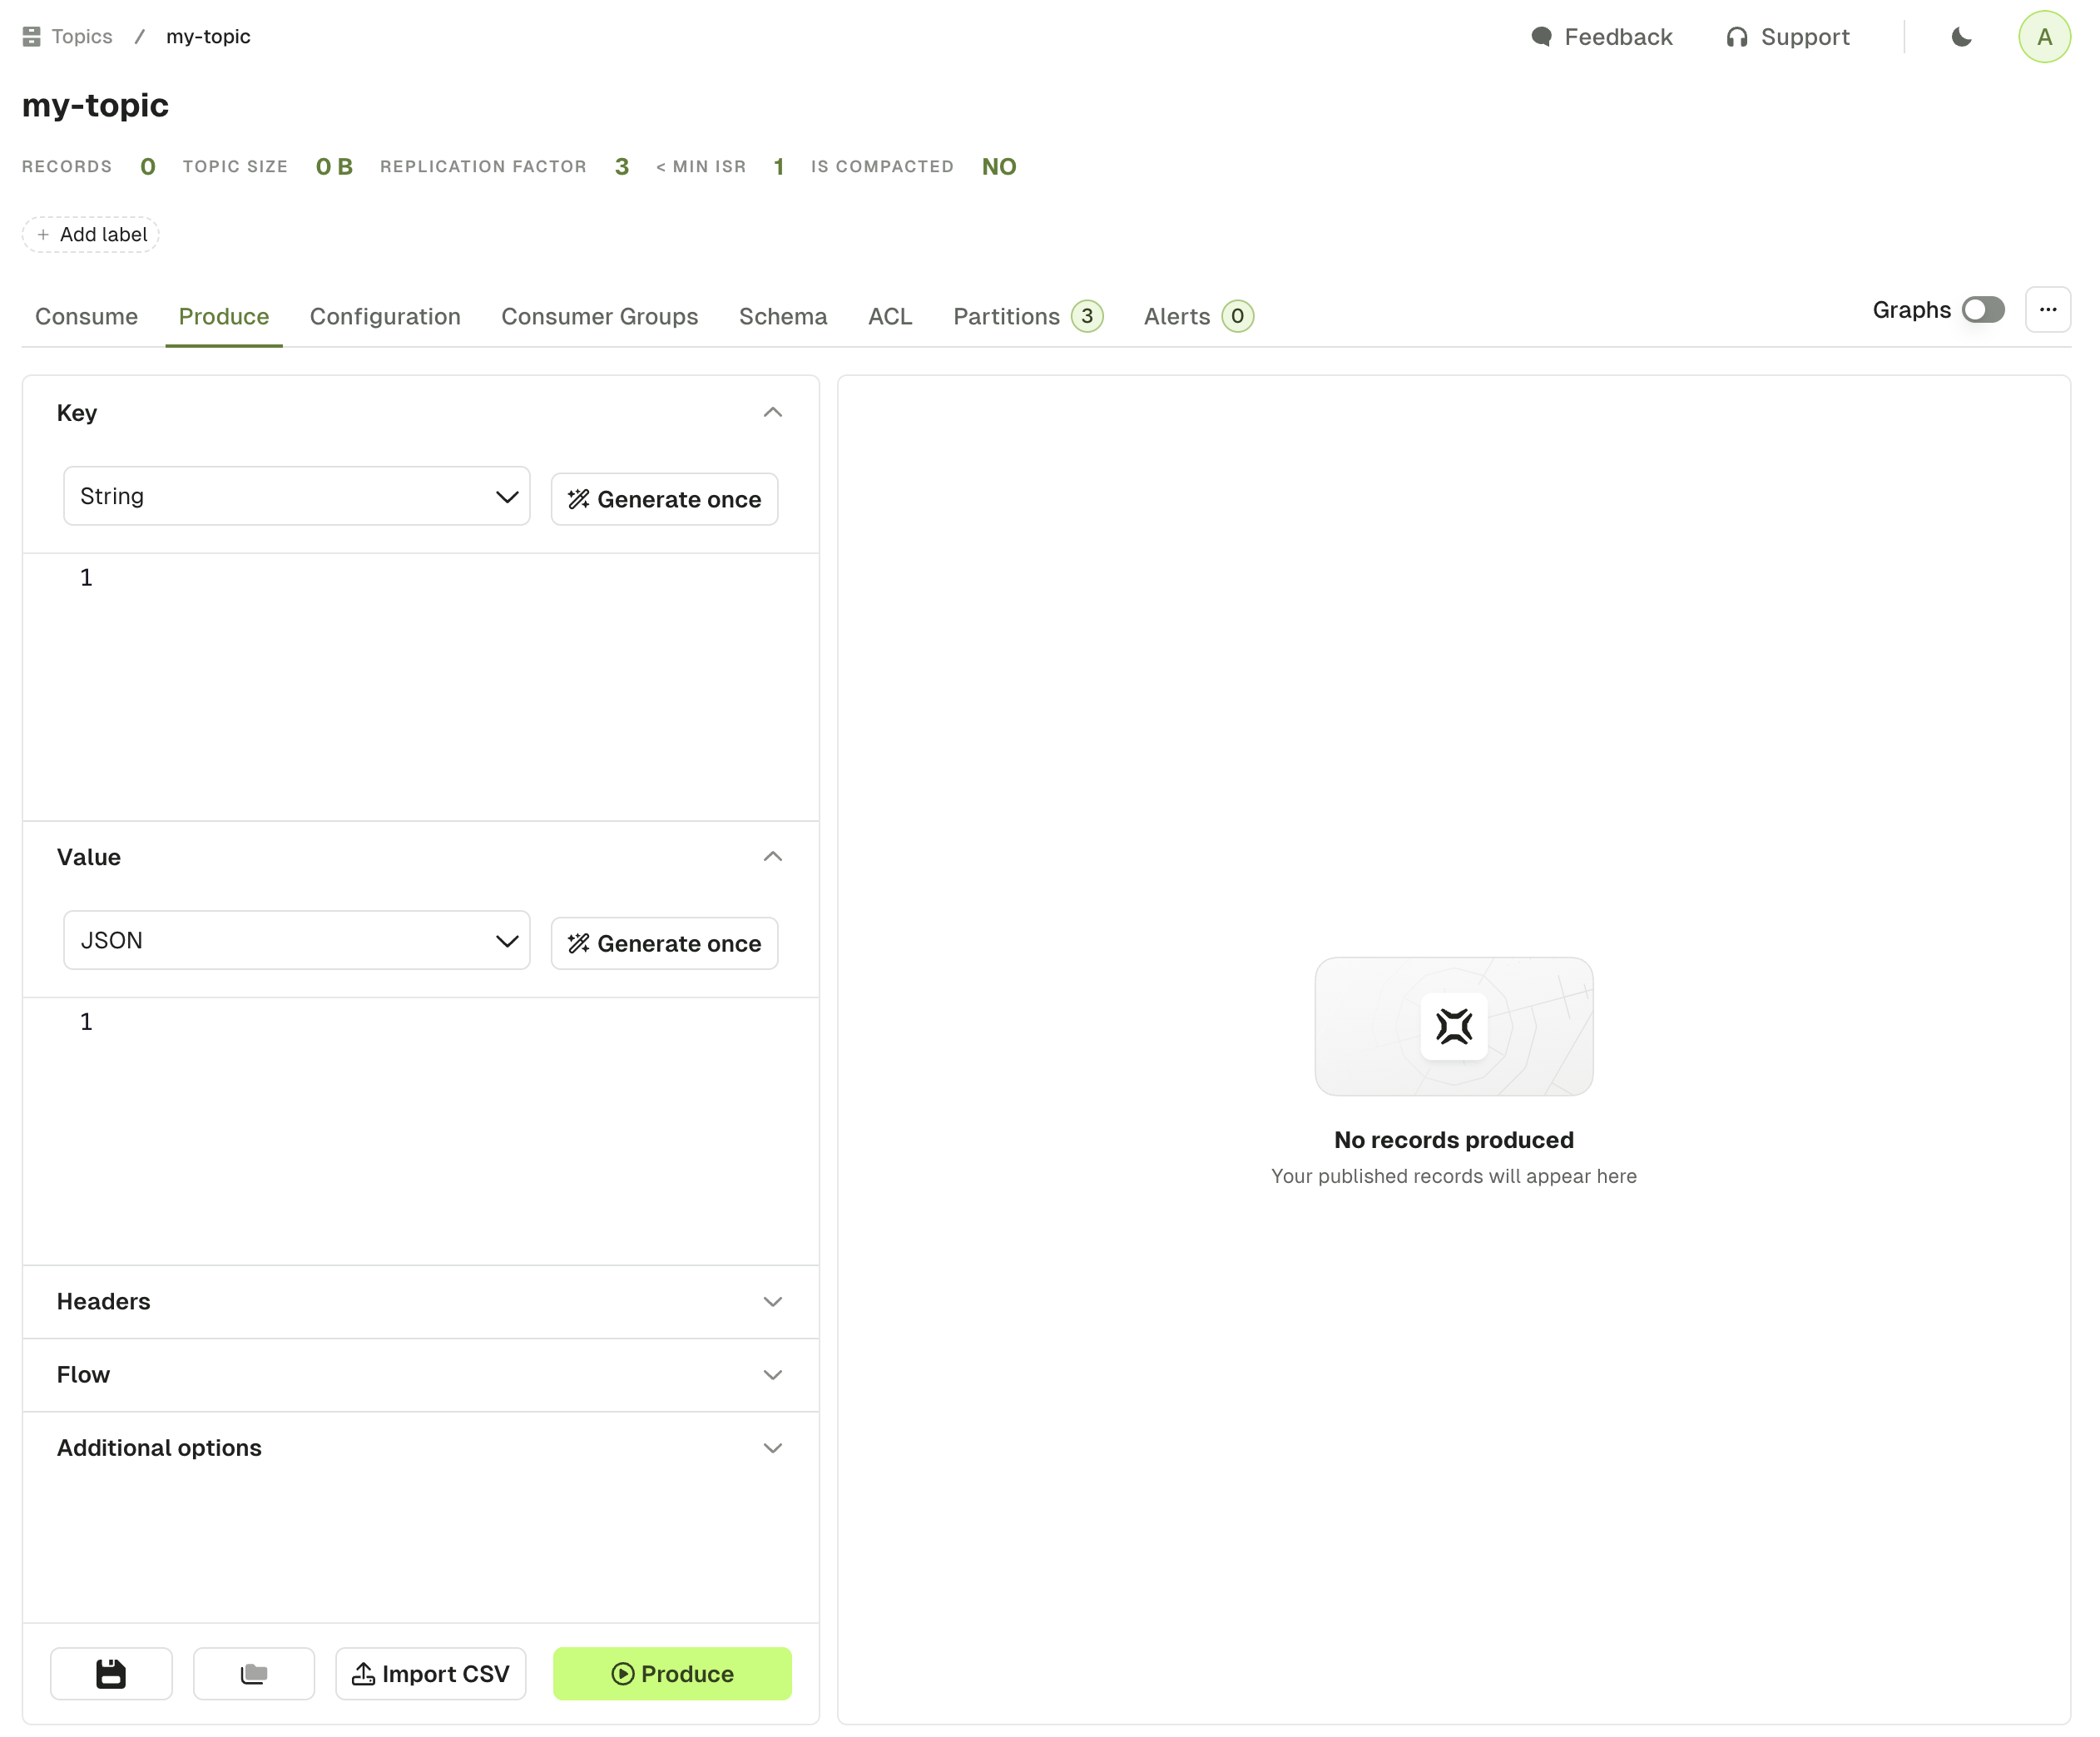
Key and value
This section is similar for both key and value. The menu lets you choose your serializer to encode your message.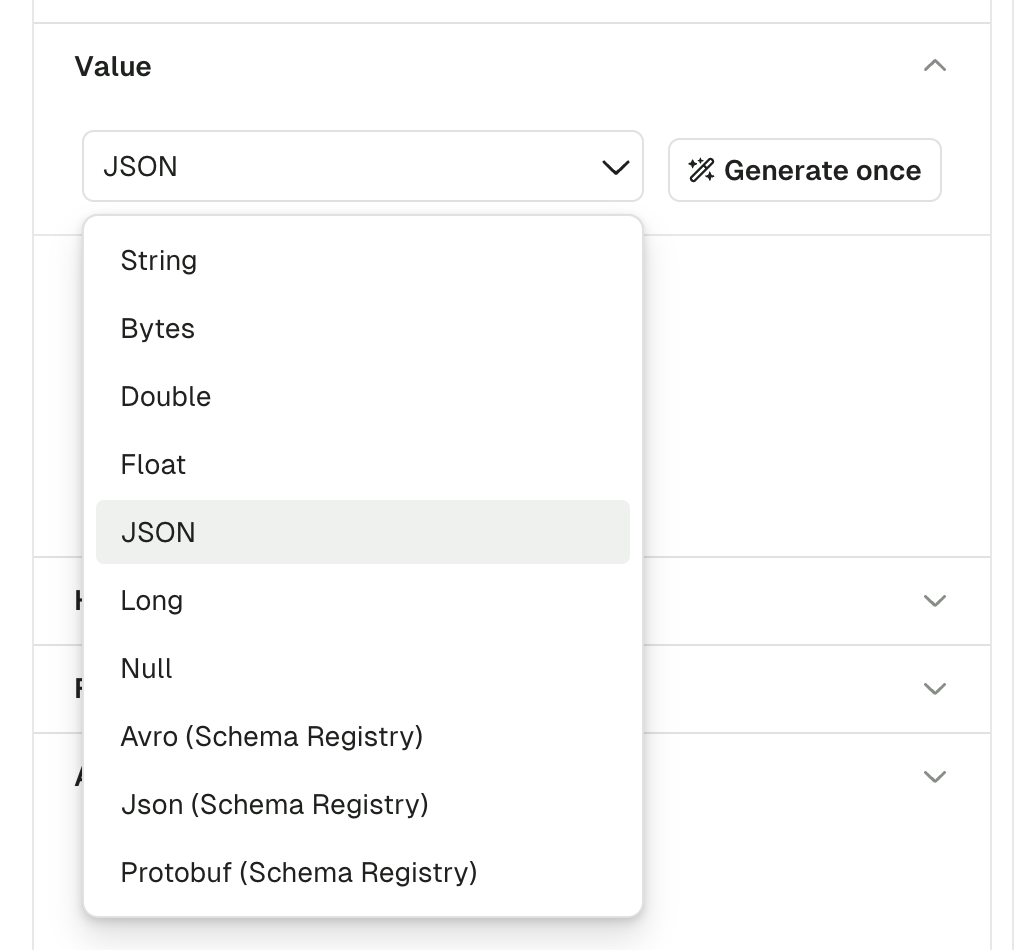
<topic-name>-key for the key and <topic-name>-value for the value.
Confluent subject strategies
When producing messages with a schema registry, Conduktor supports Confluent subject strategies, providing control over how schemas are referenced. This gives users flexibility in schema organization and naming conventions, enabling support for different strategies based on your use case (TopicName, RecordName, TopicRecordName strategies). You can configure these strategies directly from the produce page when working with topics that use schema registry.Random data generator
Click Generate once to generate a message that conforms to the selected serializer. This works with schema registry serializers as well: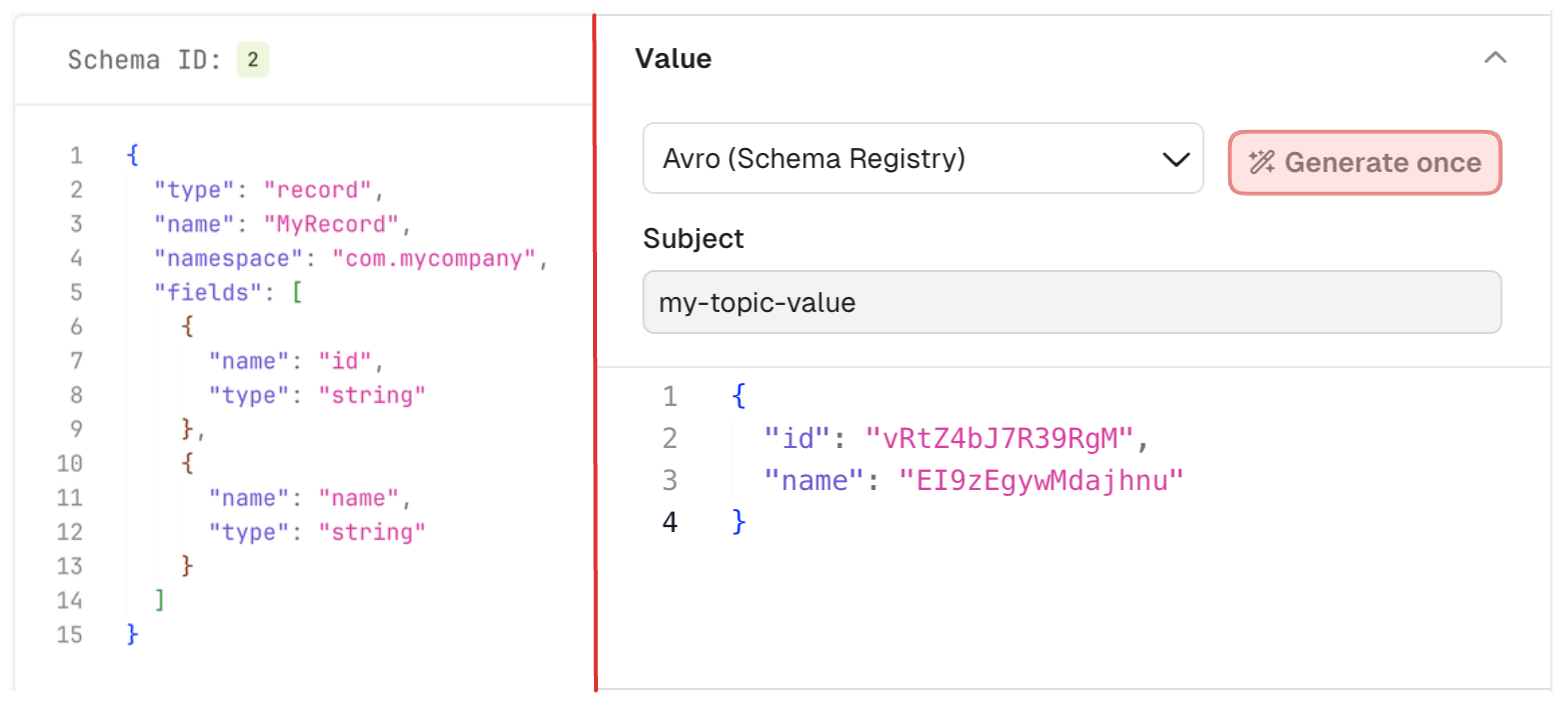
Headers
This section lets you add headers to your message. Header key and header value both expect valid UTF8 string.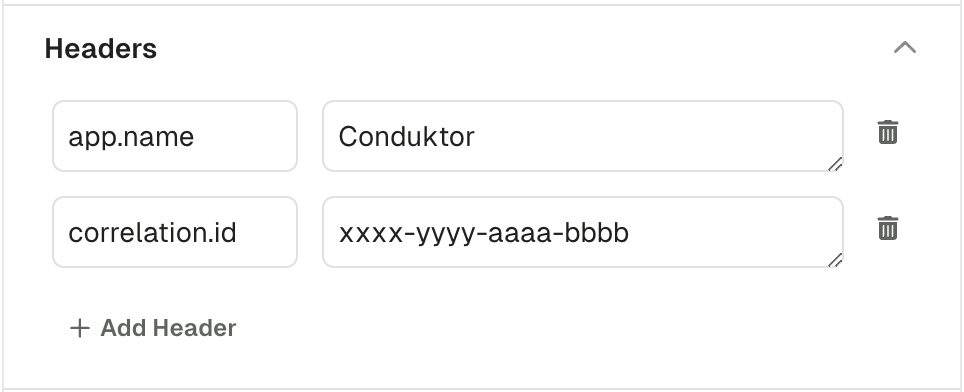
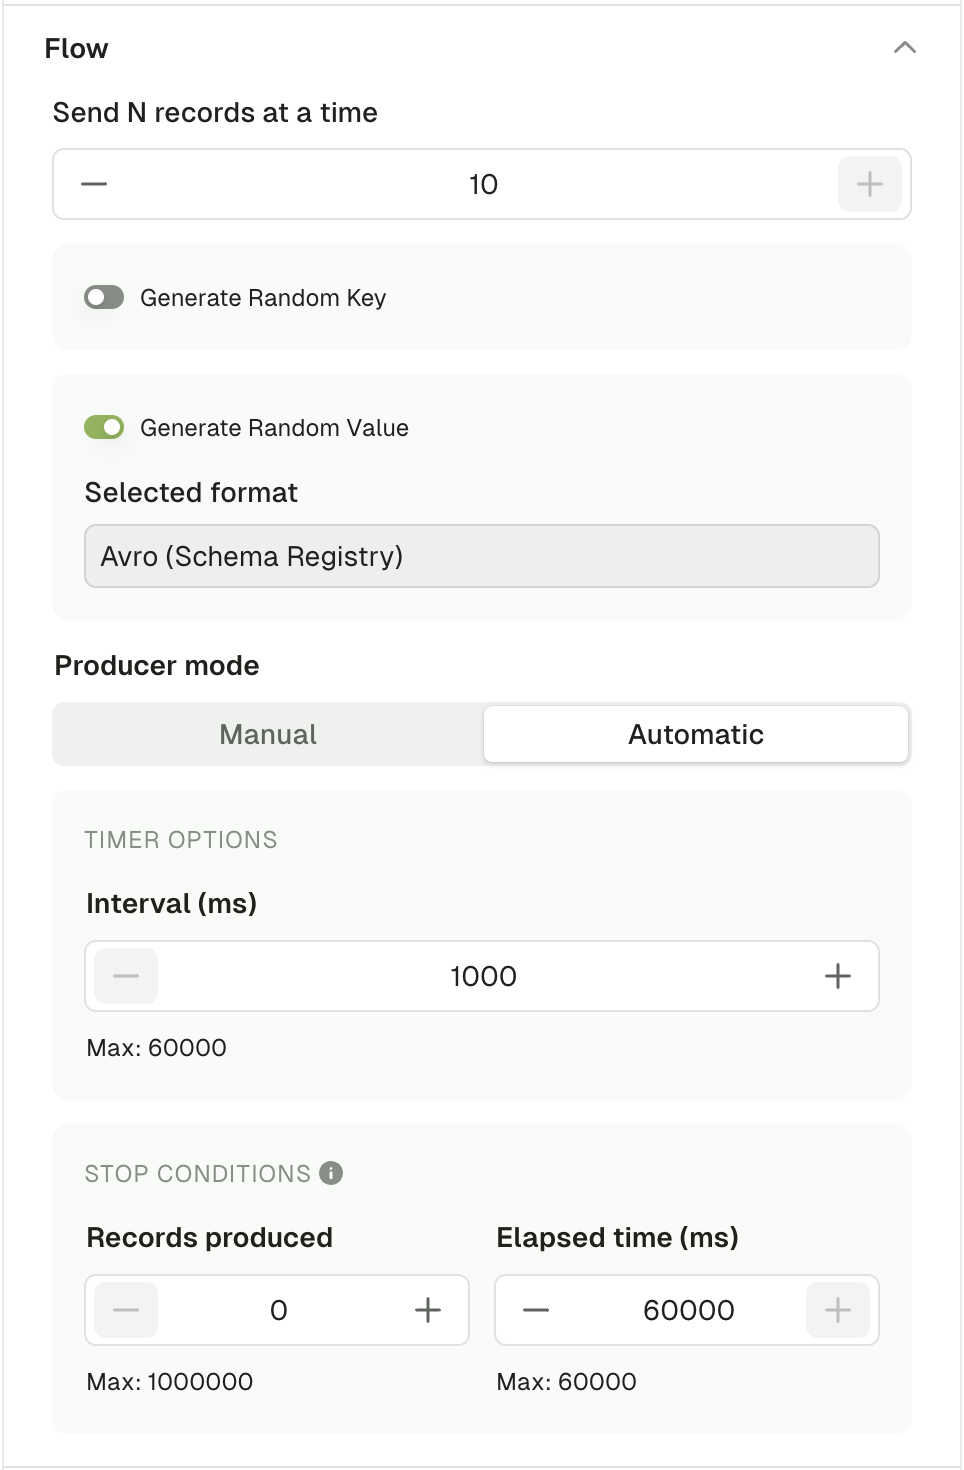
Flow
Using the flow mode, you can produce multiple records in one go or configure a live producer that will produce records at a configurable rate. Send N records at a time Define how many messages should be produced every time you click Produce. Default: 1 Range: [1, 10] Generate random key/value Enable this option to generate a different message each time you click Produce. When enabled, it will override the key or value configured above and will rely on the random data generator to produce messages (same as if you clicked Generate once before producing a record). When disabled, the producer will use the Key/Value configured above Default: disabled Producer mode Manual mode starts a single Kafka produce each time you click the Produce. Automatic mode starts a long running process that batches several Kafka produce. Interval (ms): The interval between each produce batch in milliseconds. Range: [1000, 60000] Stop conditions: The first met condition stops the producer- Number of records produced
- Stops the producer after that many records have been produced.
- Range: [0, 1000000]
- Elapsed time (ms)
- Stops the producer after a set period of time.
- Range: [0, 60000]
Additional options
Force partition This option lets you choose the partition where to produce your record. If set to all, it will use the DefaultPartitioner from KafkaClient 3.6+- StickyPartitioner when Key is null or
Utils.murmur2(serializedKey) % numPartitionsotherwise.
acks property of the producer.
Learn more about Kafka producer acks .
Default: all
Sensible defaults
The following are pre-configured by default:- If you have connected a schema registry and there’s a subject named
<topic-name>-keyand<topic-name>-value, the serializers will be populated automatically to the right type (Avro/Protobuf/JsonSchema); otherwise, theStringSerializerwill be picked. - A single header
app.name=Conduktorwill be added
Produced messages panel
Kafka records produced through this screen will be available from the produced message panel, which acts similarly as the consume page, allowing you to review your produced record and check the key, value, headers and metadata.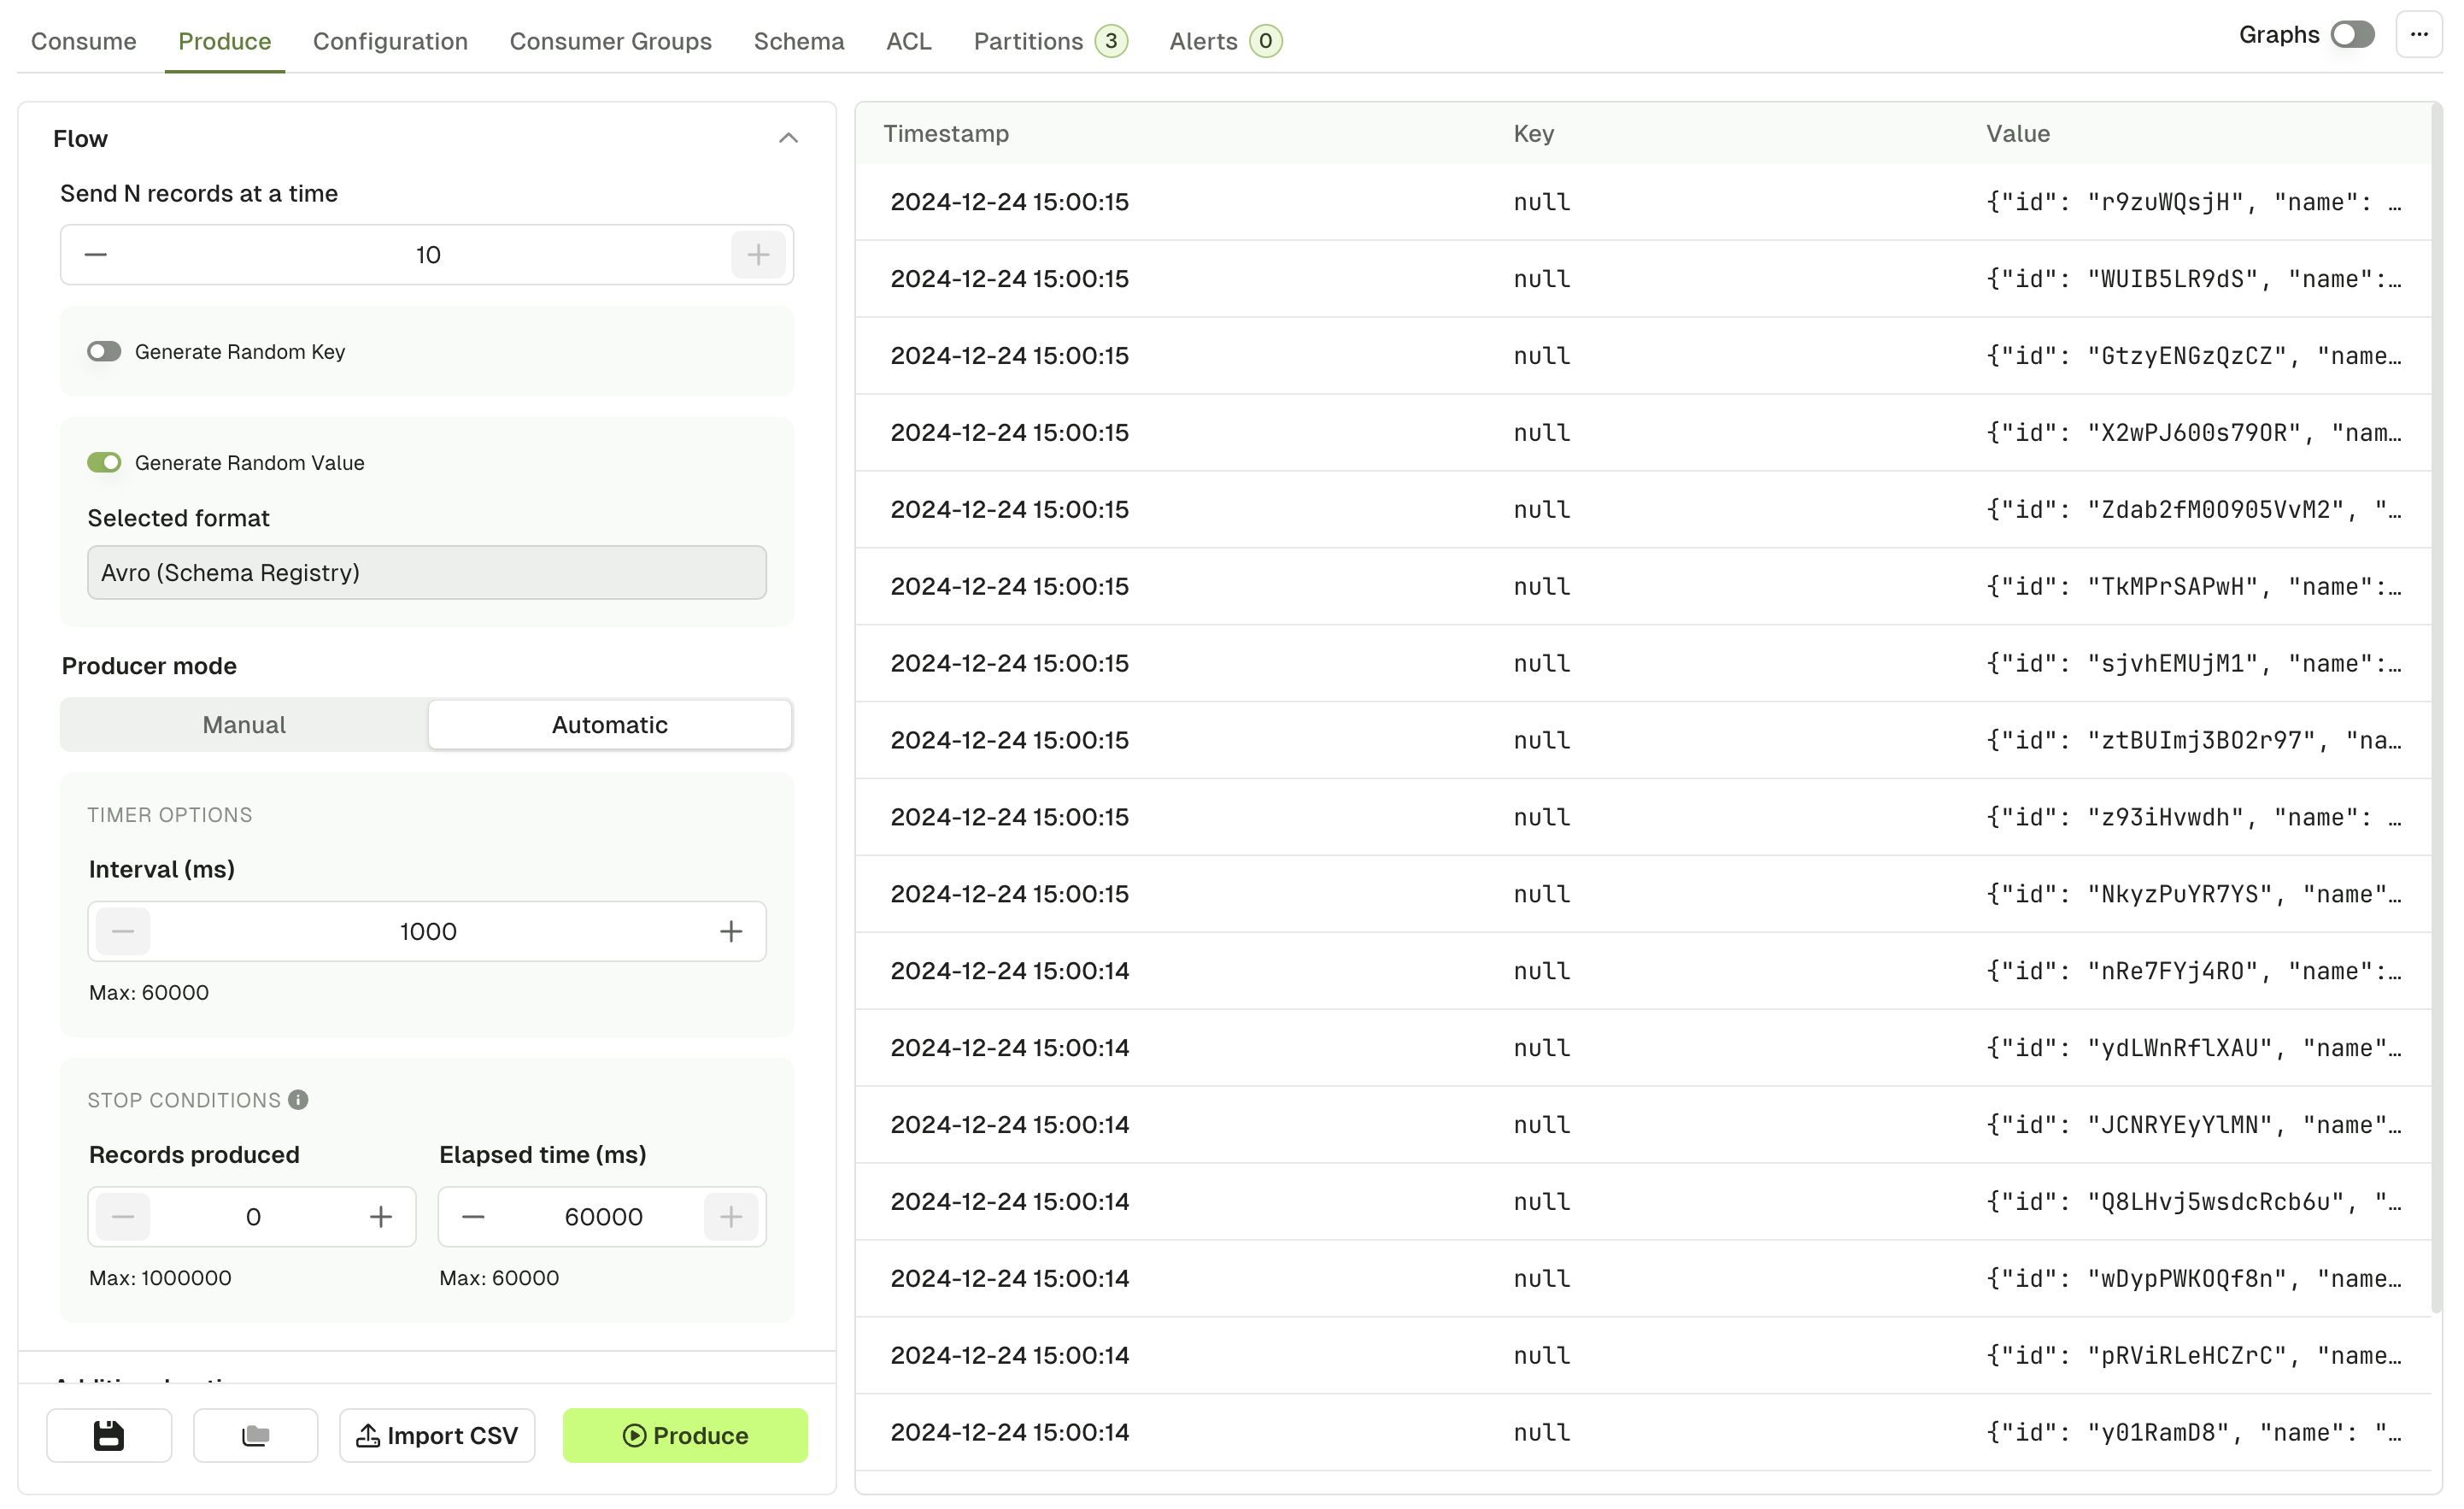
Operations
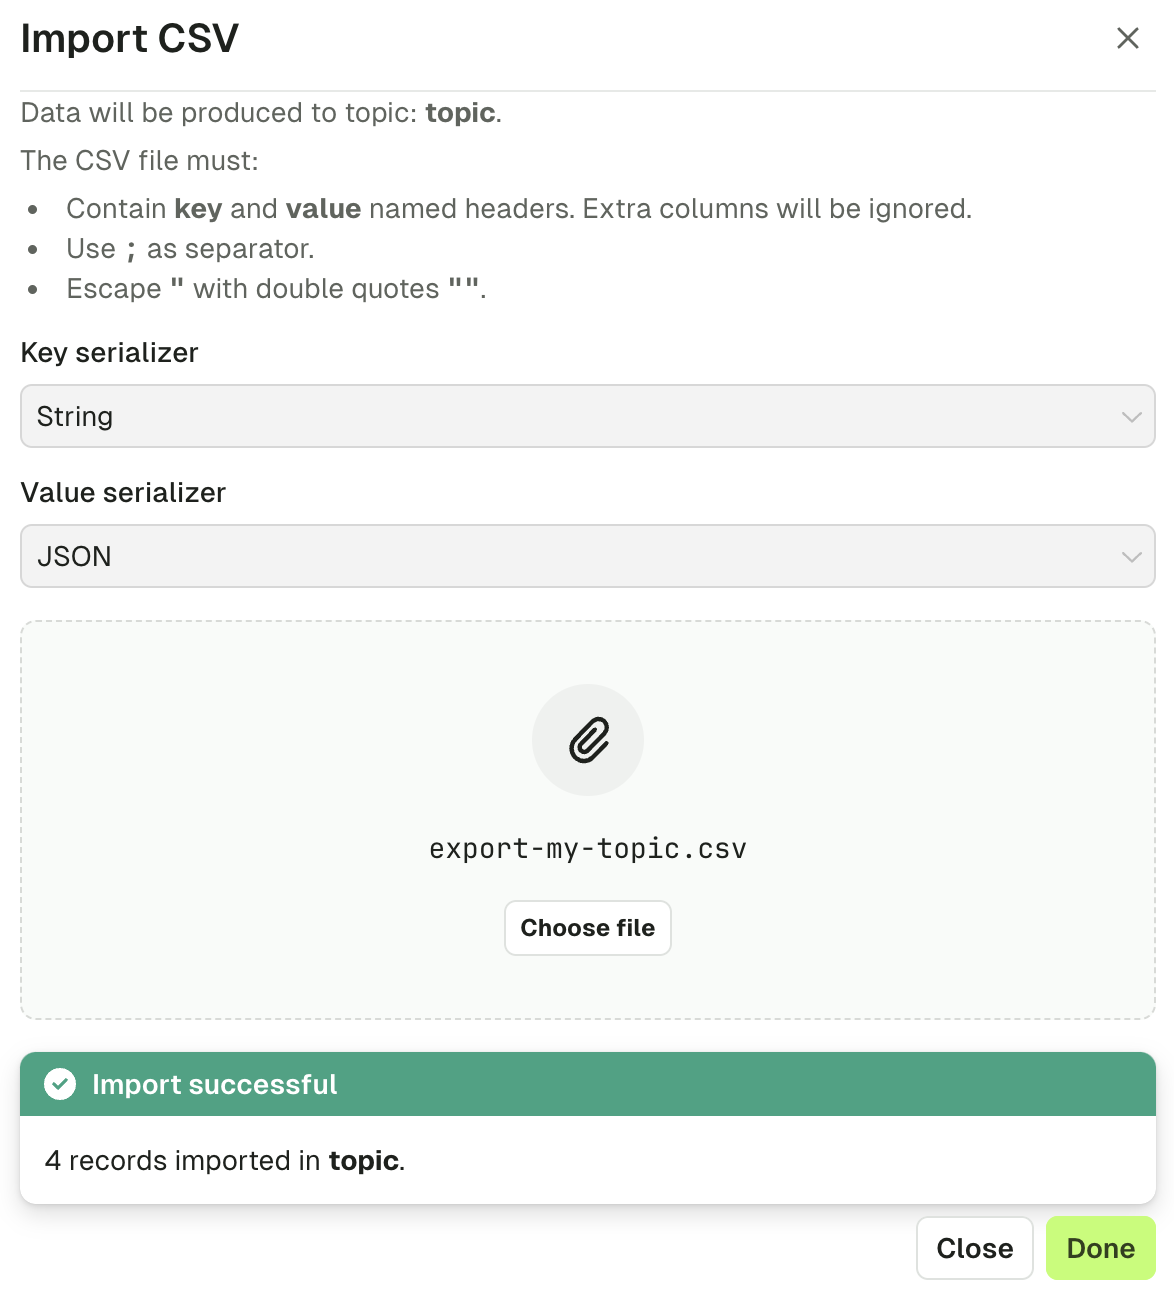
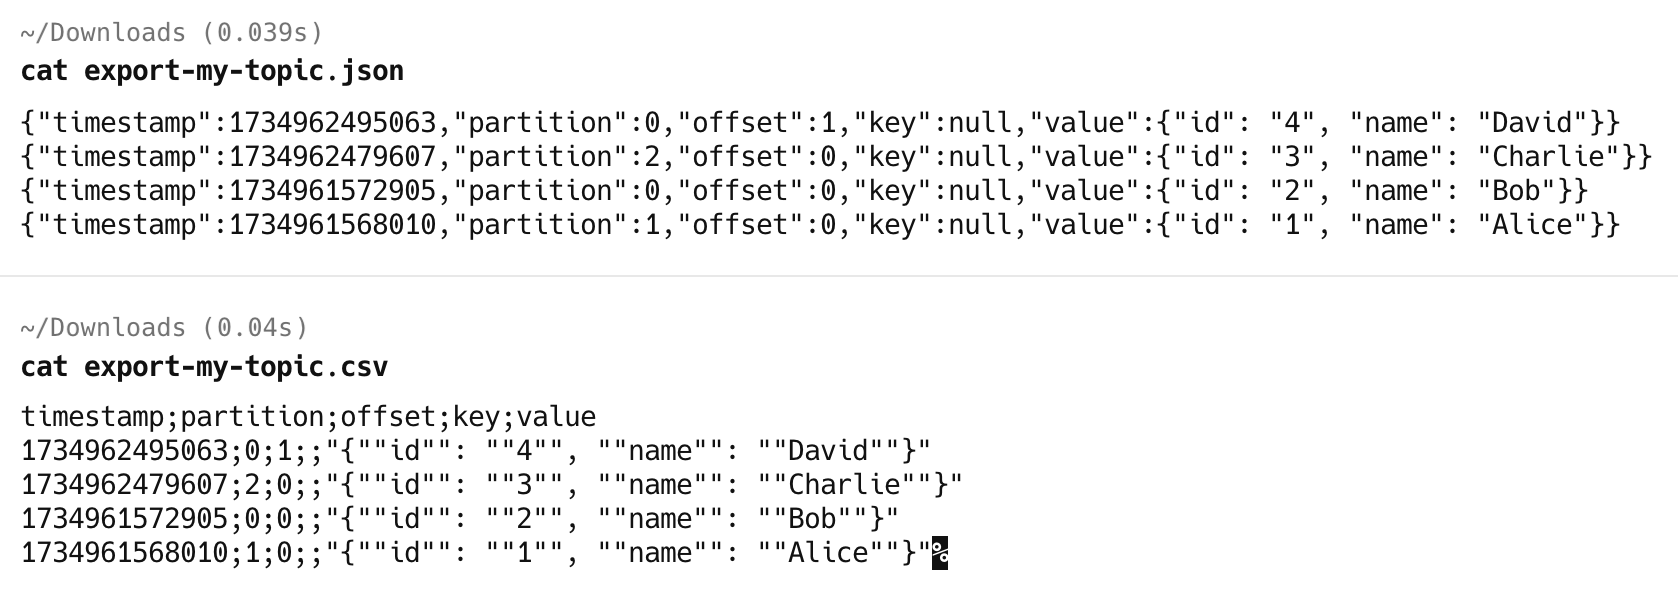
Import CSV
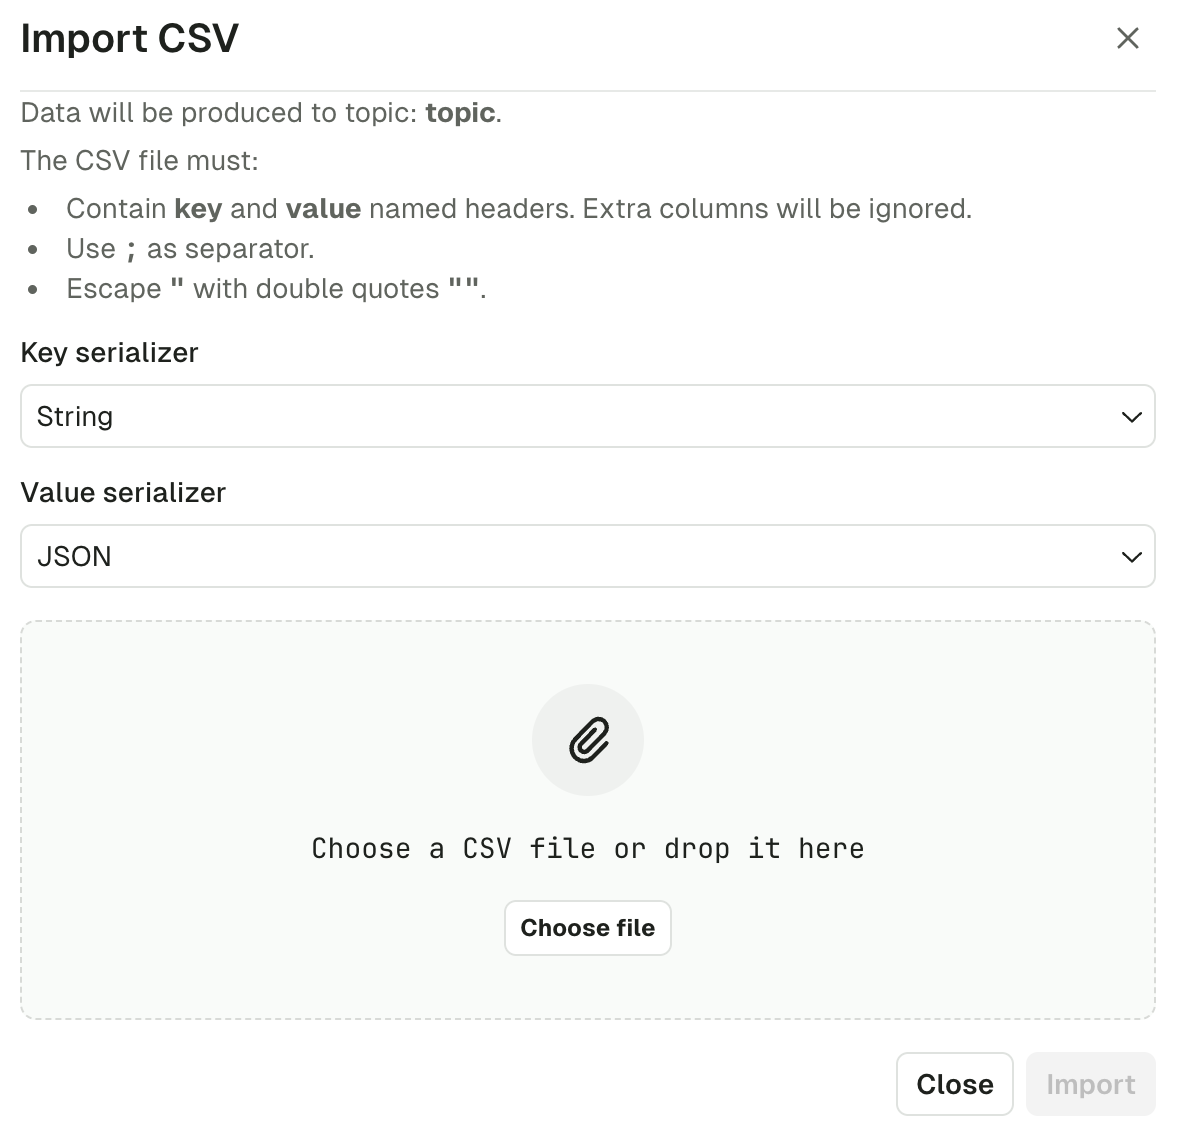
- named headers
keyandvaluemust be present. Additional columns will be ignored. - the separator must be
; - double-quoting a field
"is optional unless it contains either"or;, then it’s mandatory - escape double-quotes by doubling them
""
Save and load producer templates
If you are regularly using the same set of producer configuration, you can save your current settings as a template for reuse. At the bottom of the produce page, click Save and enter the name for this template. Click Load to see the available templates.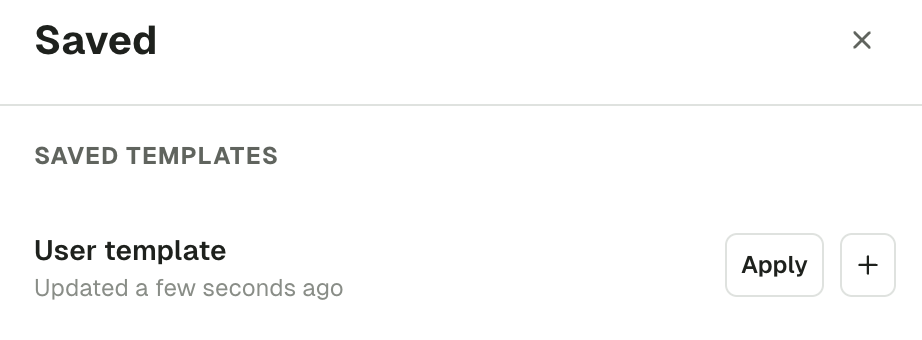
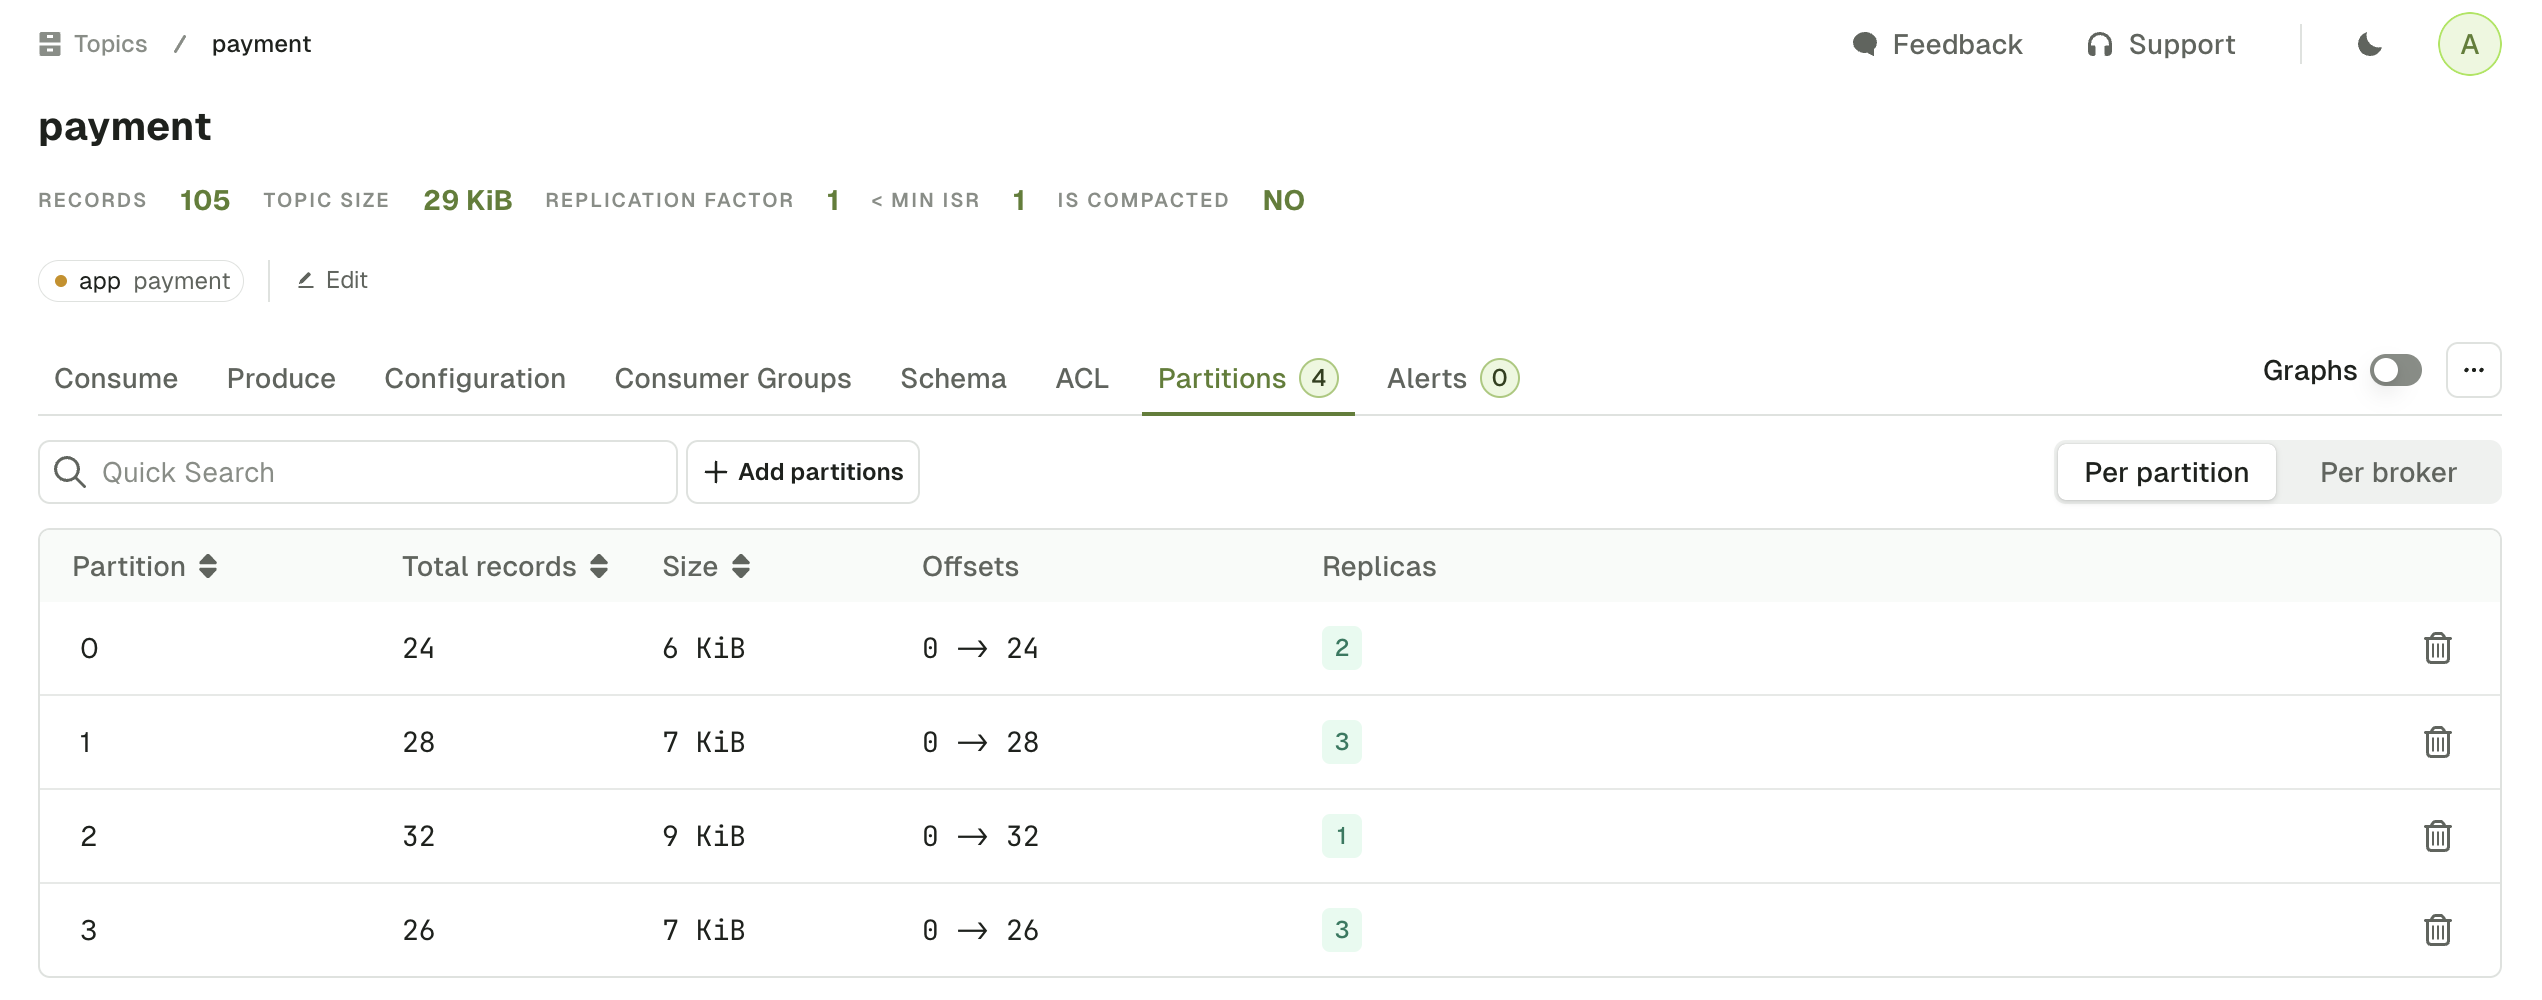
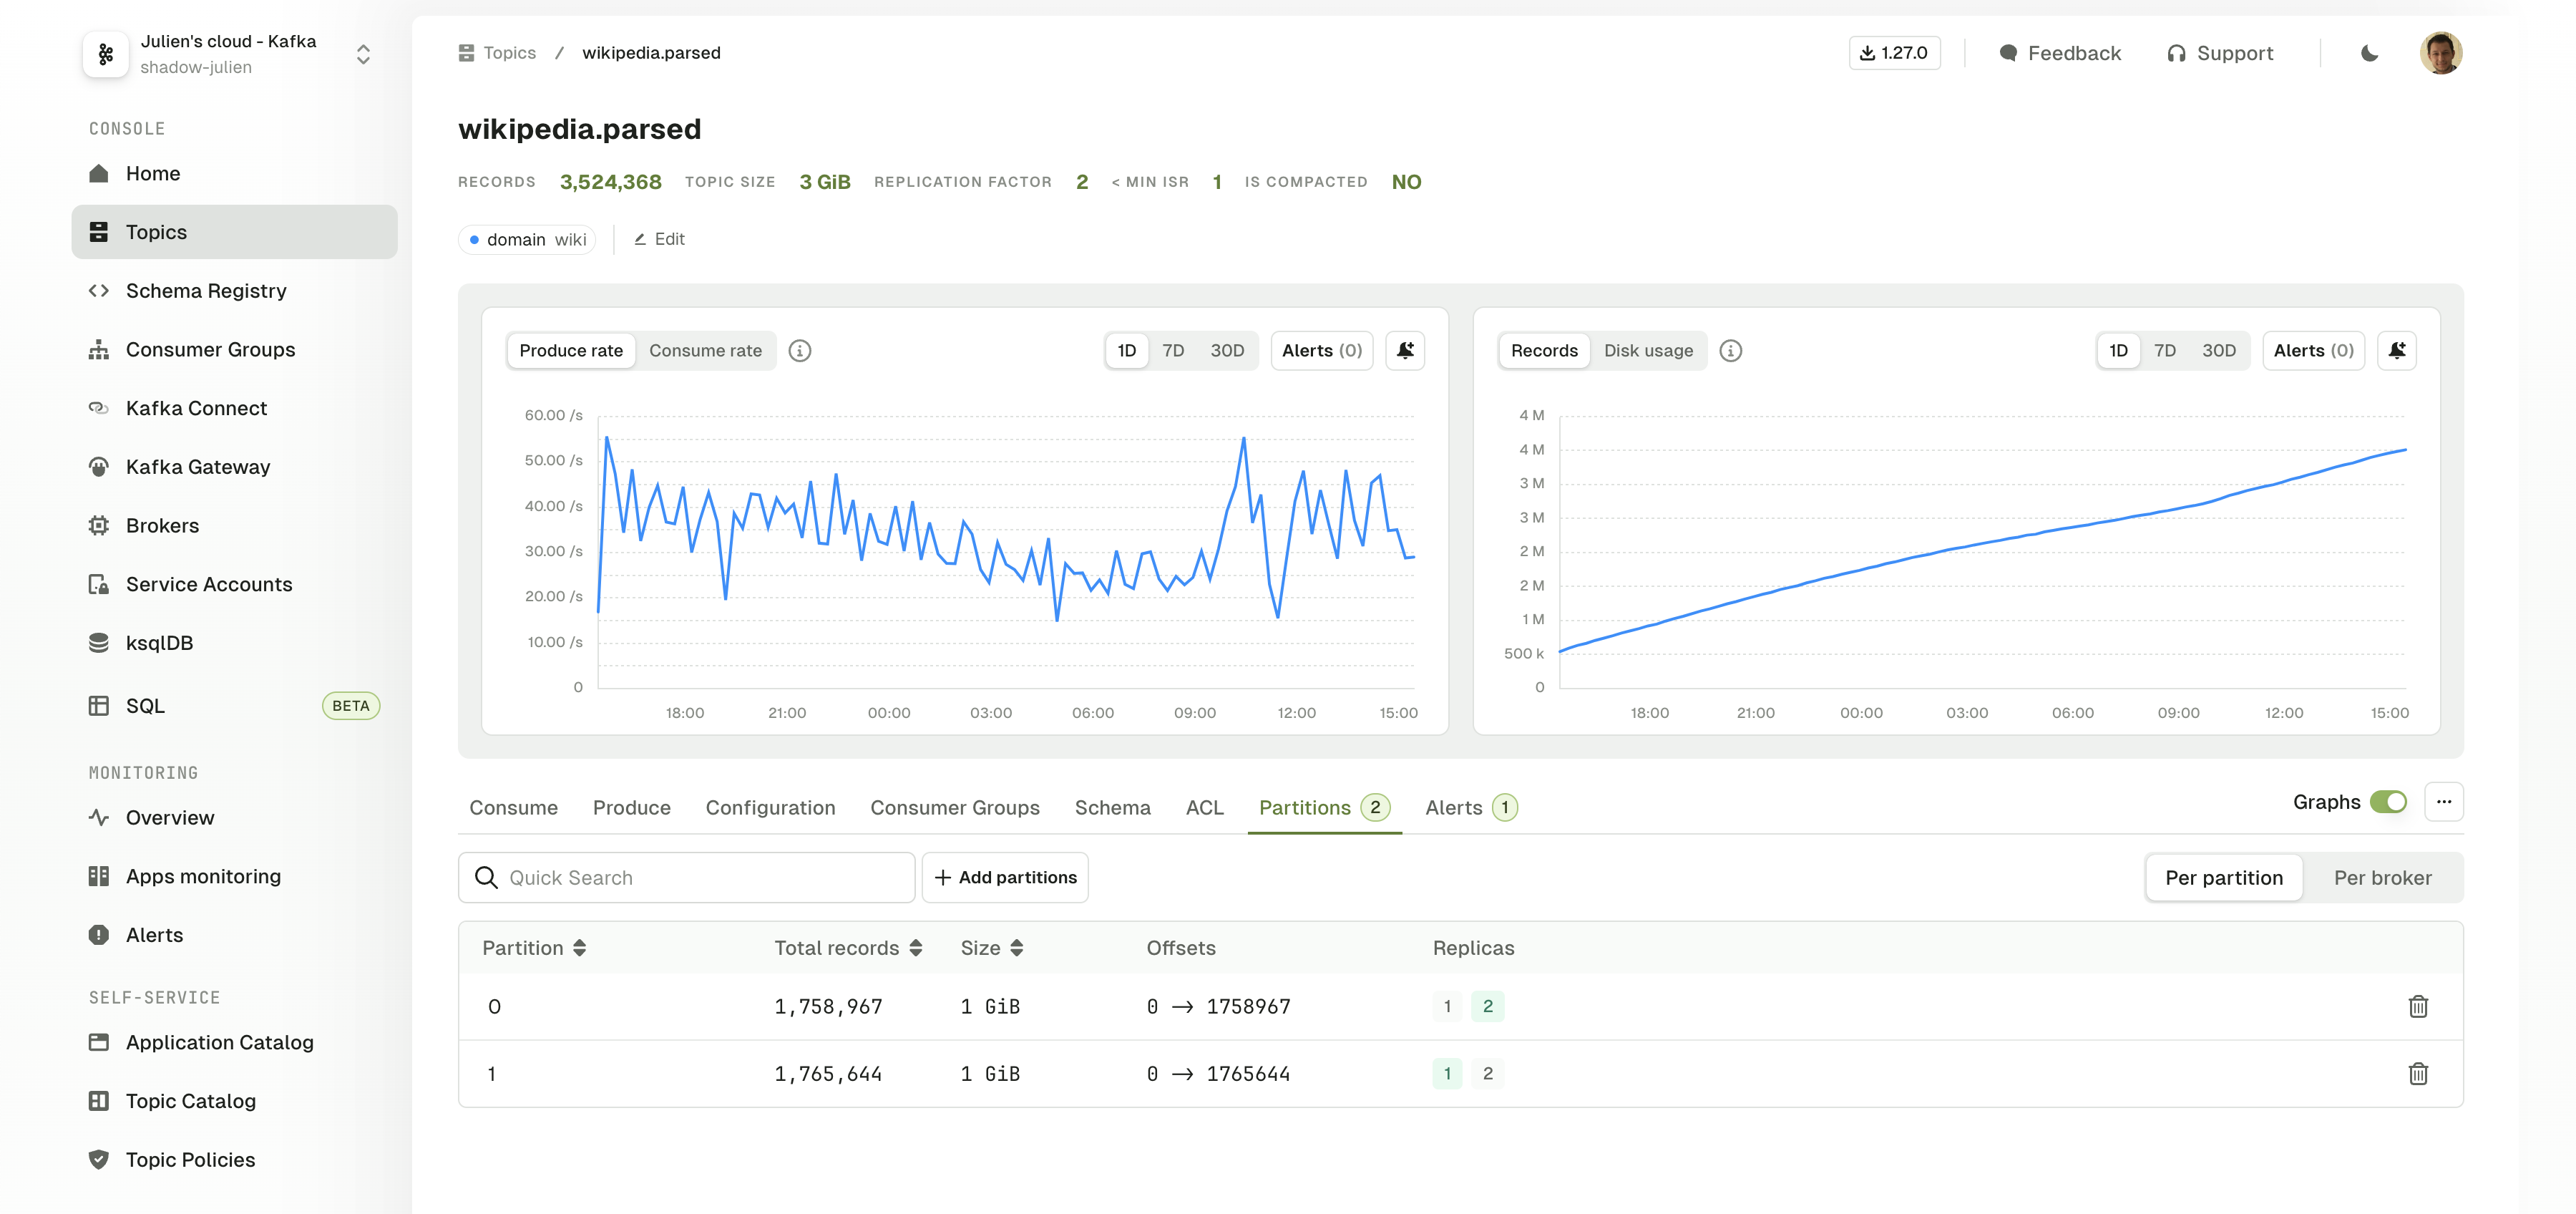
Topic partitions
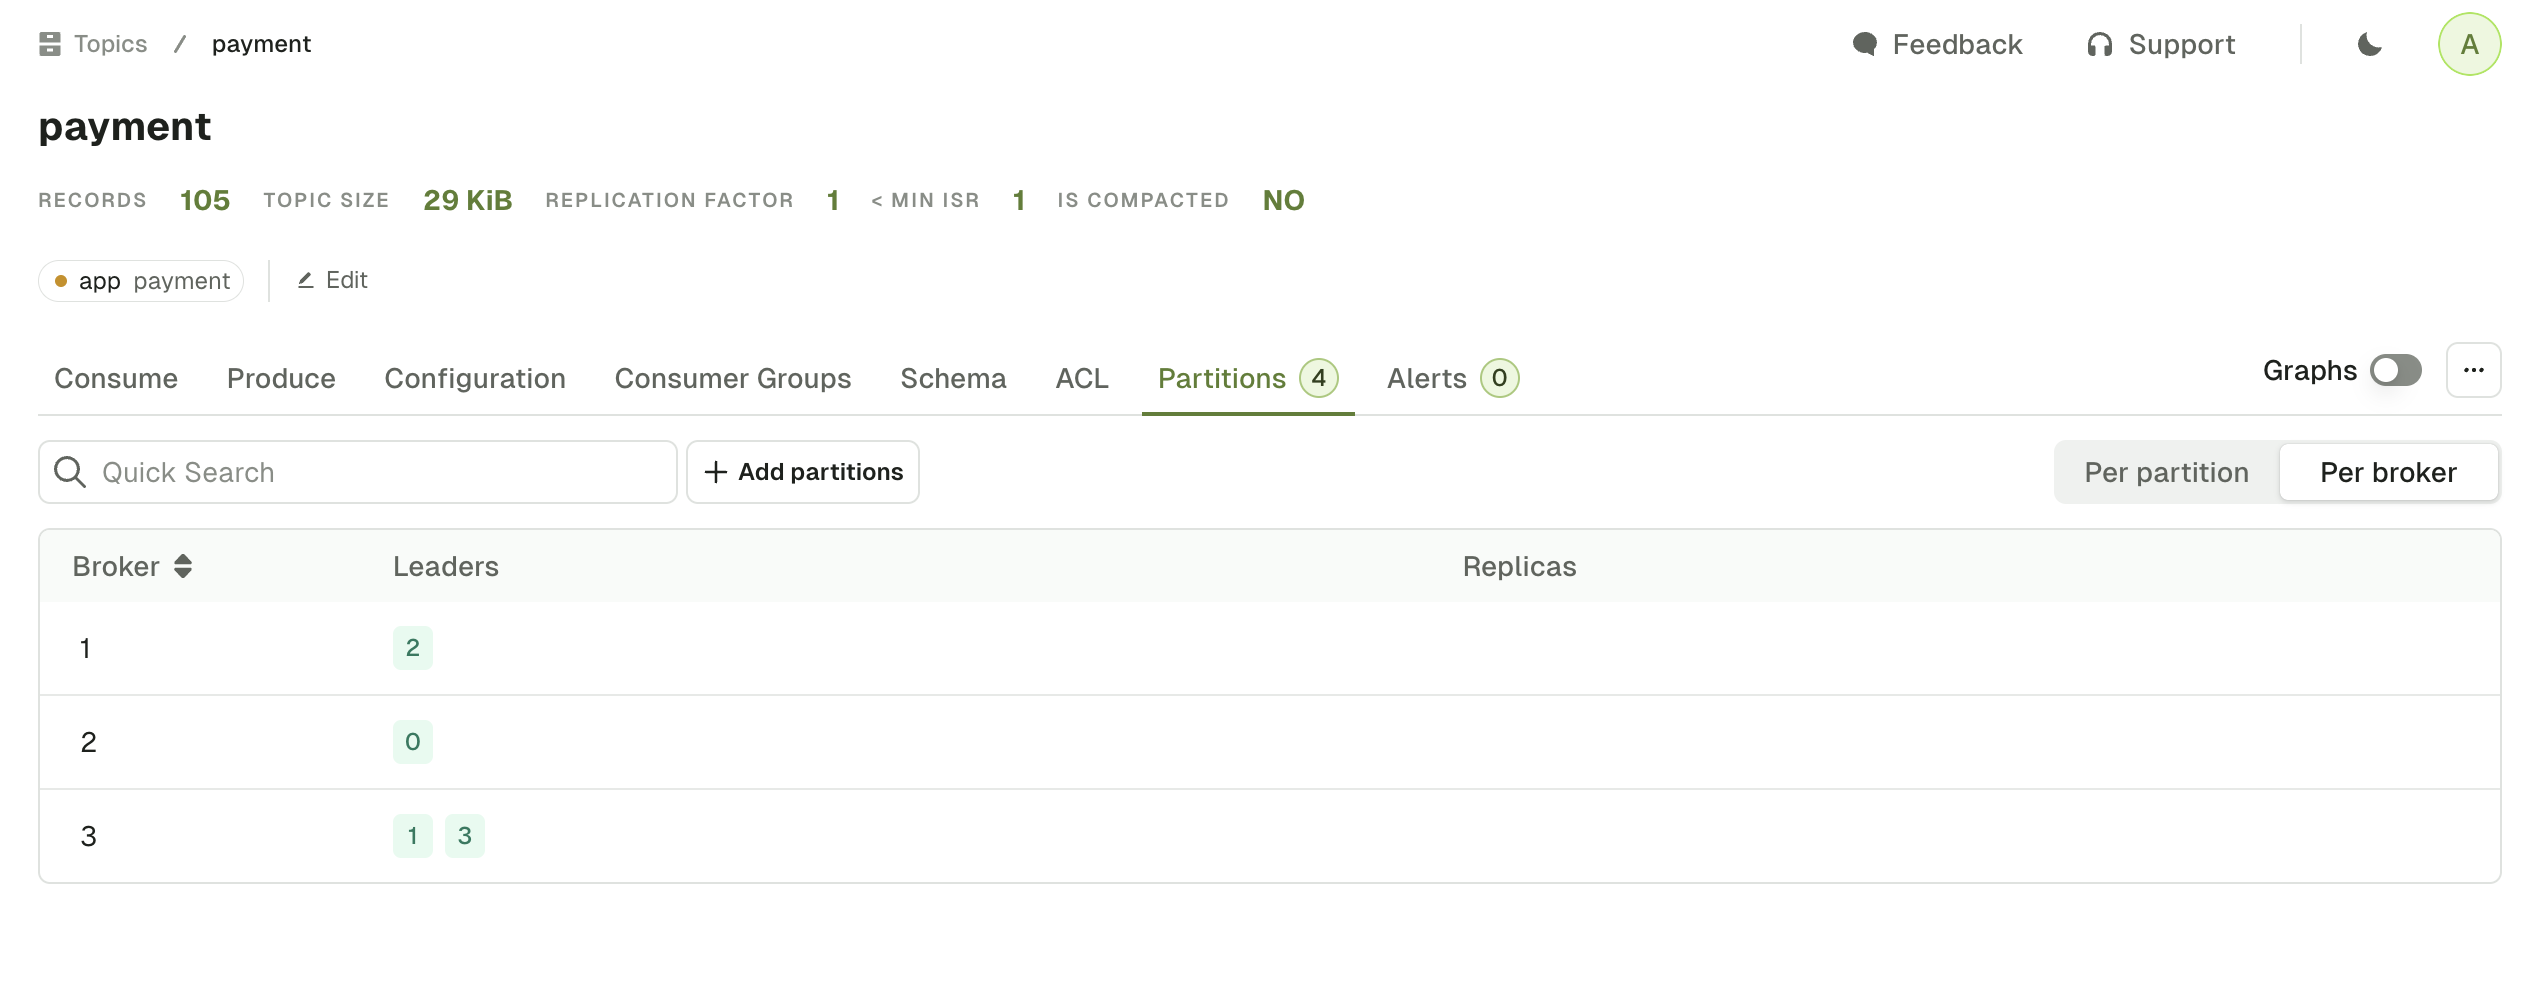
The Partitions tab shows all the partition information associated with the topic. You can switch from the default Per partition view to the Per broker view. The Per partition view show data available for each partition:- Total number of records (estimated using EndOffset - BeginOffset)
- Partition size
- Begin and end offsets
- Broker Ids of the partition leader (green) and followers (grey)
- partitions where the broker is Leader
- partitions where the broker is Follower
Empty Partition
In the Per partition view, you can click on the trash icon to remove the Kafka records from this specific partition.If you need to delete all records from all partitions, click
... above the per partition/per broker switch and select Empty topic.Topic linked resources
If you need to find related resources, your can use one of the following tabs to display all the Kafka resources associated to this specific topic.Linked consumer groups
The topic consumer groups tab displays the consumer groups associated to the current topic.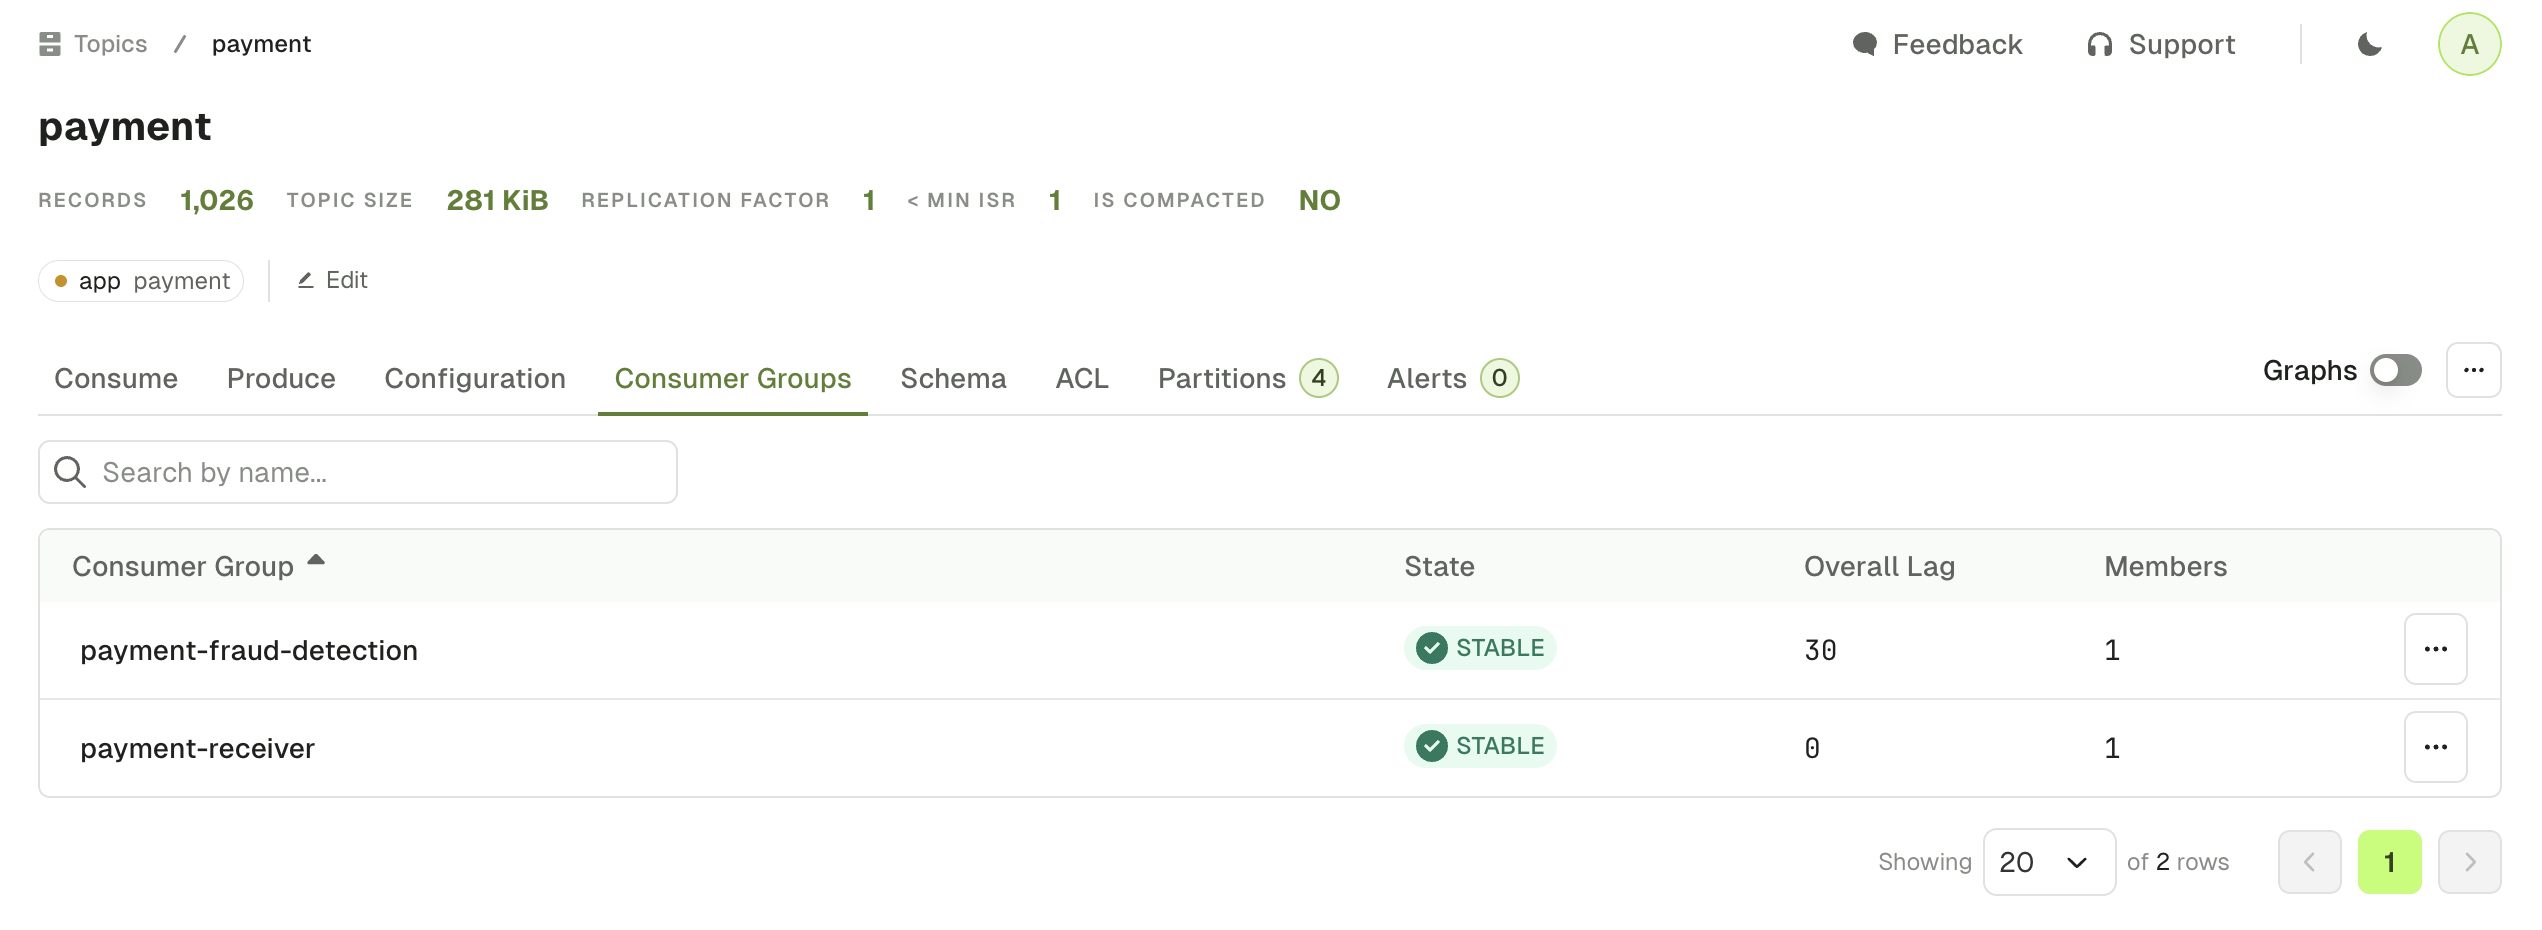
Linked schema registry subjects
The Schema tab shows the key subject and value subject associated to your topic, assuming you’ve defined them using TopicNameStrategy .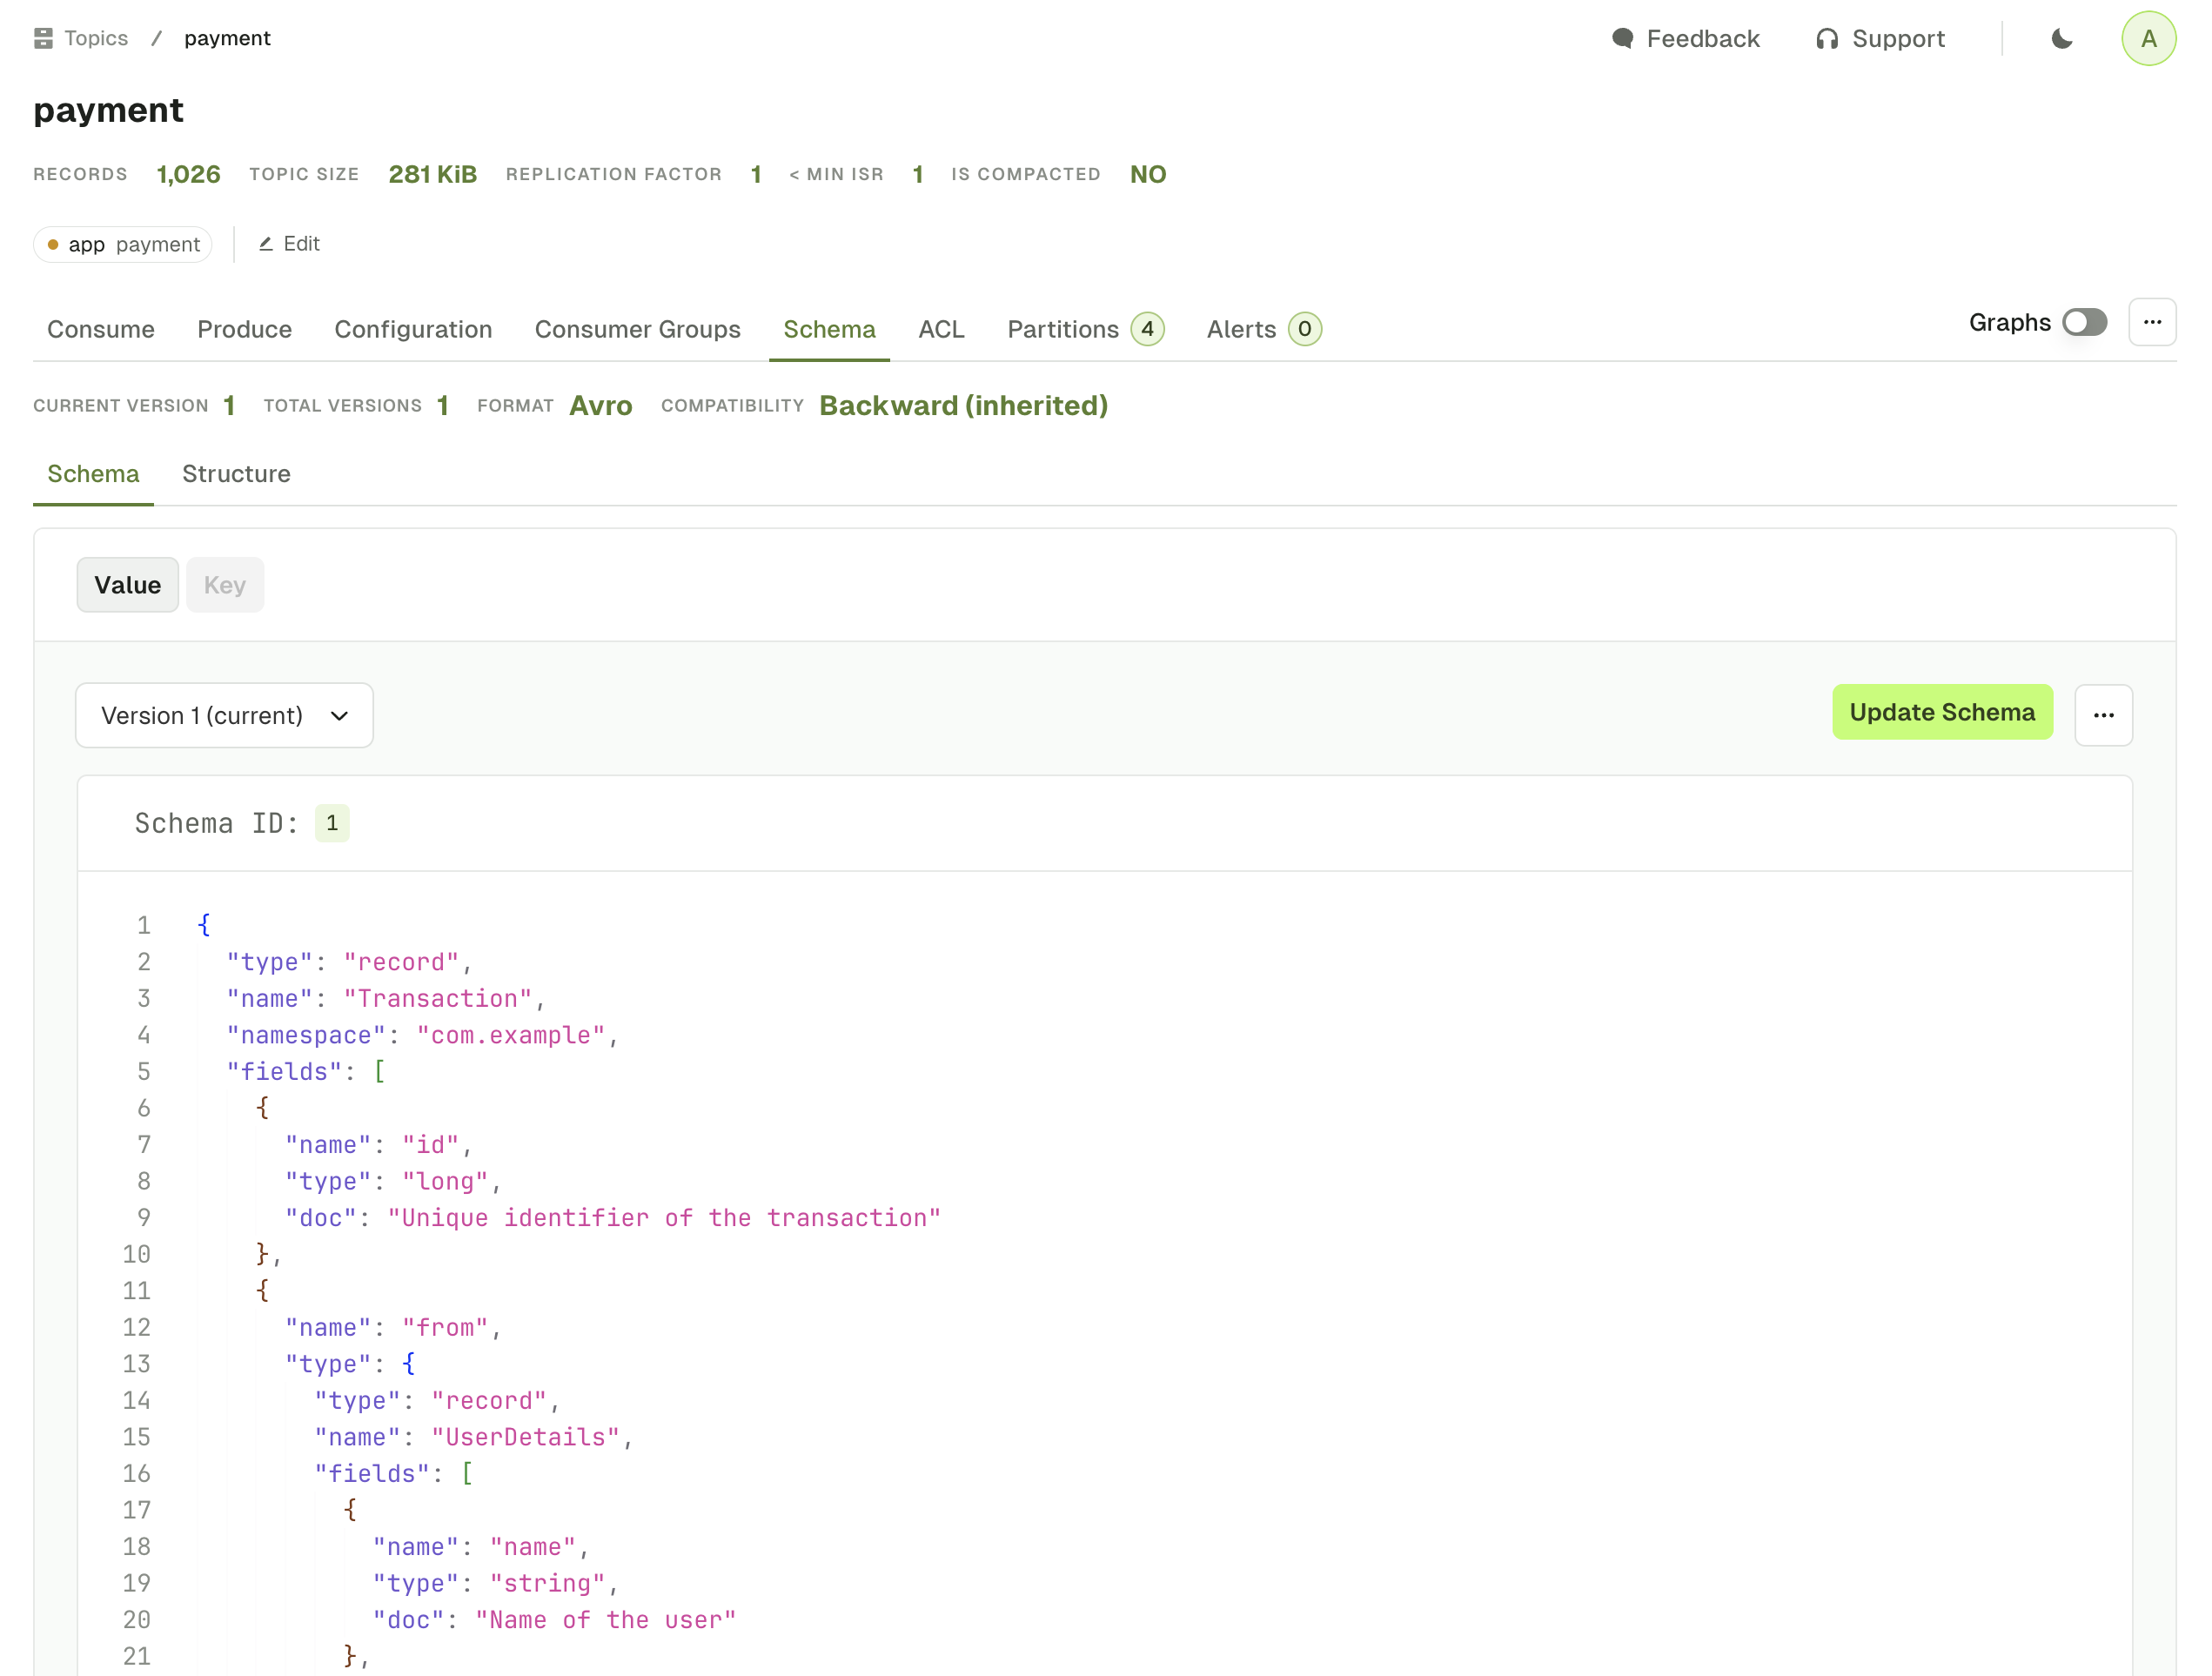
Linked ACLs
The ACL tab displays the list of Kafka permissions associated with the current topic.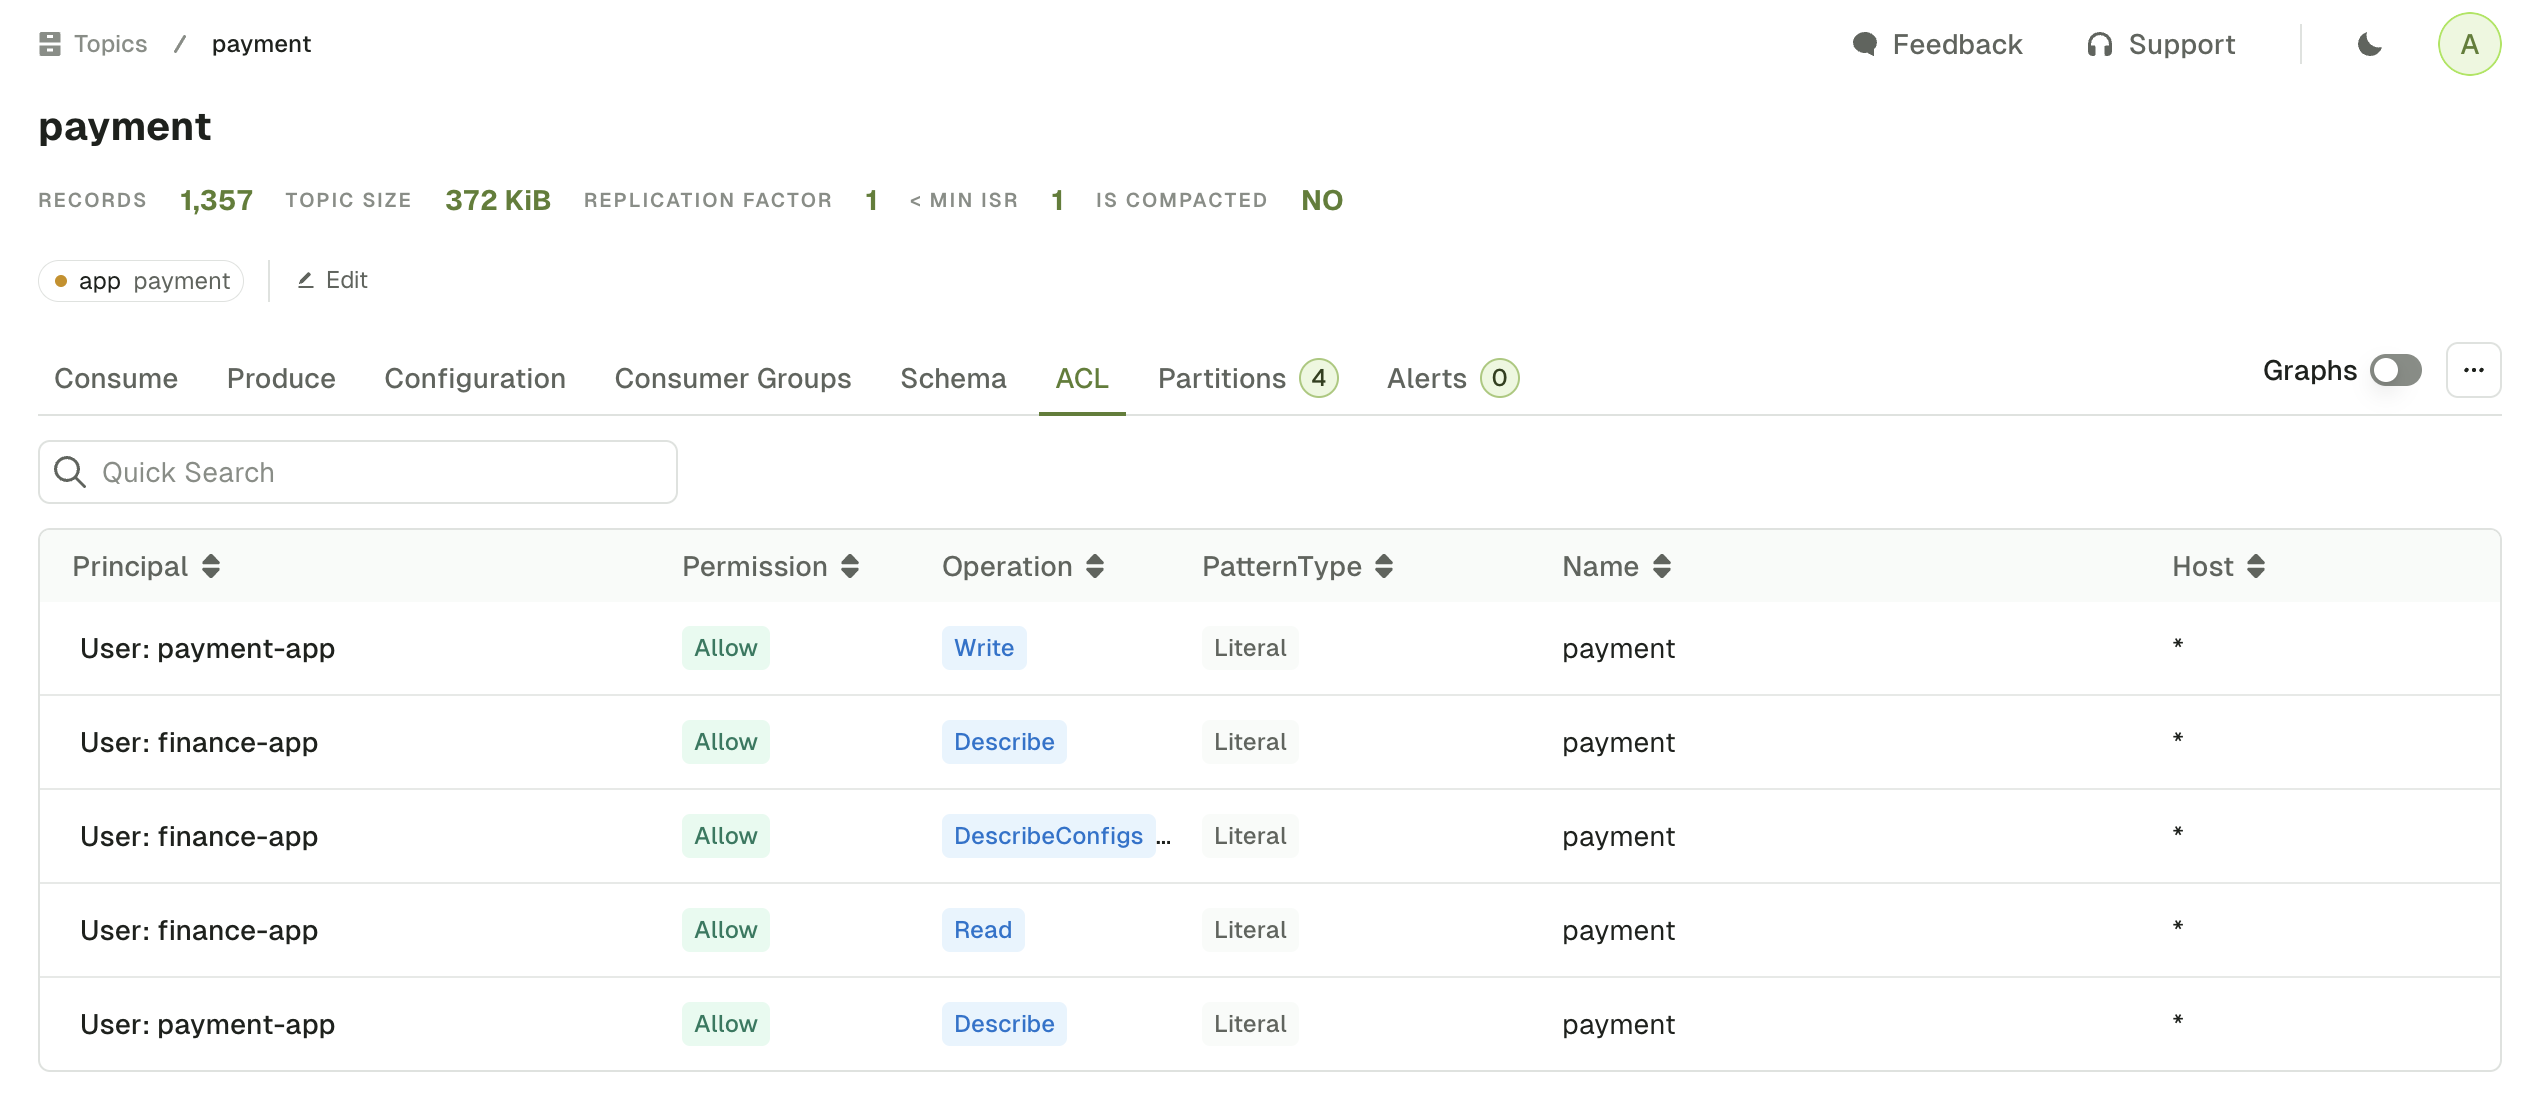
Topic graphs
When you browse any topic details page, you’ll see the associated graphs for this topic:- produce and consume rate
- number of records
- disk usage
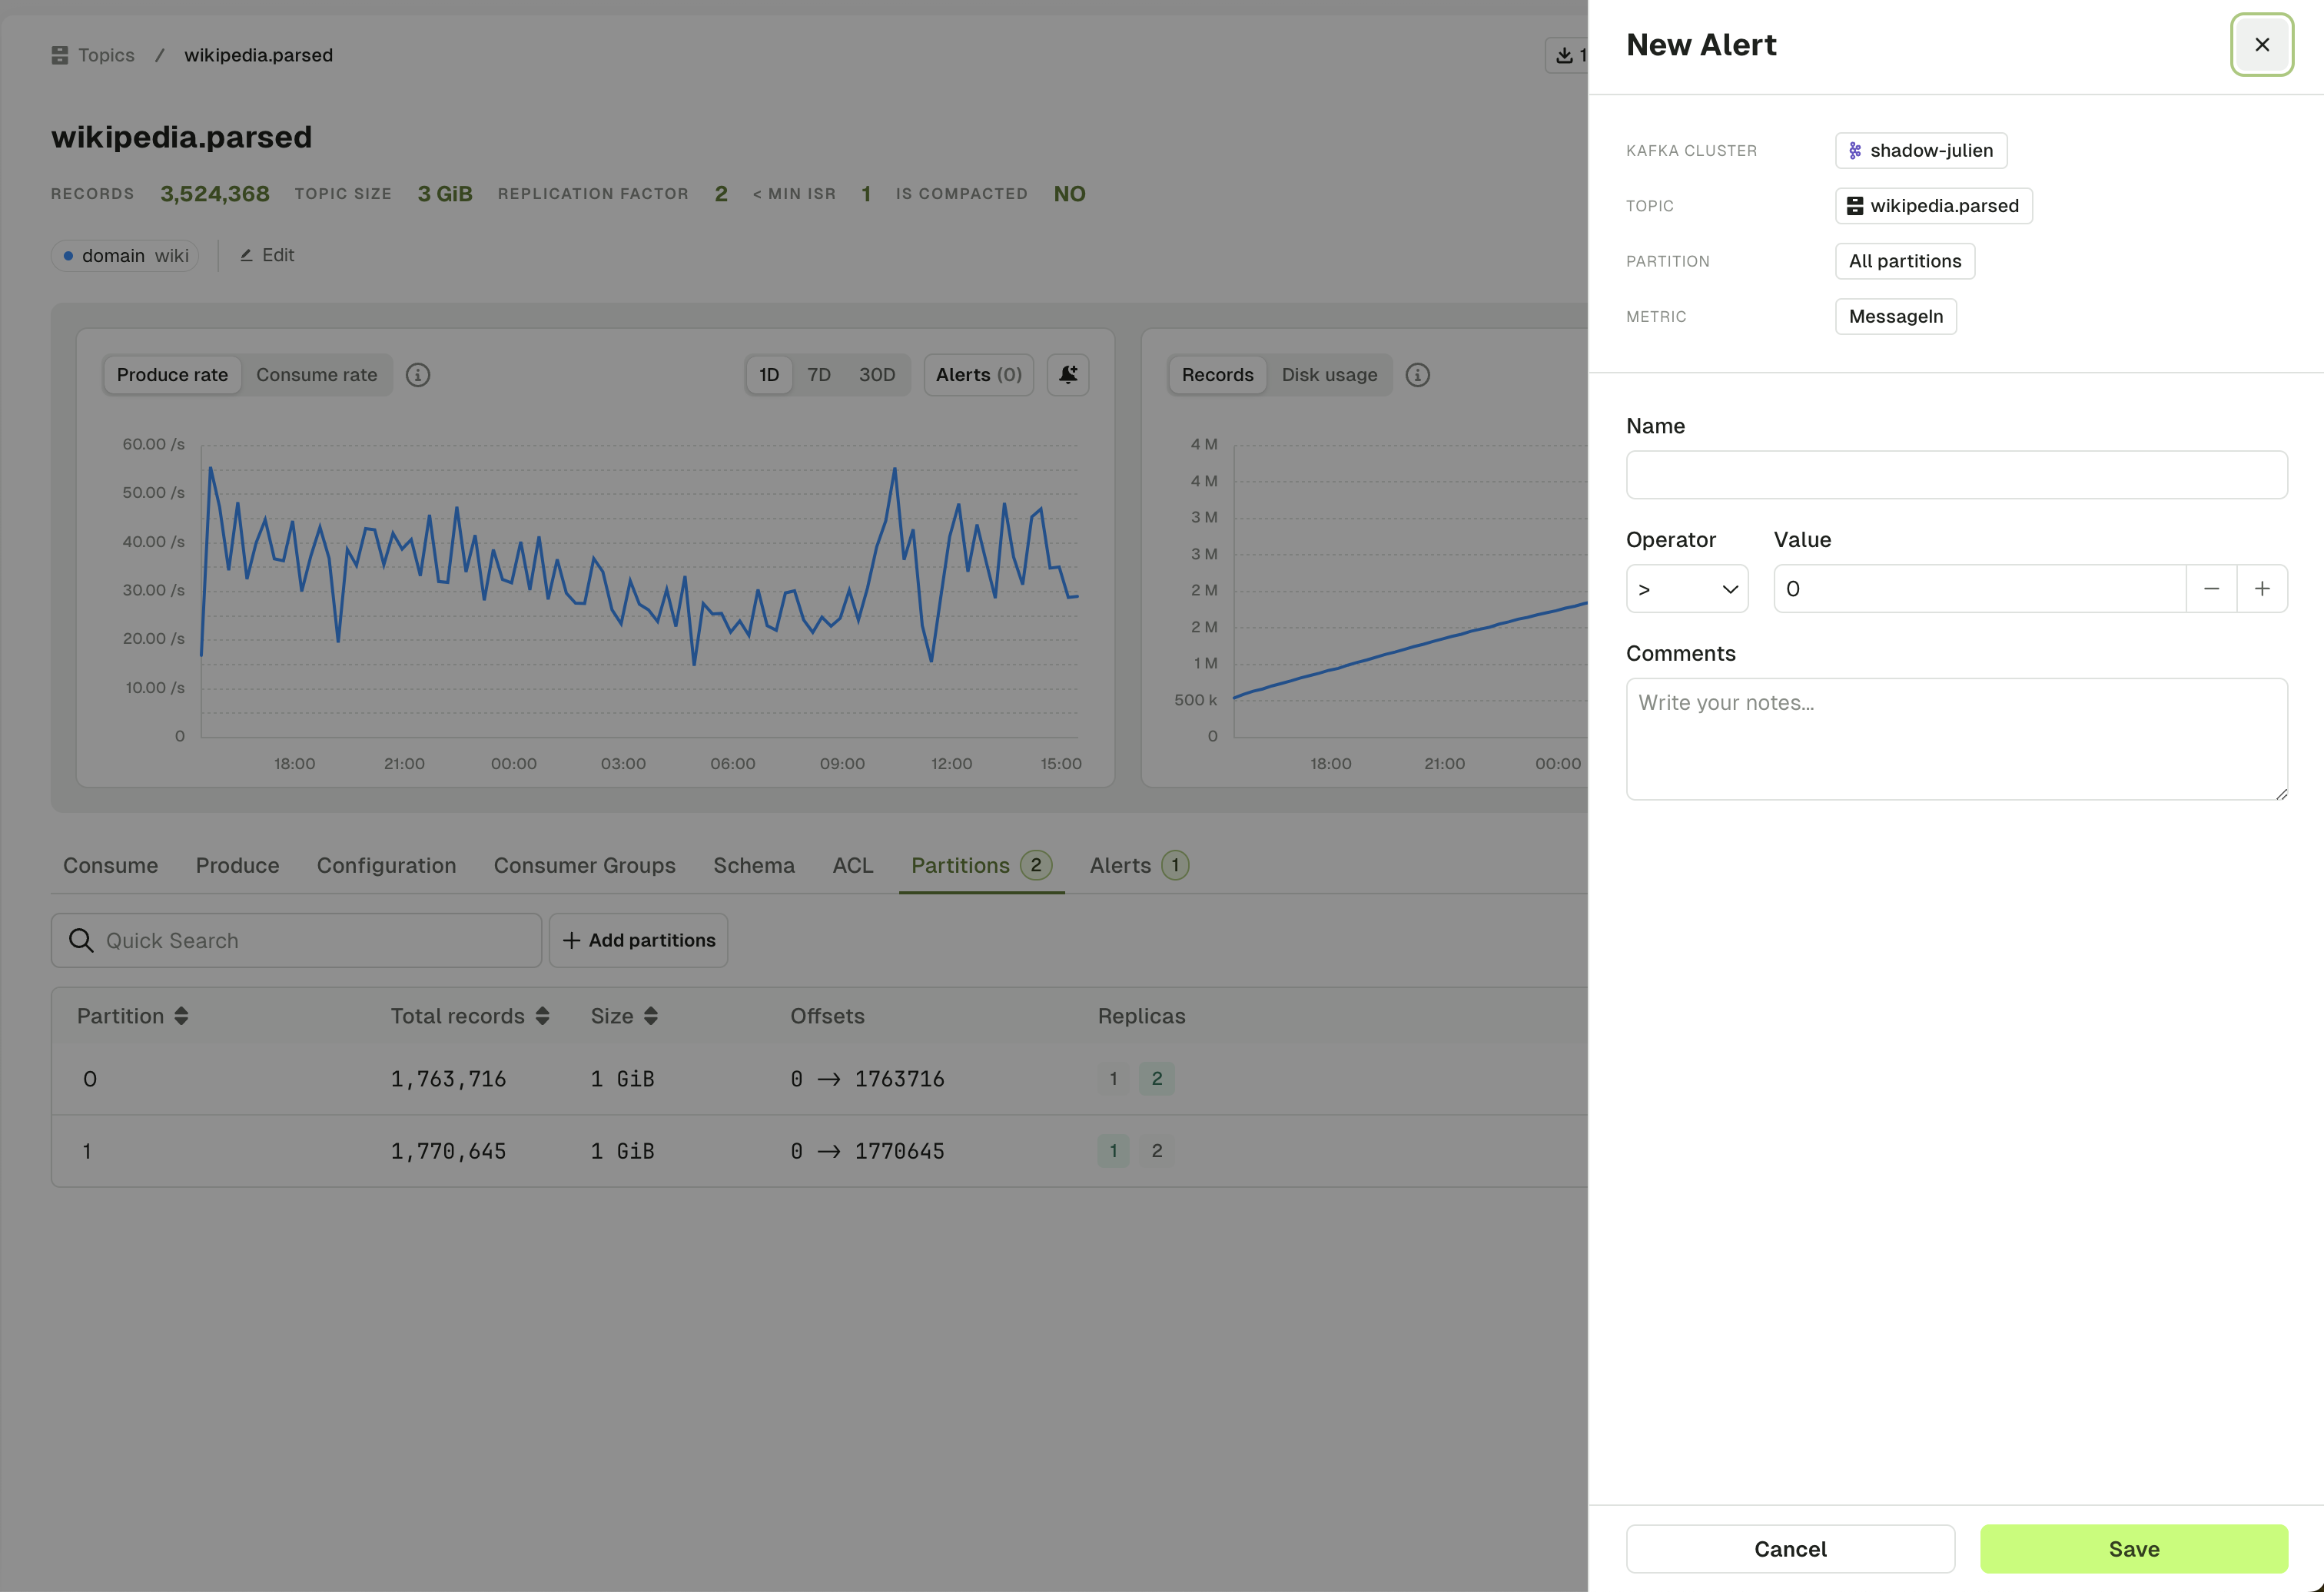
Alerts tab
The topic Alert tab lets you see all the active alerts associated to this Kafka cluster. You can edit or toggle them on/off.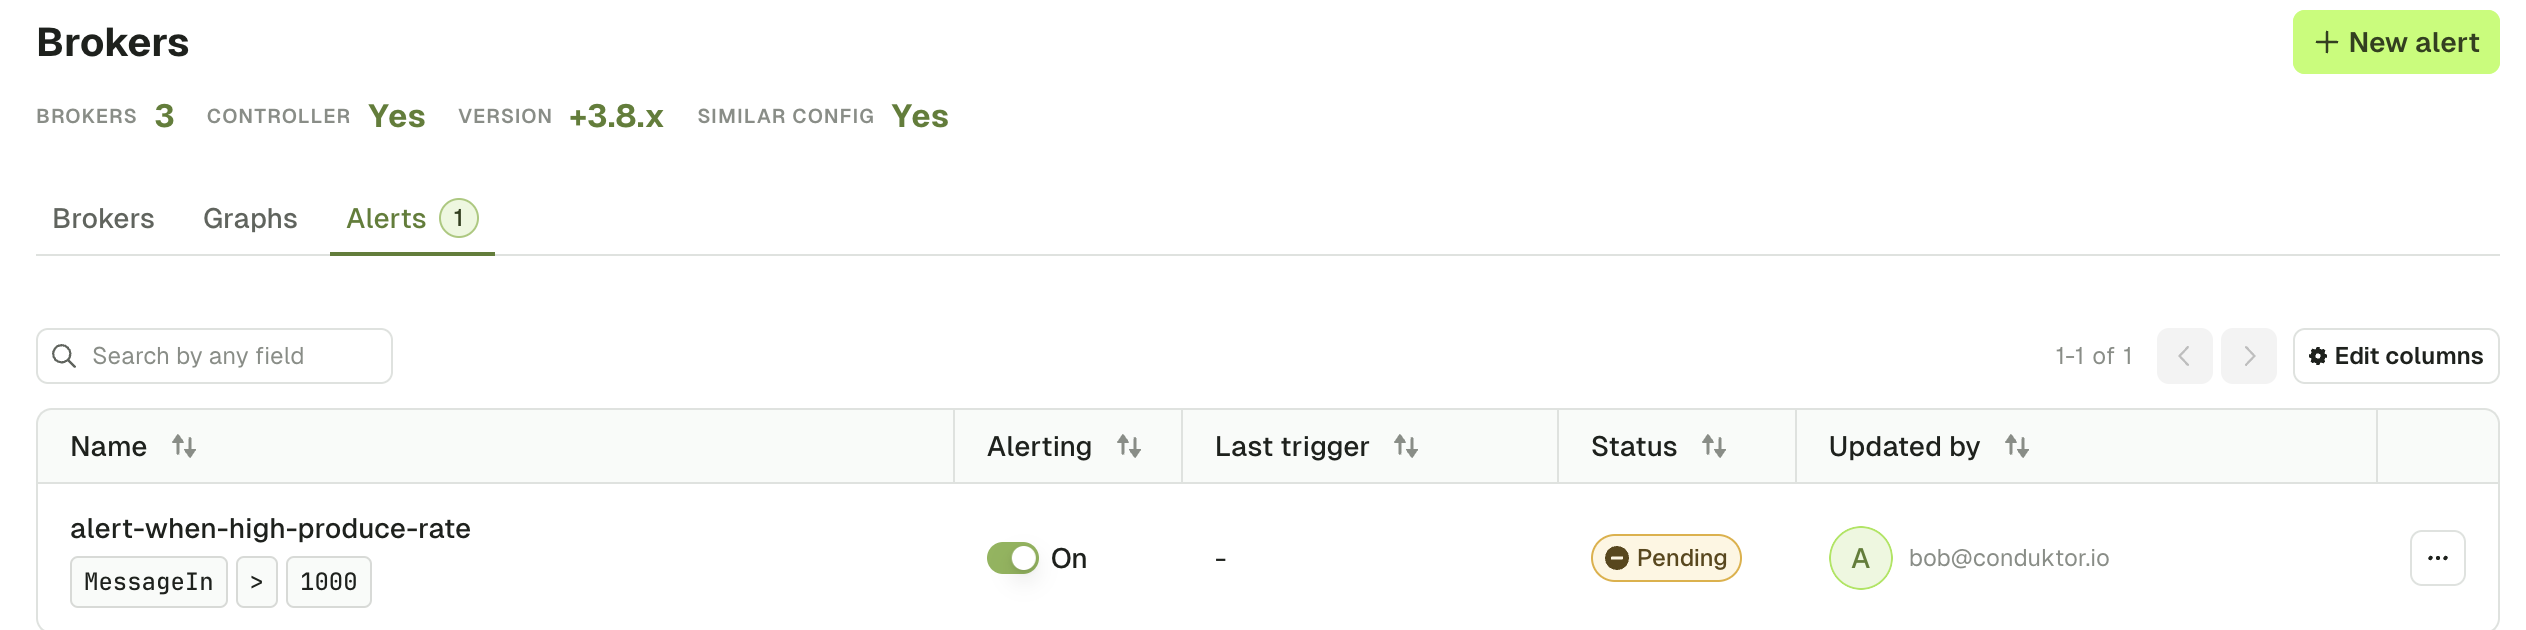
Topic consume
View data quality policy violations
Available for Gateway clusters with Console v1.42 or later.
- A Policy badge appears in the topic header (for example, “Data Quality” or “Encryption”)
- The consume table includes a Marking violations column showing Policy and Rule violations for each message
- Hover over Policy names to see the Policy ID and violated Rules (deleted Rules appear greyed out)
- Click Policy names to navigate to Policy details
- Open any message to see full violation details in the Metadata tab’s Violations section, including Policy IDs, Rule IDs, and links to Policy details
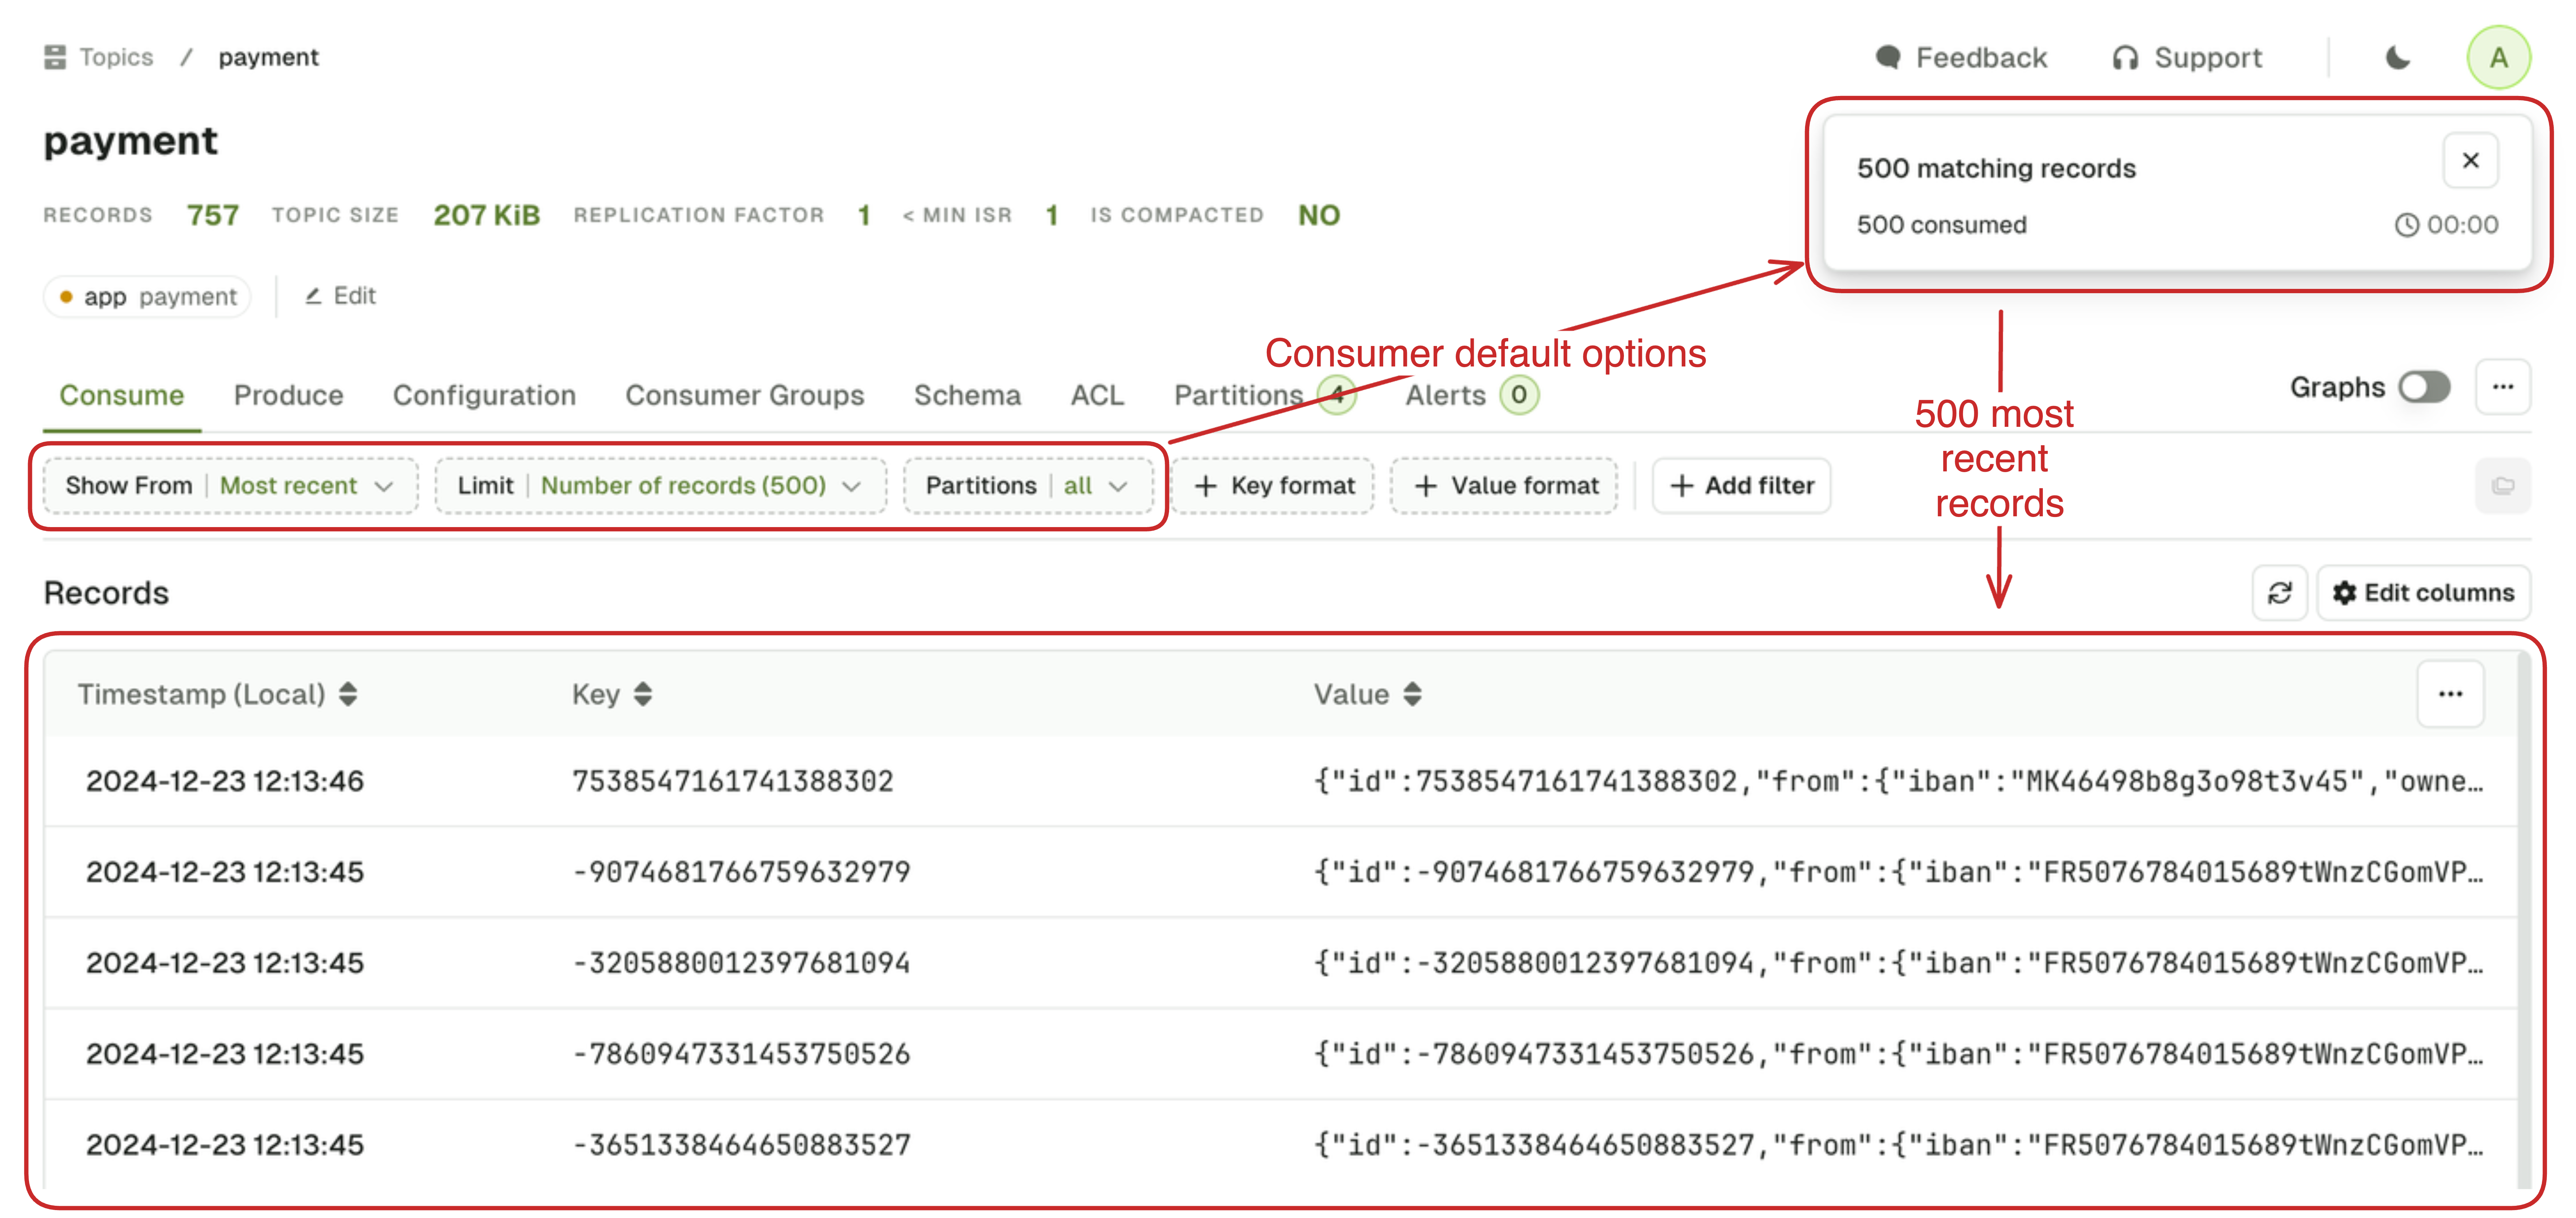
Configure the Kafka consumer
When you access a topic from the topic list page for the first time, a consumer is automatically triggered with default settings:- show from:
Most recent - limit:
500 records - partitions:
All
Show from
Show From defines the starting point for the Kafka consumer in your topic.
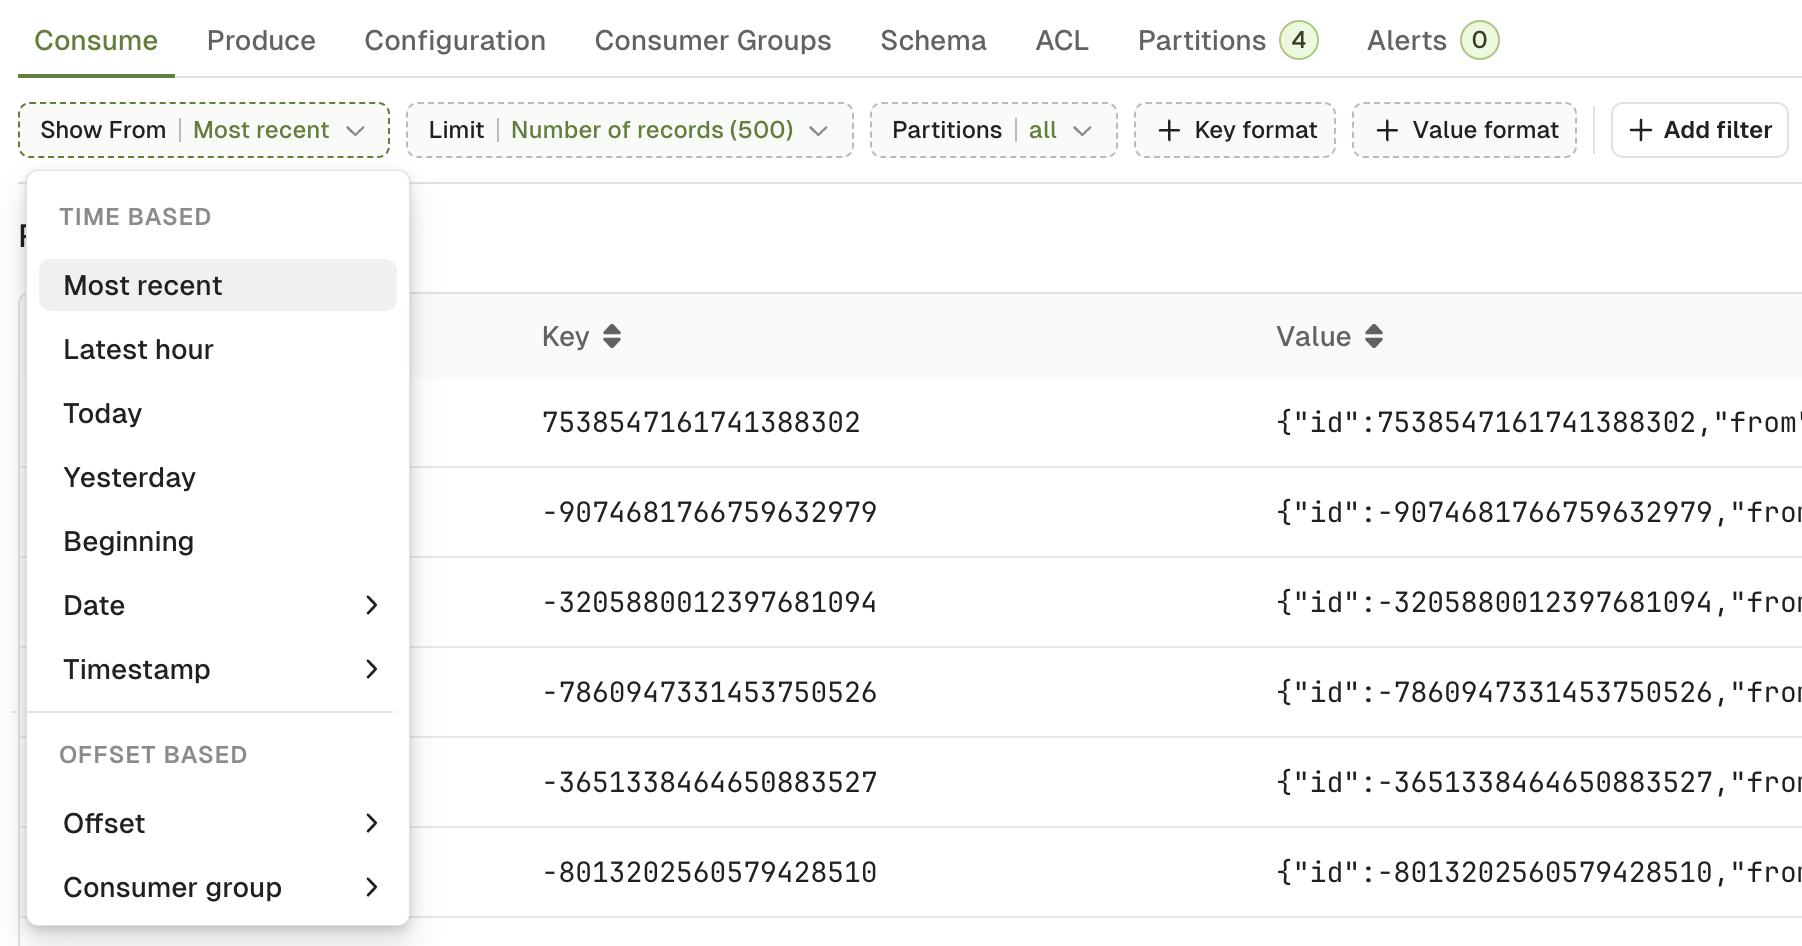
Most recentoption works differently depending on the Limit that you select- with Number of records limit (let’s say 500), it sets the starting point in your topic backward relative to Now, in order to get your the 500 most recent records.
- with None (live consume), it simply set the starting point to Now. This lets you consume only the messages produced after the consumer was started.
Latest hour,Today,Yesterdayto start the consumer, respectively:- 60 minutes ago
- at the beginning of the day at 00:00:00 (local timezone based on your browser)
- at the beginning of the day before at 00:00:00 (local timezone)
Beginningto start the consumer from the very beginning of the topic.DateandTimestampto start from a specific point in time datetime or an epoch- Date: ISO 8601 DateTime format with offset
2024-12-21T00:00:00+00:00 - Timestamp: Unix timestamp in milliseconds
1734949697000
- Date: ISO 8601 DateTime format with offset
Offsetto start the consumer at a specific offset, ideal for use with a single Partition setting.Consumer Groupto start the consumer from the last offsets committed by a consumer group on this topic.
Limit
Limit defines when your consumer has to stop.
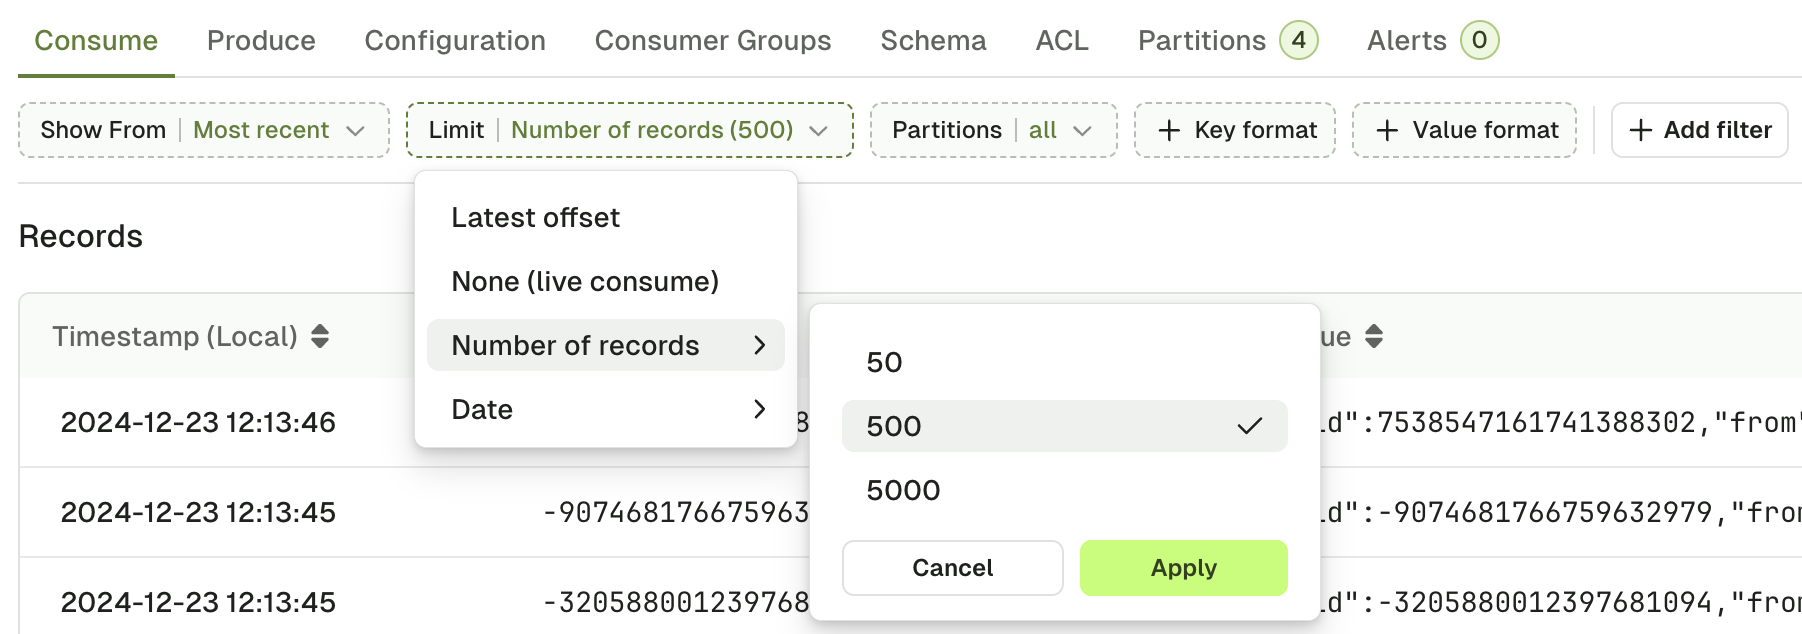
Latest offset- stop the consumer upon reaching the end of the topic. The end offsets are calculated when you trigger the search. Records produced after that point will not appear in the search results.None (live consume)- start a live consumer that will look for messages indefinitely.Number of records- stop the consumer after having sent a certain number of records to the browser. When you have active filters, non-matching records will not count toward this limit.Date- stop the consumer after reaching the configured date. The ISO 8601 DateTime format with offset2023-12-21T00:00:00+00:00.
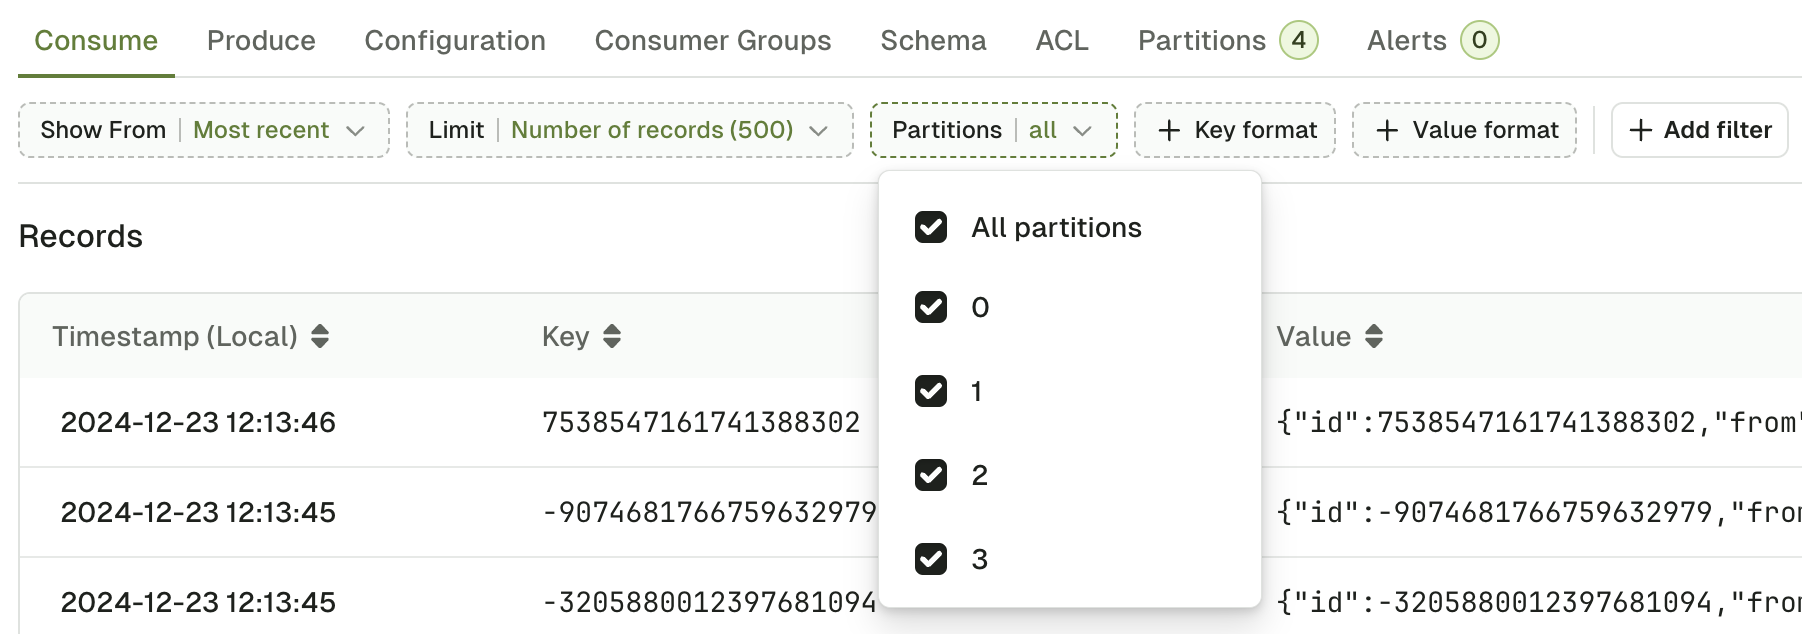
Partitions
Partitions lets you restrict the consumer to only consume from certain partitions of your topic. By default, records from all partitions are consumed.
Key and value format
Key format and Value format lets you force the deserializer for your topic.
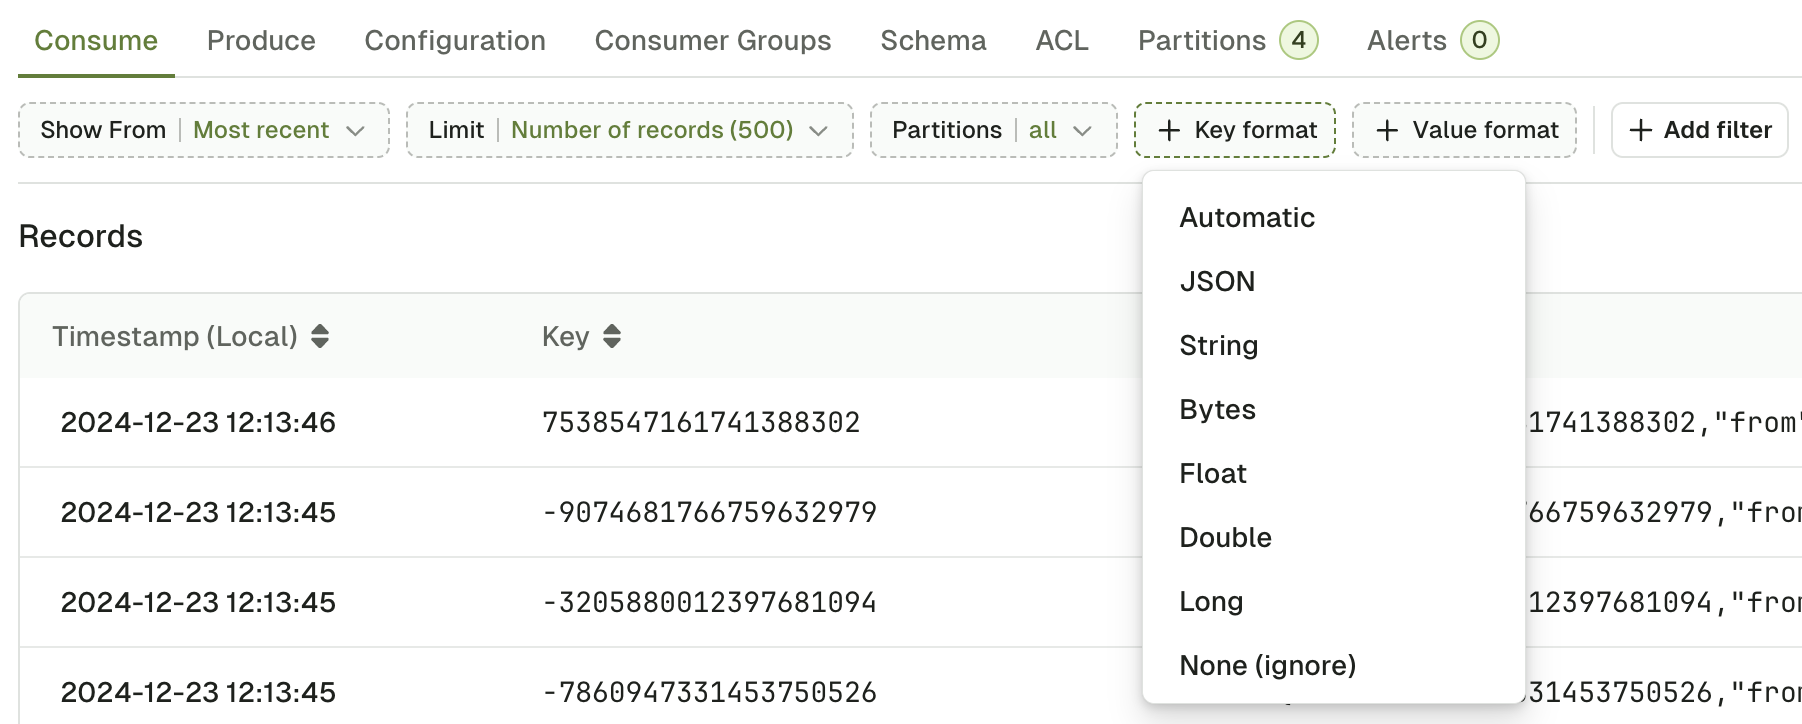
Automatic deserializer
This is the default deserializer. Automatic infers the correct deserializer in the following order:- schema registry deserializers (Avro, Protobuf, Json Schema)
- JsonDeserializer
- StringDeserializer
- ByteDeserializer (fallback)
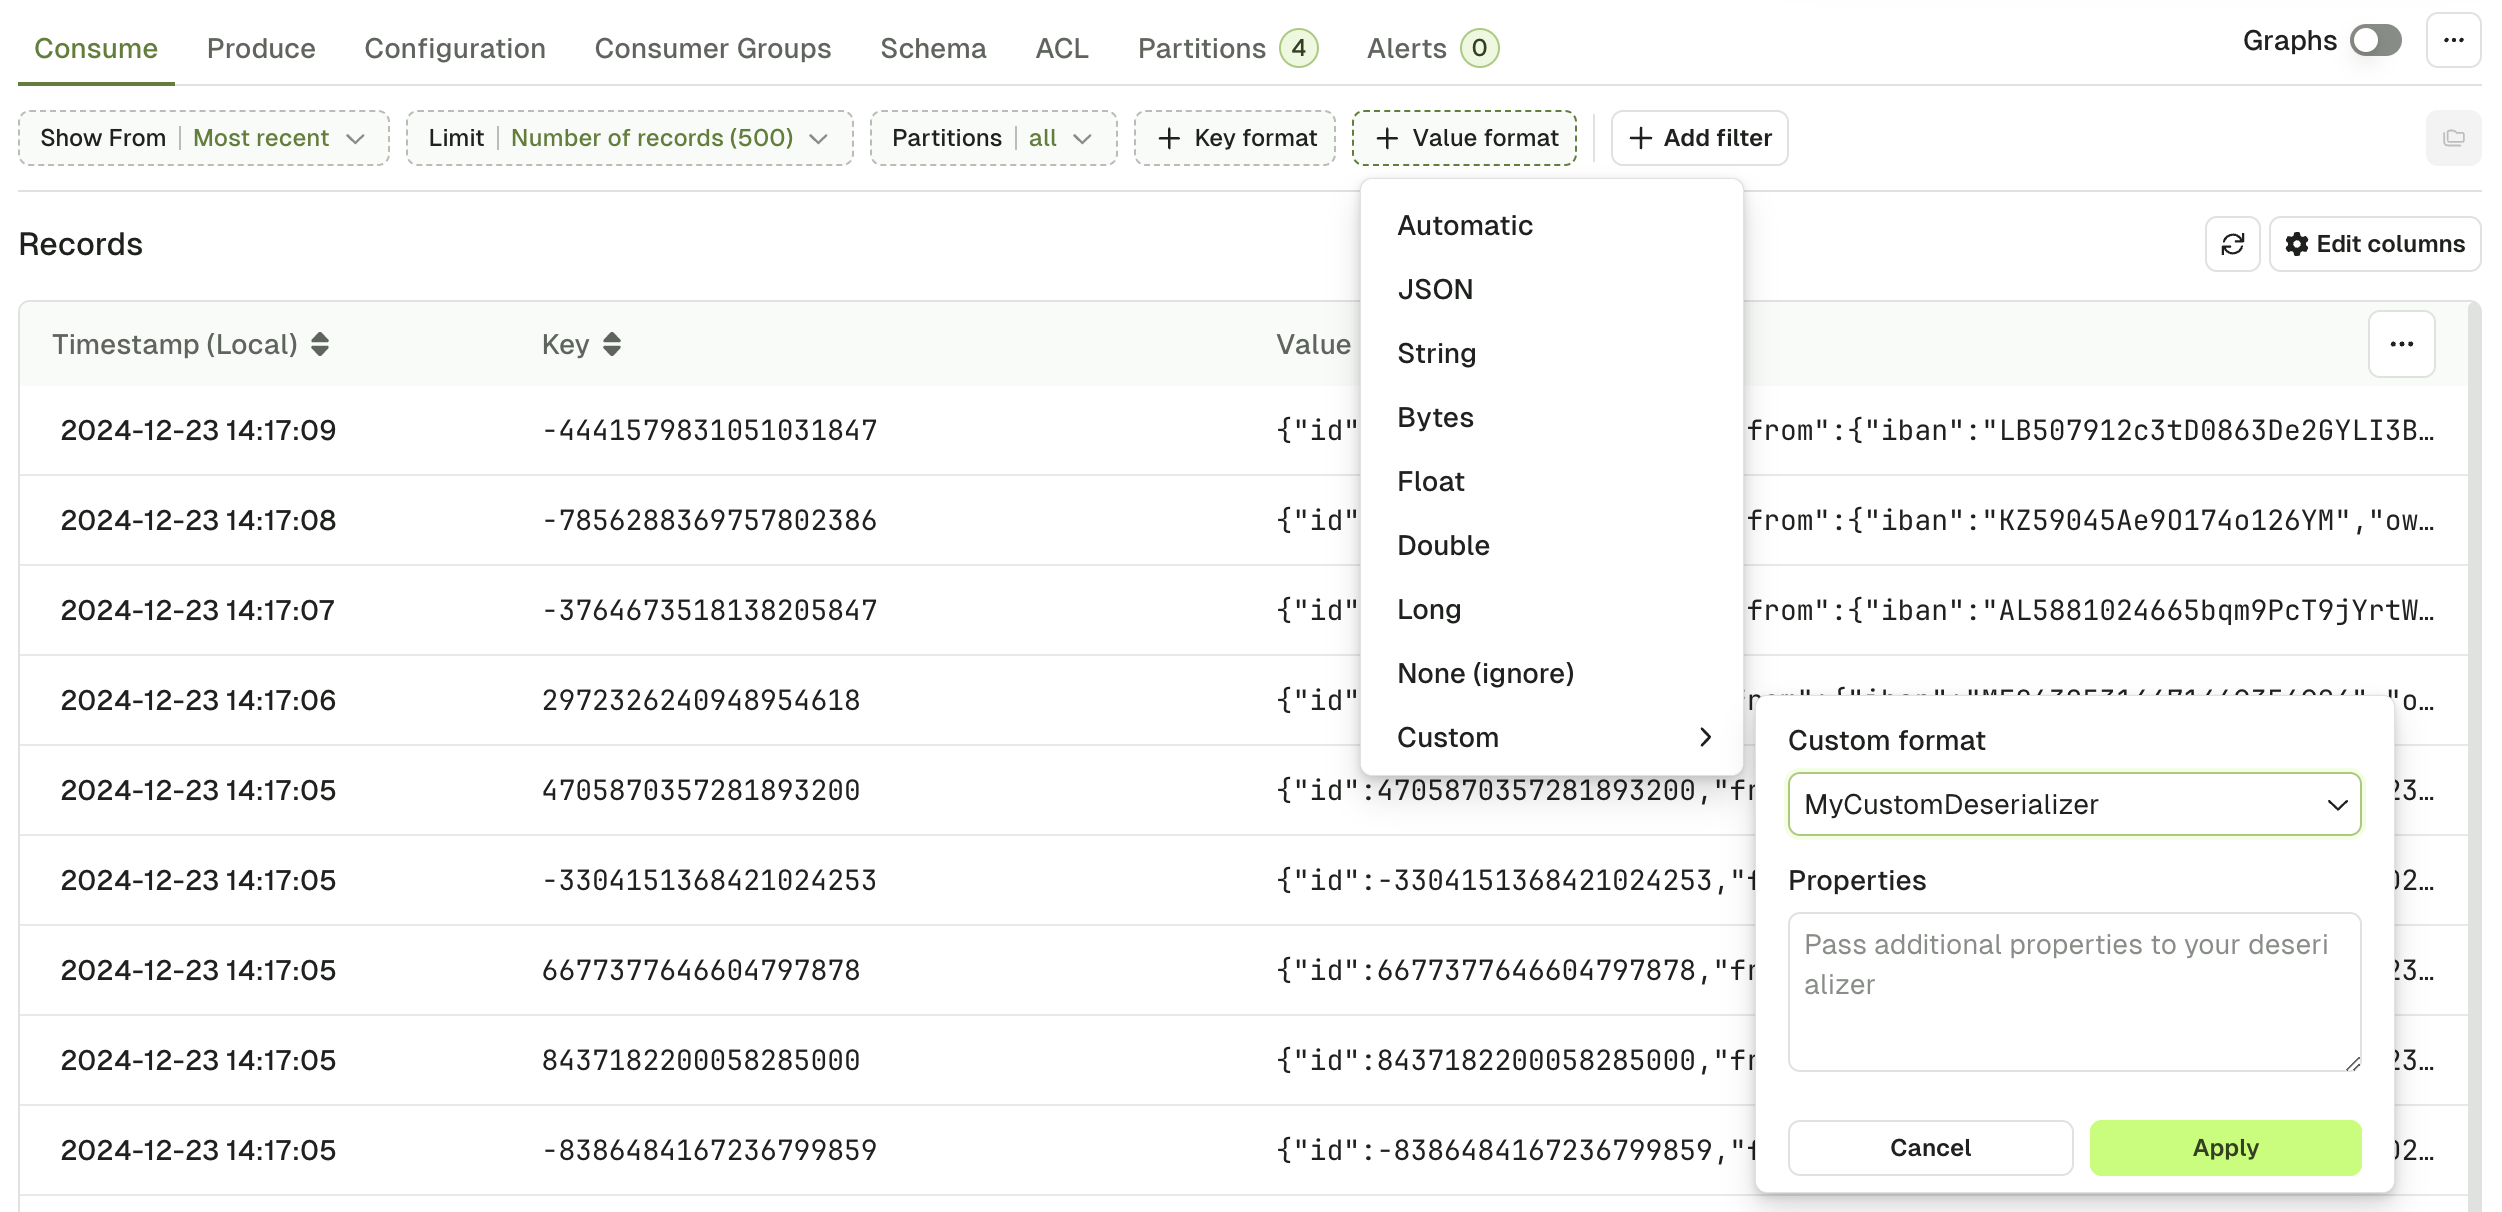
Custom deserializer
If you have installed them, your custom deserializers will appear here. Optionally, configure them using theProperties text and your messages will show as expected.
Check out the tutorial on installing and configuring custom deserializers in Console.
JSON deserializer
JSON deserializer will explicitly fail on records that doesn’t match a JSON type.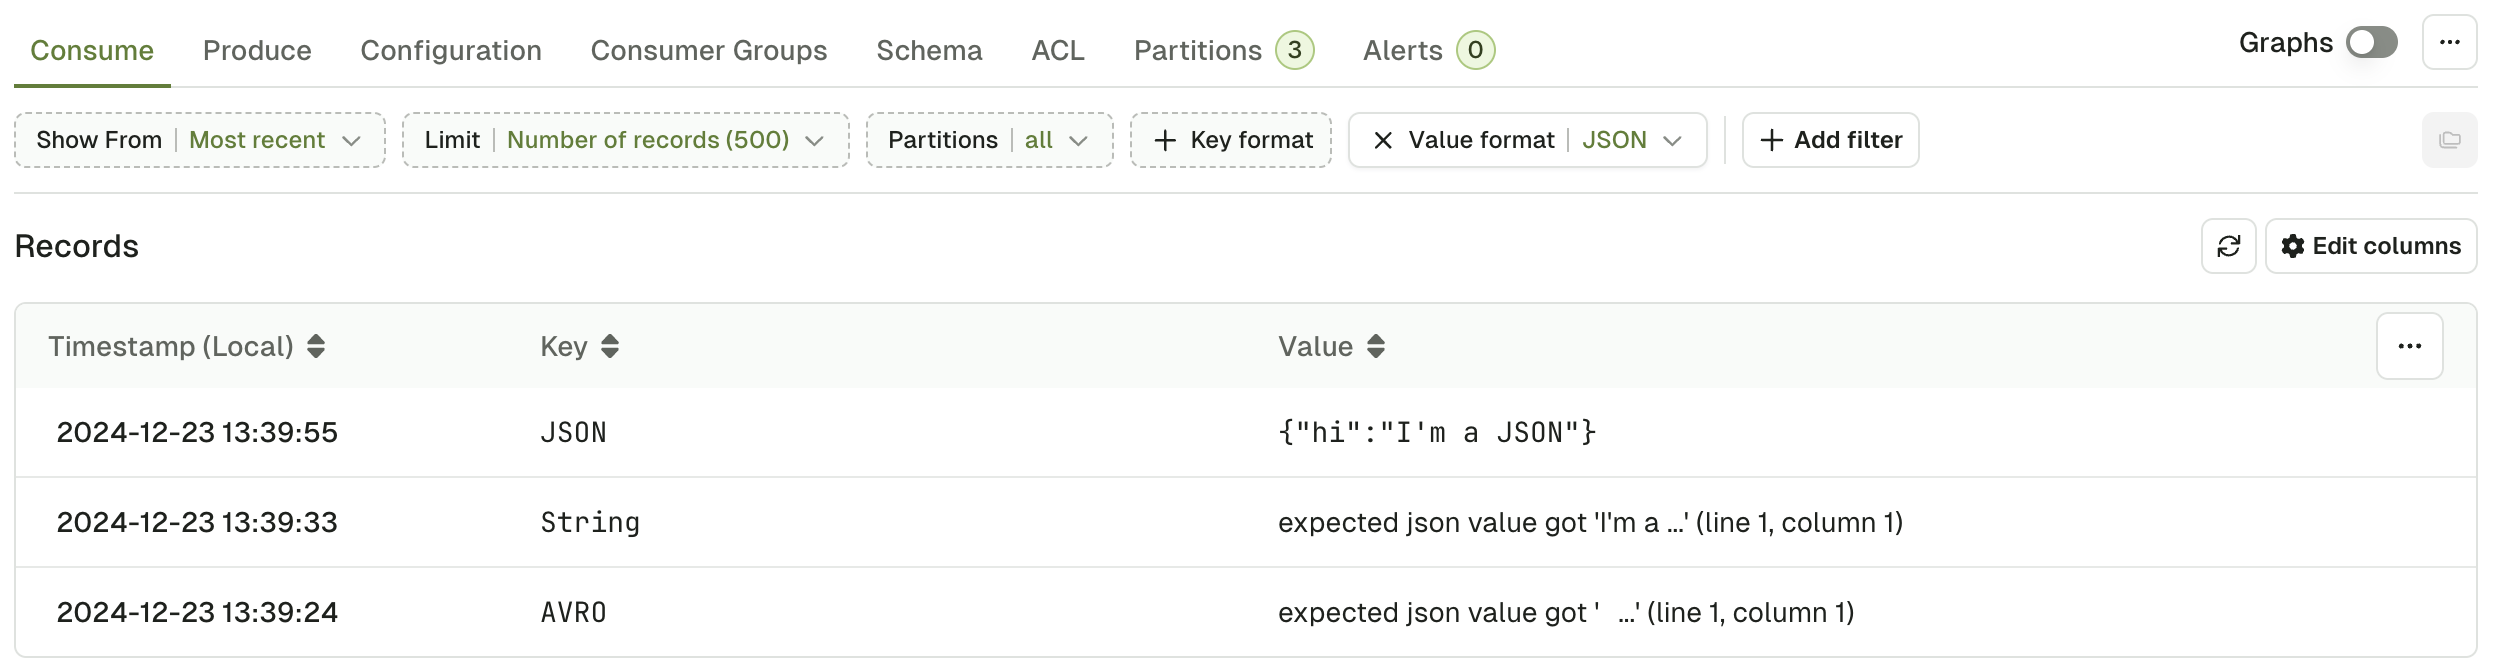
Bytes deserializer
Bytes deserializer helps you visualize your records by printing the non-ASCII characters as hexadecimal escape sequences. For instance, the following sequence of bytes: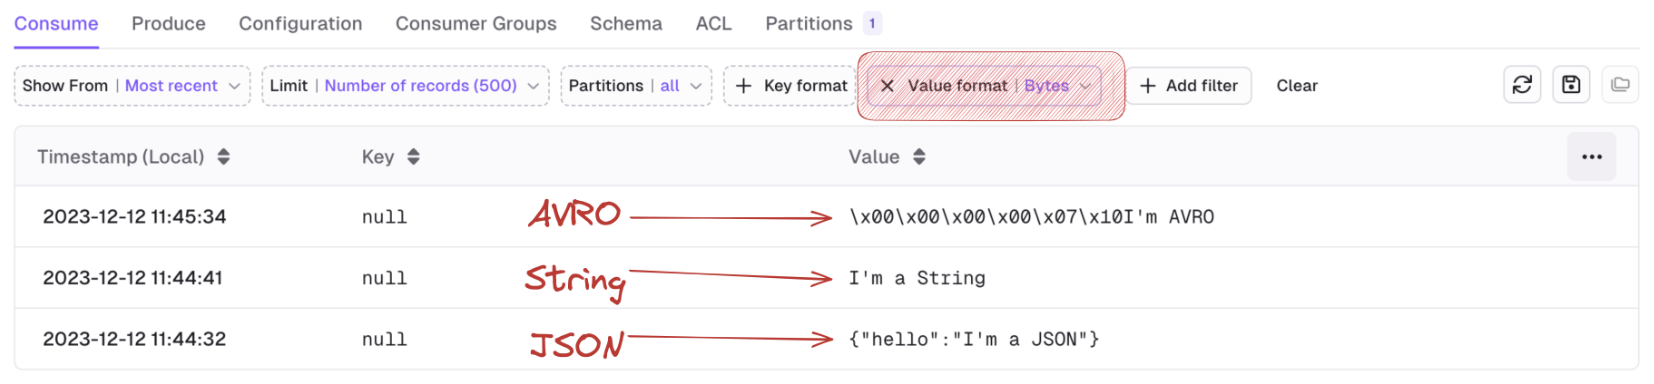
Filter records
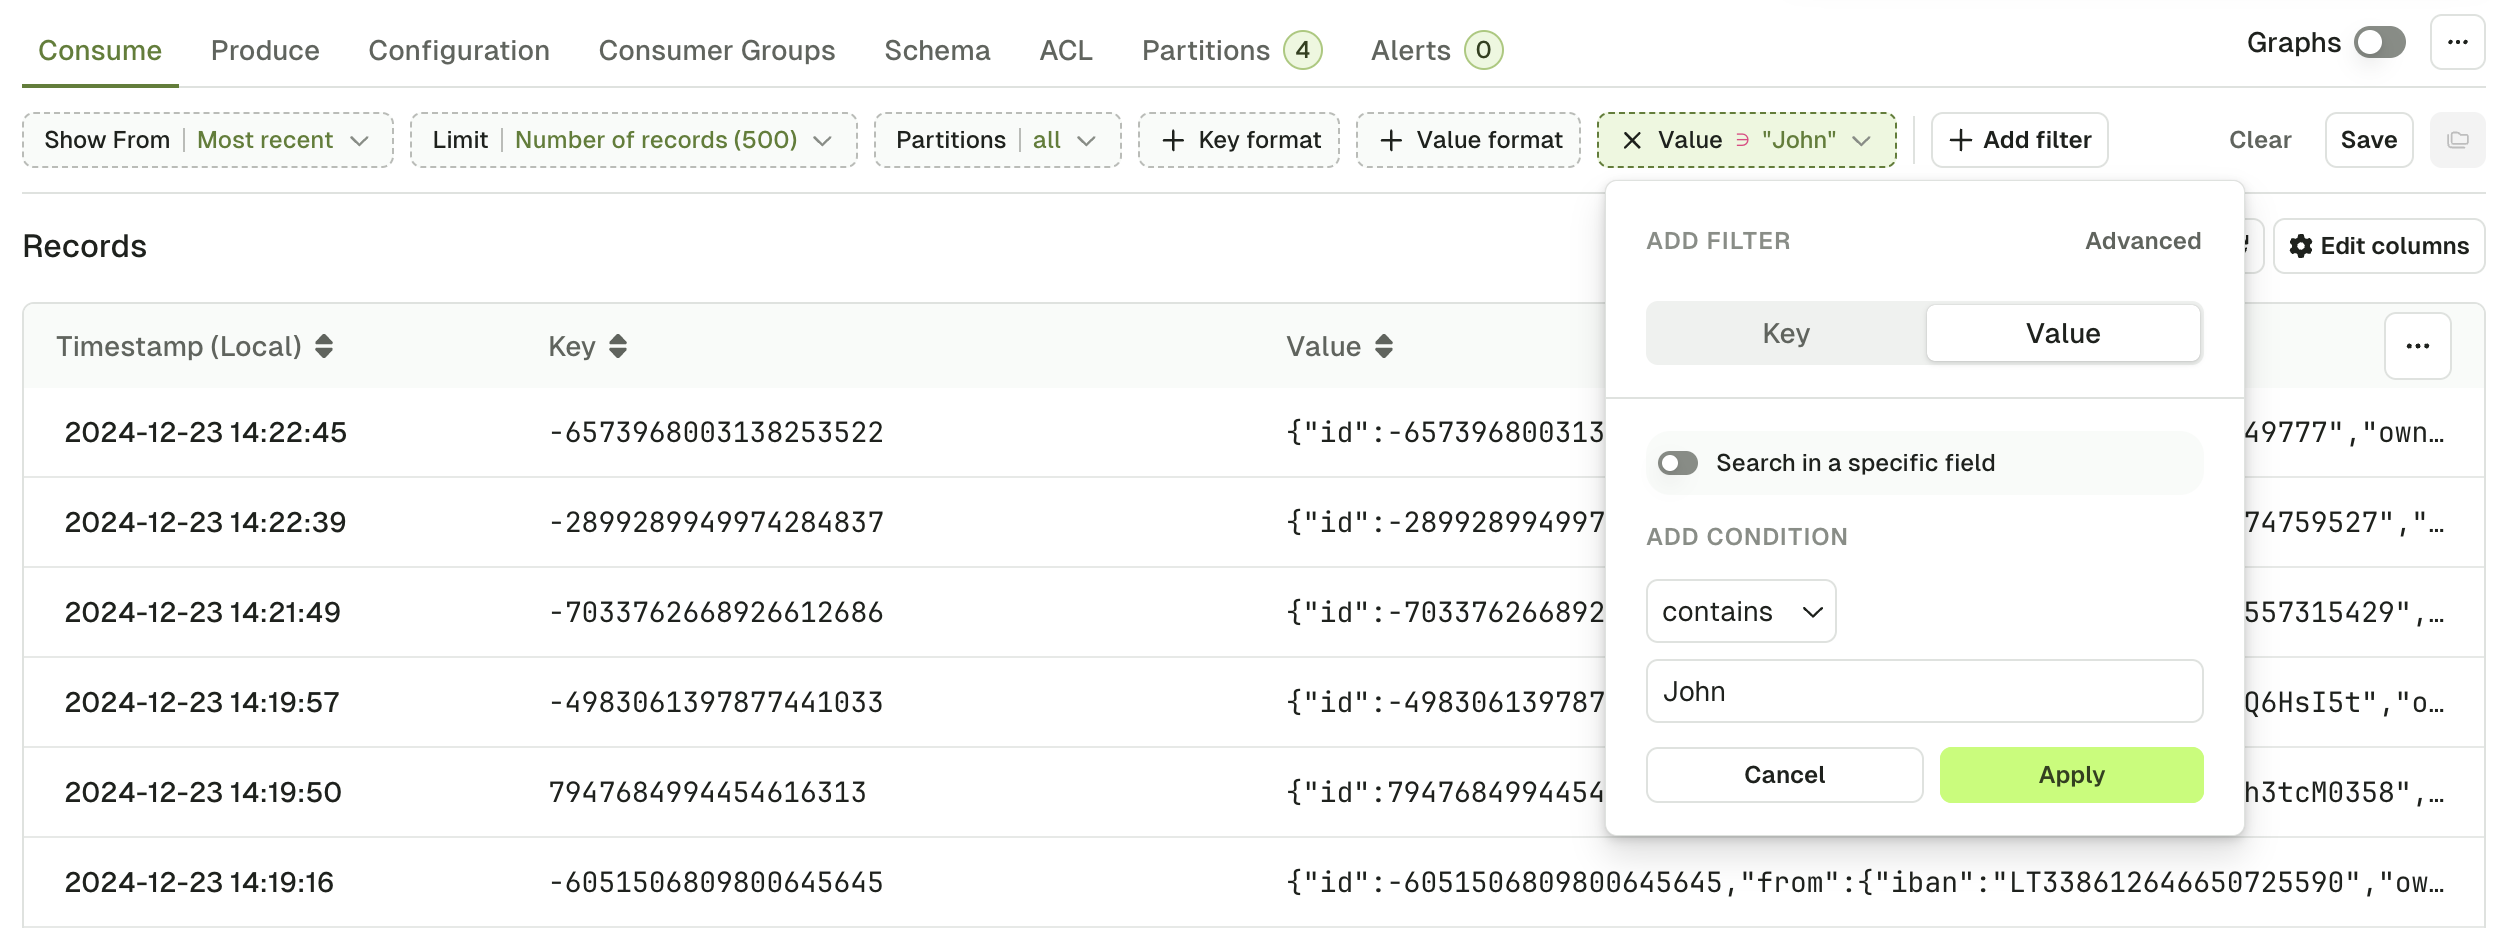
Console provides three methods to define filters that will be executed on the server and will only return the records that match. This is a very powerful feature that allows you to quickly see the records that matter to you, especially in large topics.Global search
Global search is the most simple type of filter you can use.- Specify whether to look in the Key or in the value.
- Pick an operator (contains, not contains, equals, not equals).
- Type your search term.
Internally, the global will treat the record Key or Value as text to apply the operation (contains, equals, …). This might not be the preferred approach if your record is JSON-ish
Search in a specific field
You can make your search more fine-grained by activating “Search in a specific field”.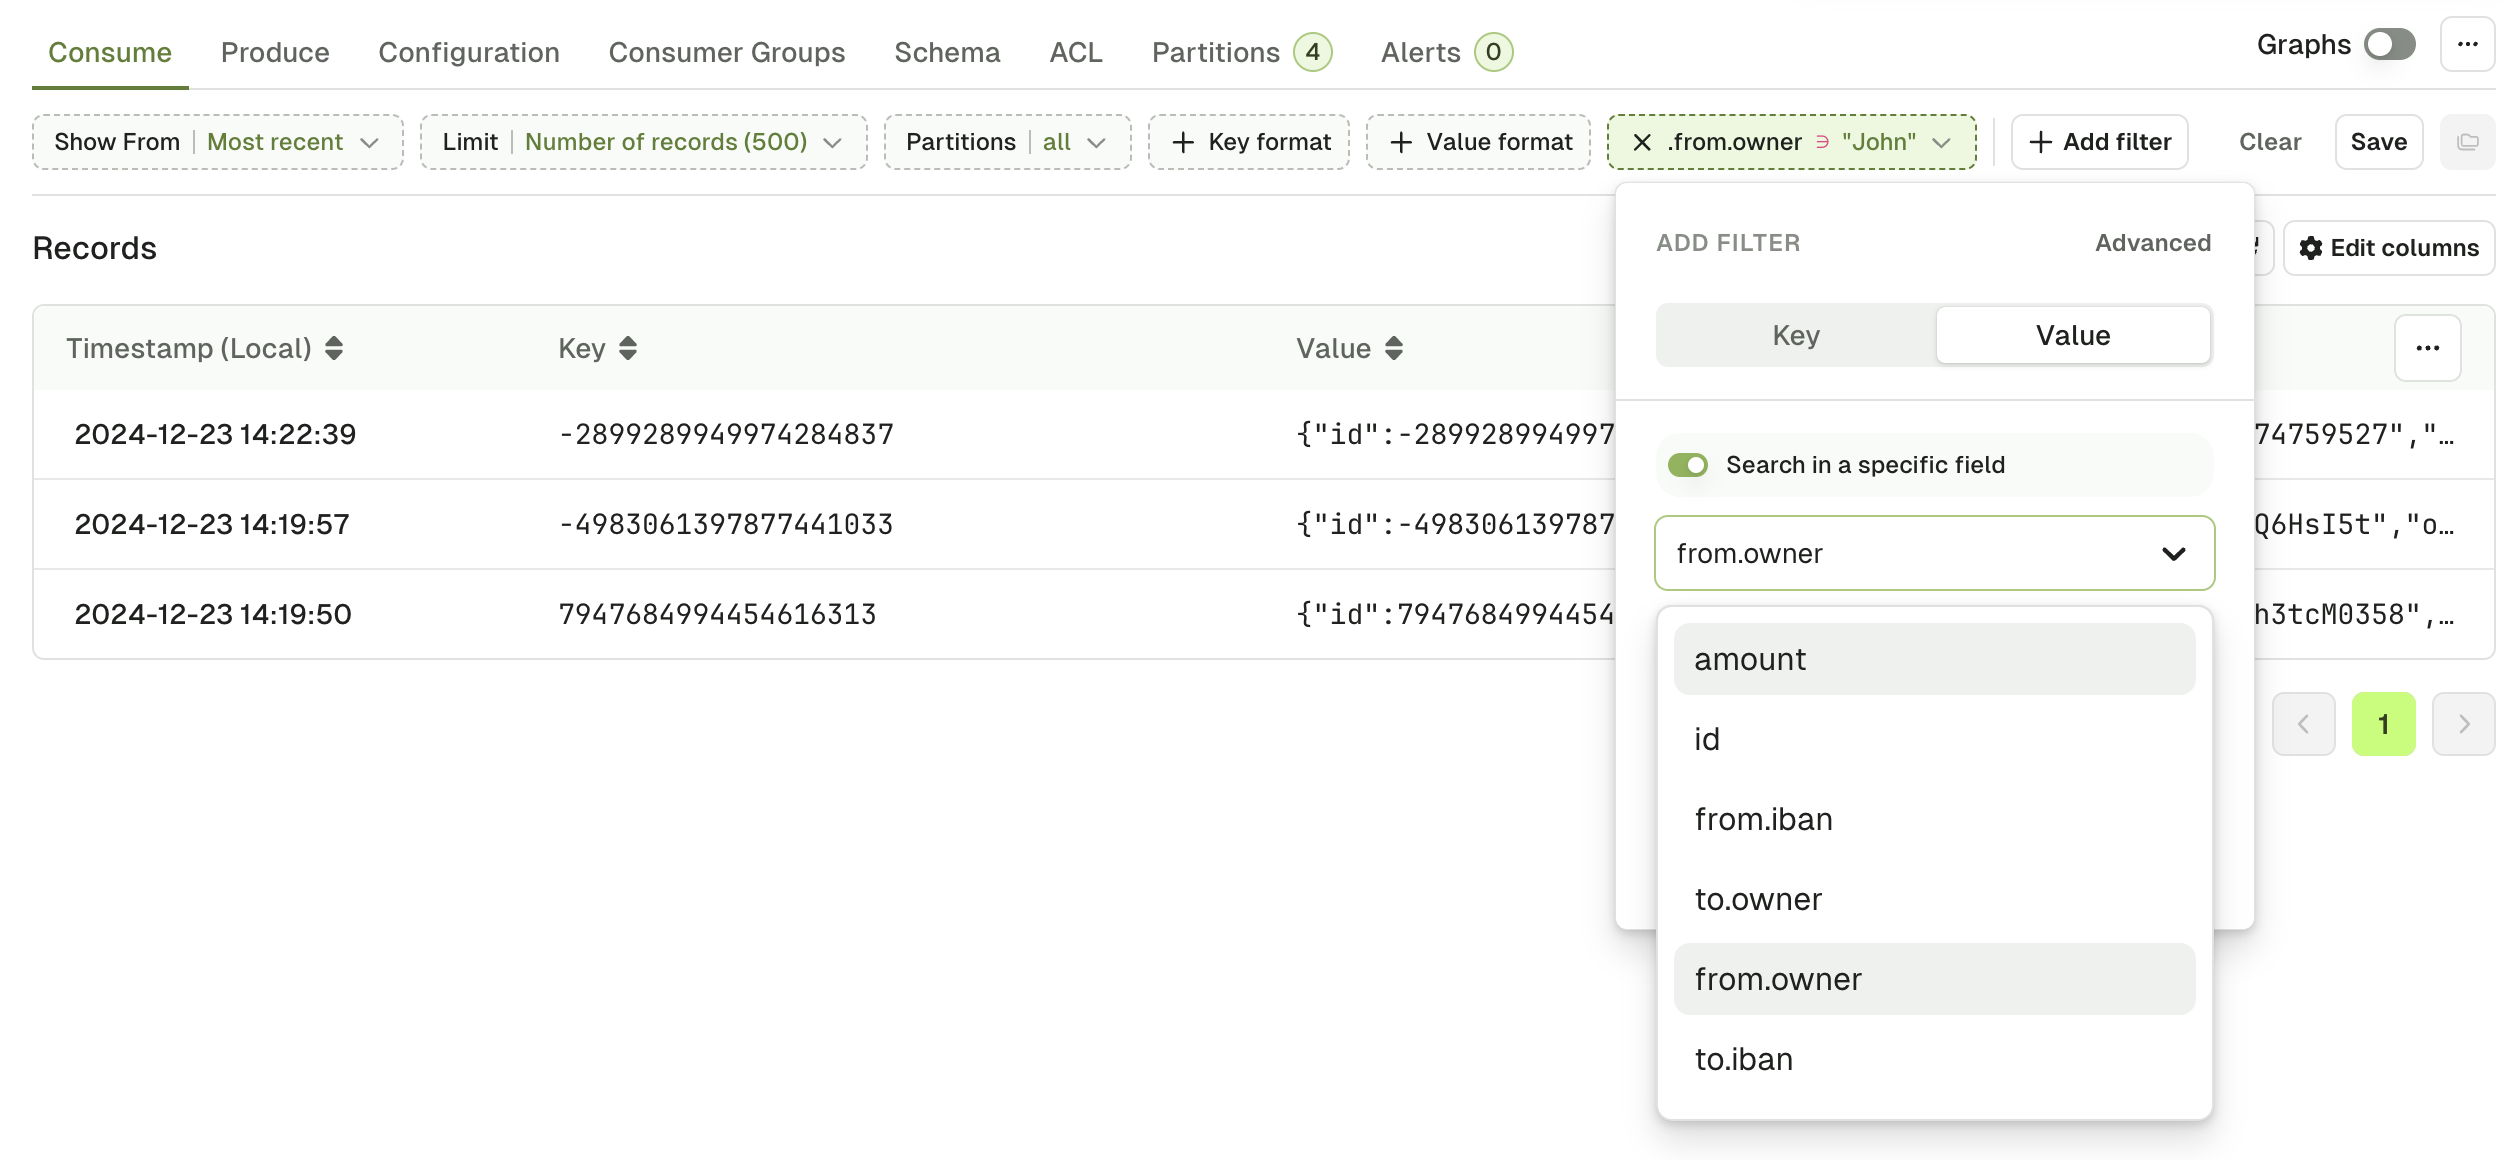
Console will generate an autocomplete list by looking at the most recent 50 messages in the topic. If the key you’re looking for is not here, you can type it manually. Examples:
data.event.namedata.event["correlation-id"]data.clientAddress[0].ipJS search
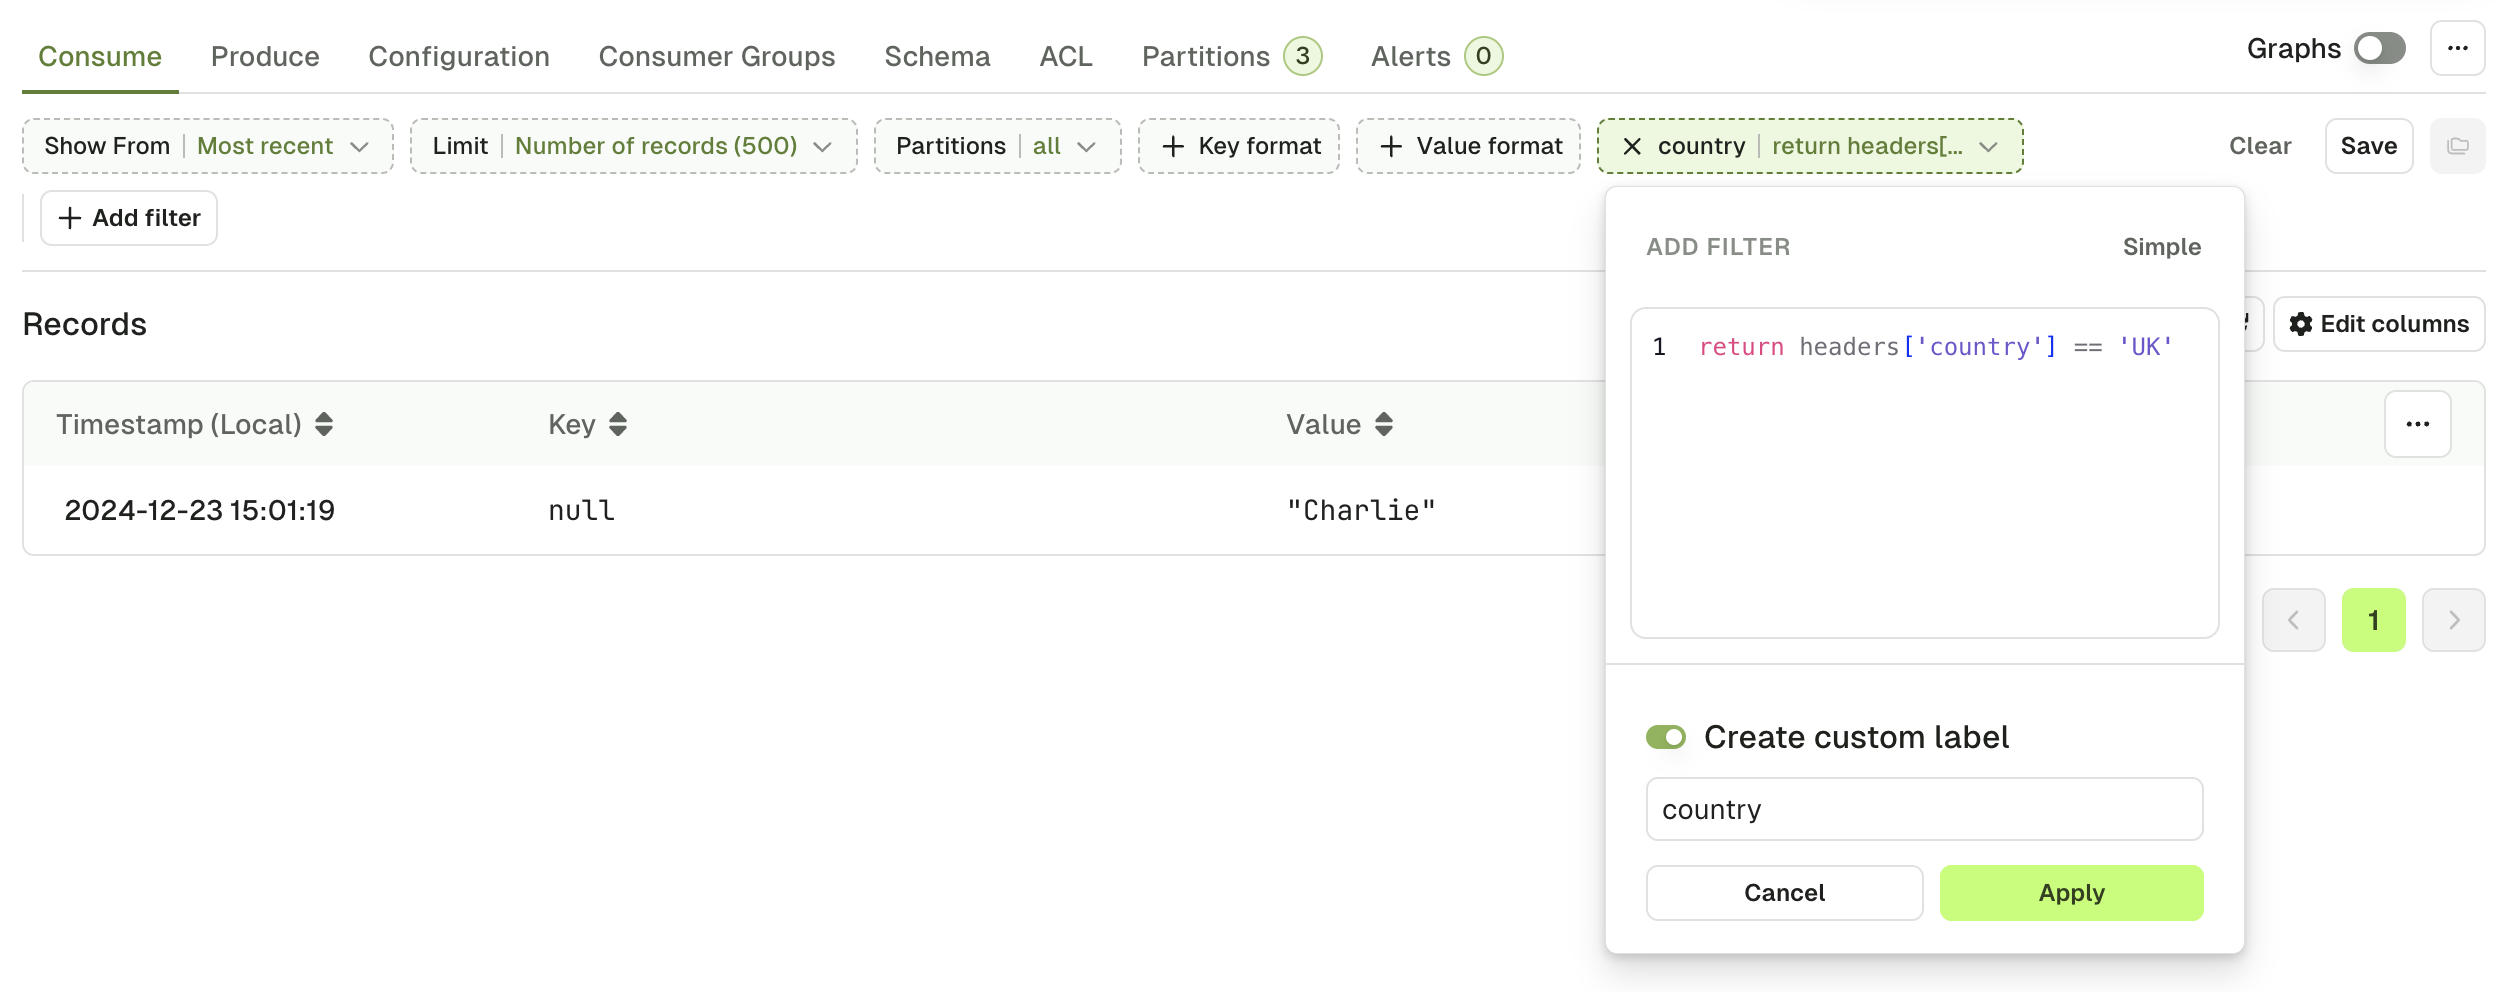
If you need to construct more advanced filters, you can switch to the advanced view and use plain Javascript to build your filter.Statistics pop-up
While the consumer is processing, you’ll see the following: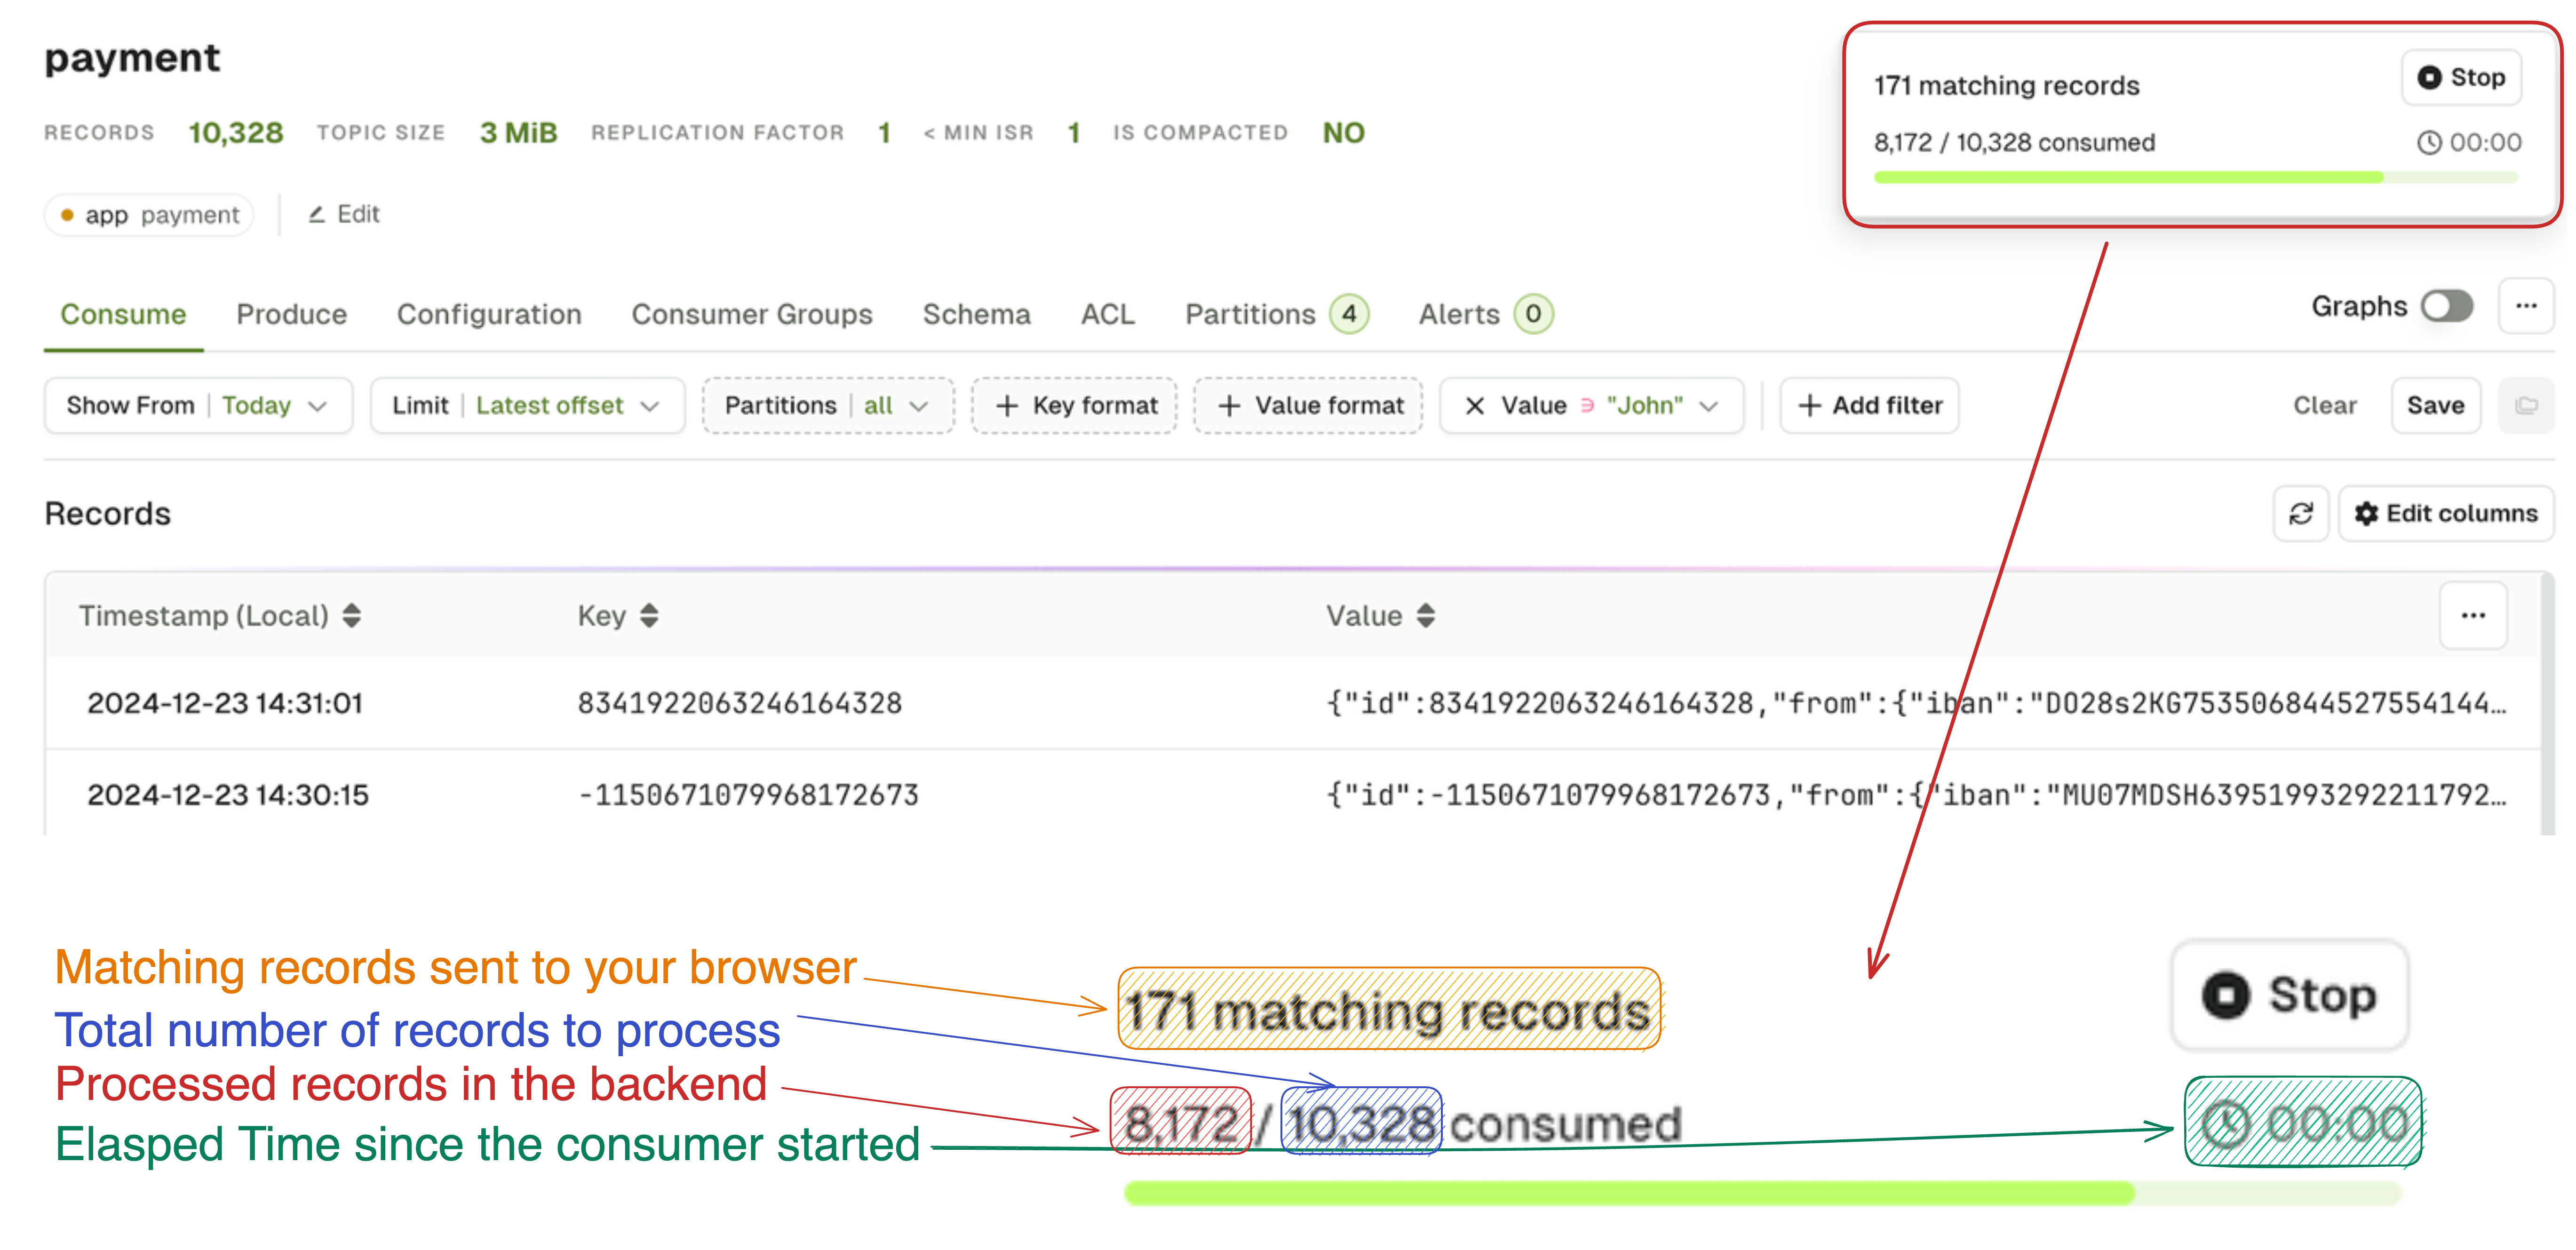
Browse records
From the main table
Once the search starts, you’ll see messages appearing in the main table with three columns: timestamp, key and value.The timestamp column uses the local timezone of the user. For example, if you’re producing a message from Dublin, Ireland (UTC+1) at
14:57:38 local time and you then consume this message from your browser (in Dublin), you’ll see 14:57:38.However, if another user consumes the same message in Console but from Paris, France (UTC+2), they’ll see 15:57:38.Individual records
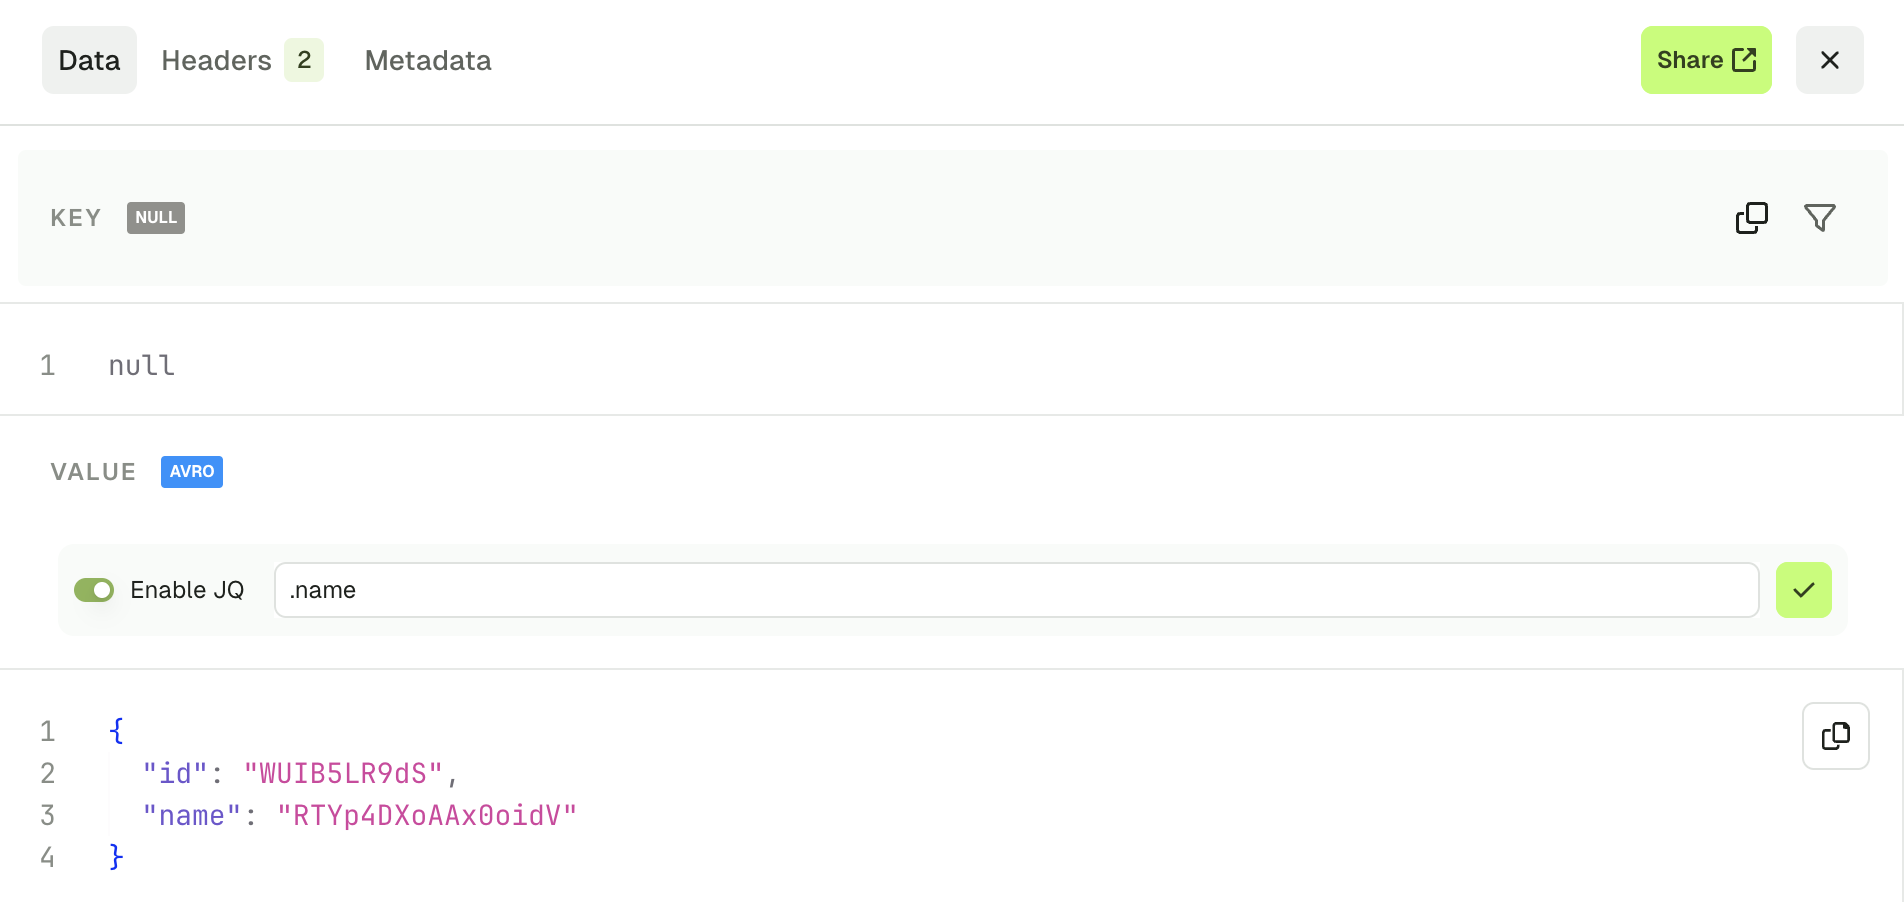
Click on a record from the list to see the entire record. Use the up/down arrow keys to navigate between messages. There are three tabs at the top, displaying different elements of your record: data, headers and metadata.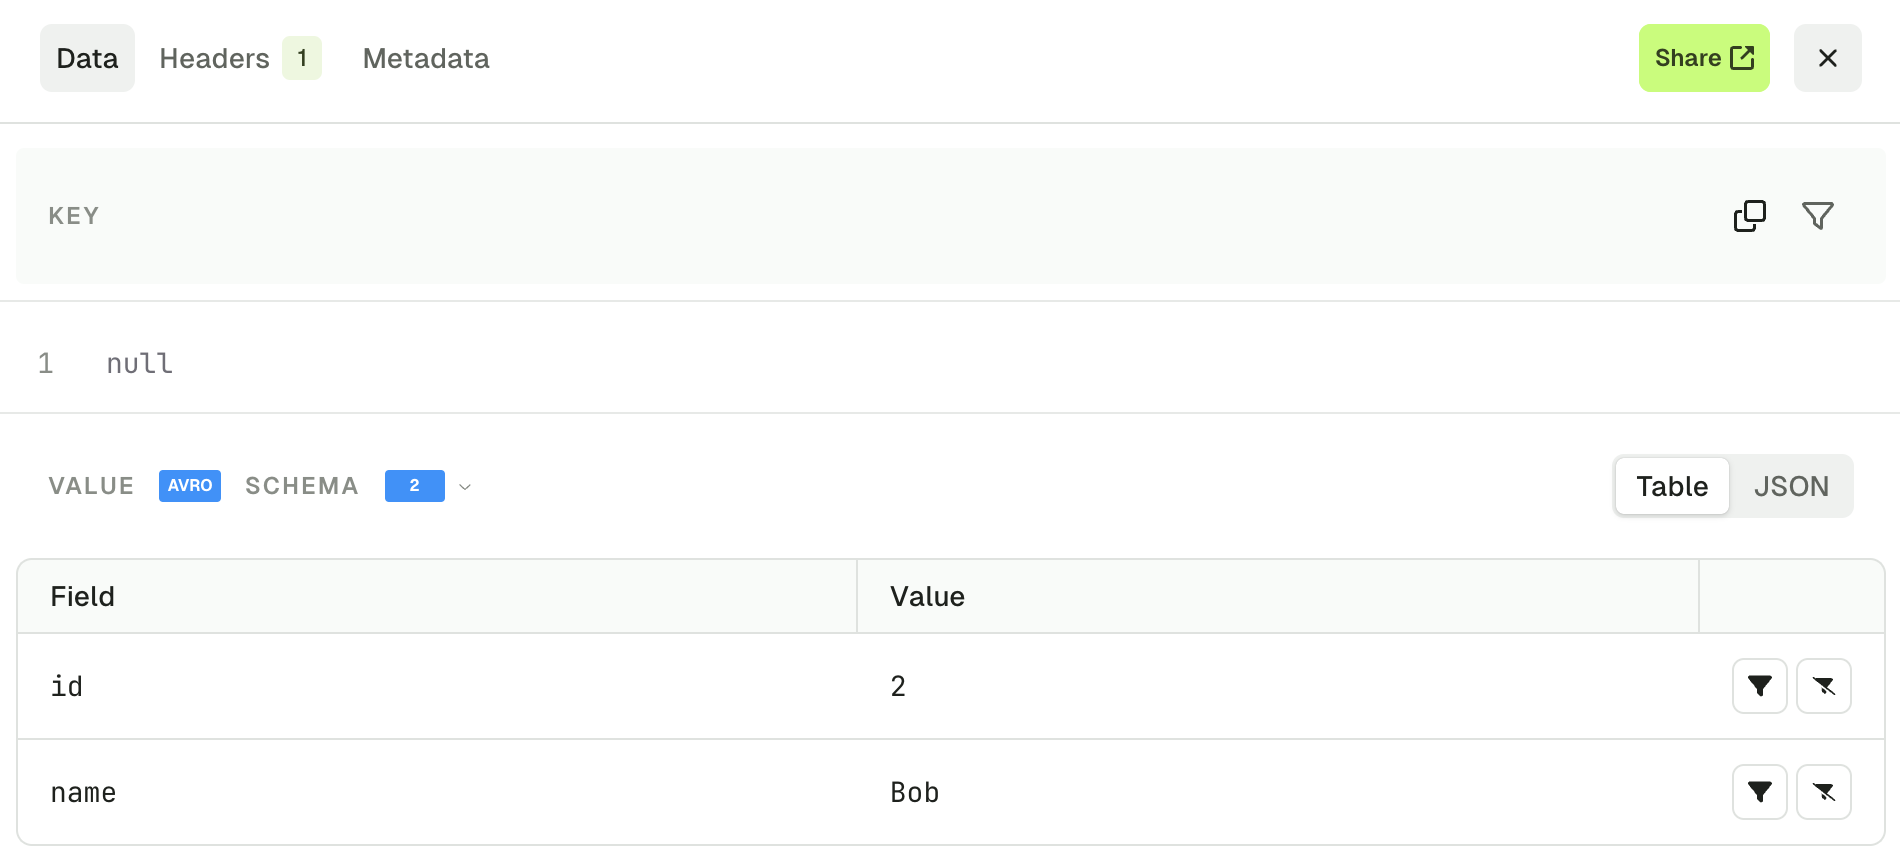
Data tab
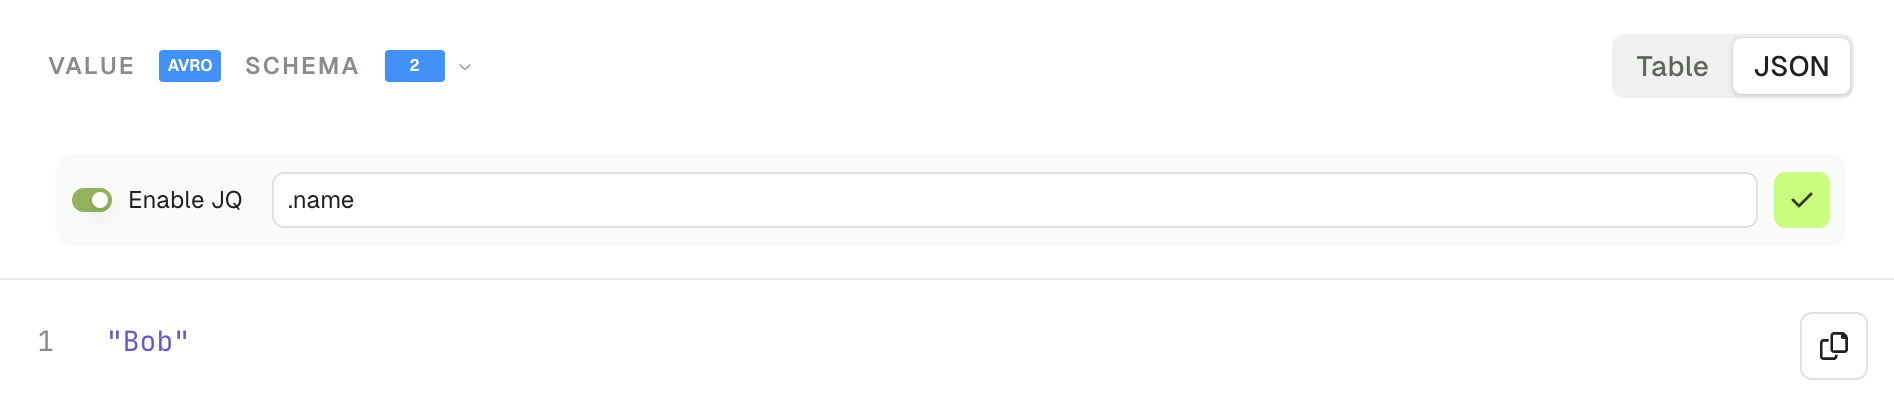
The Data tab lets you visualize your record’s key and value. If your record value is serialized with JSON or using a schema registry, it’s presented in the table view by default. You can also switch to the JSON view if necessary.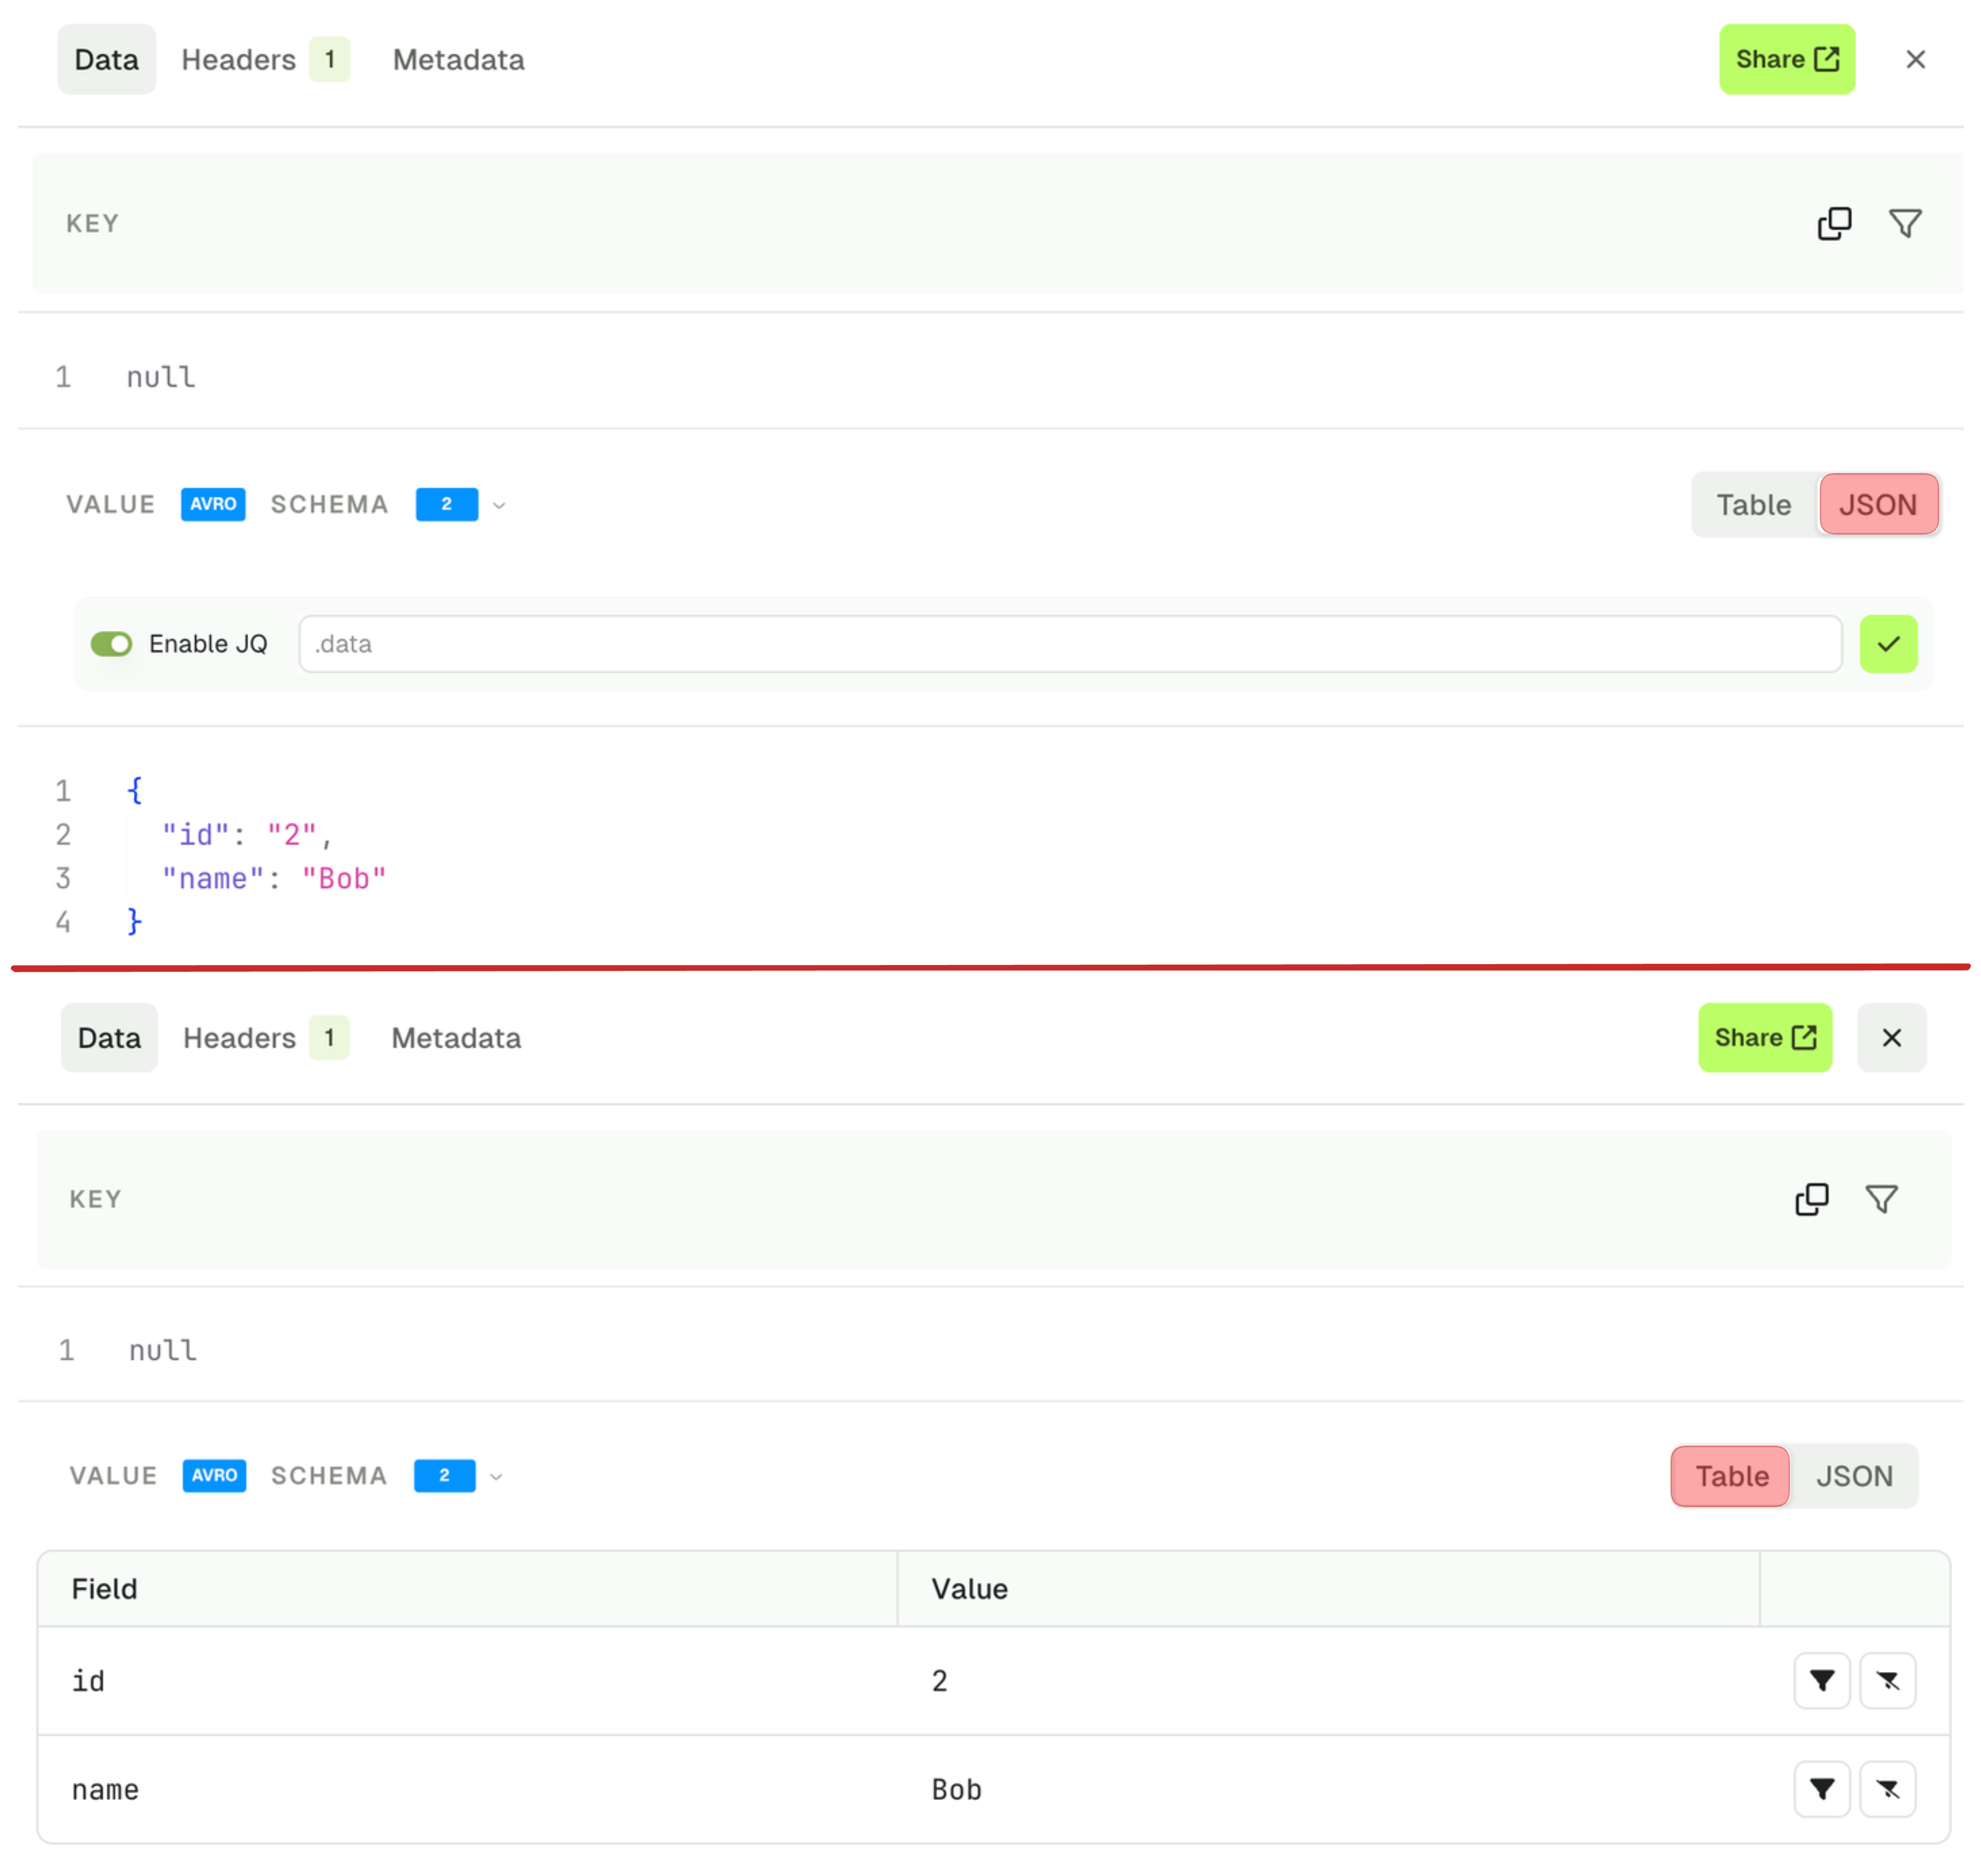
- Table view lets you visualize your message field by field and allows you to restrict your search further by applying more filters on individual fields. Filter types are include and exclude and are available for: string, number and boolean fields (disabled for null and fields contained within lists).
- JSON view lets you visualize your message and the Enable JQ toggle allows you to create a different projection of your record value.
Headers tab
The Headers tab shows all the headers of your Kafka record and lets you find more messages with the same header value. Use the funnel icon to filter the view: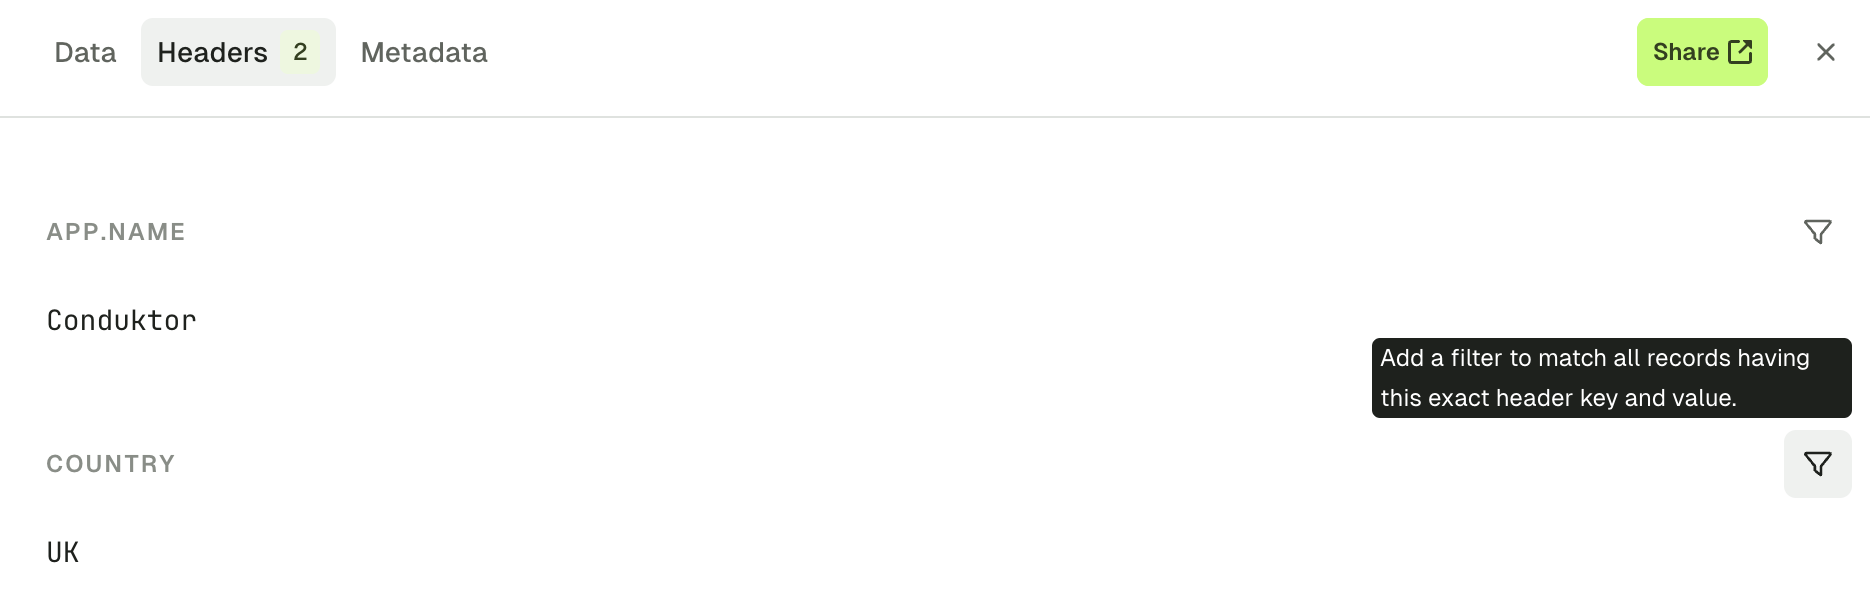
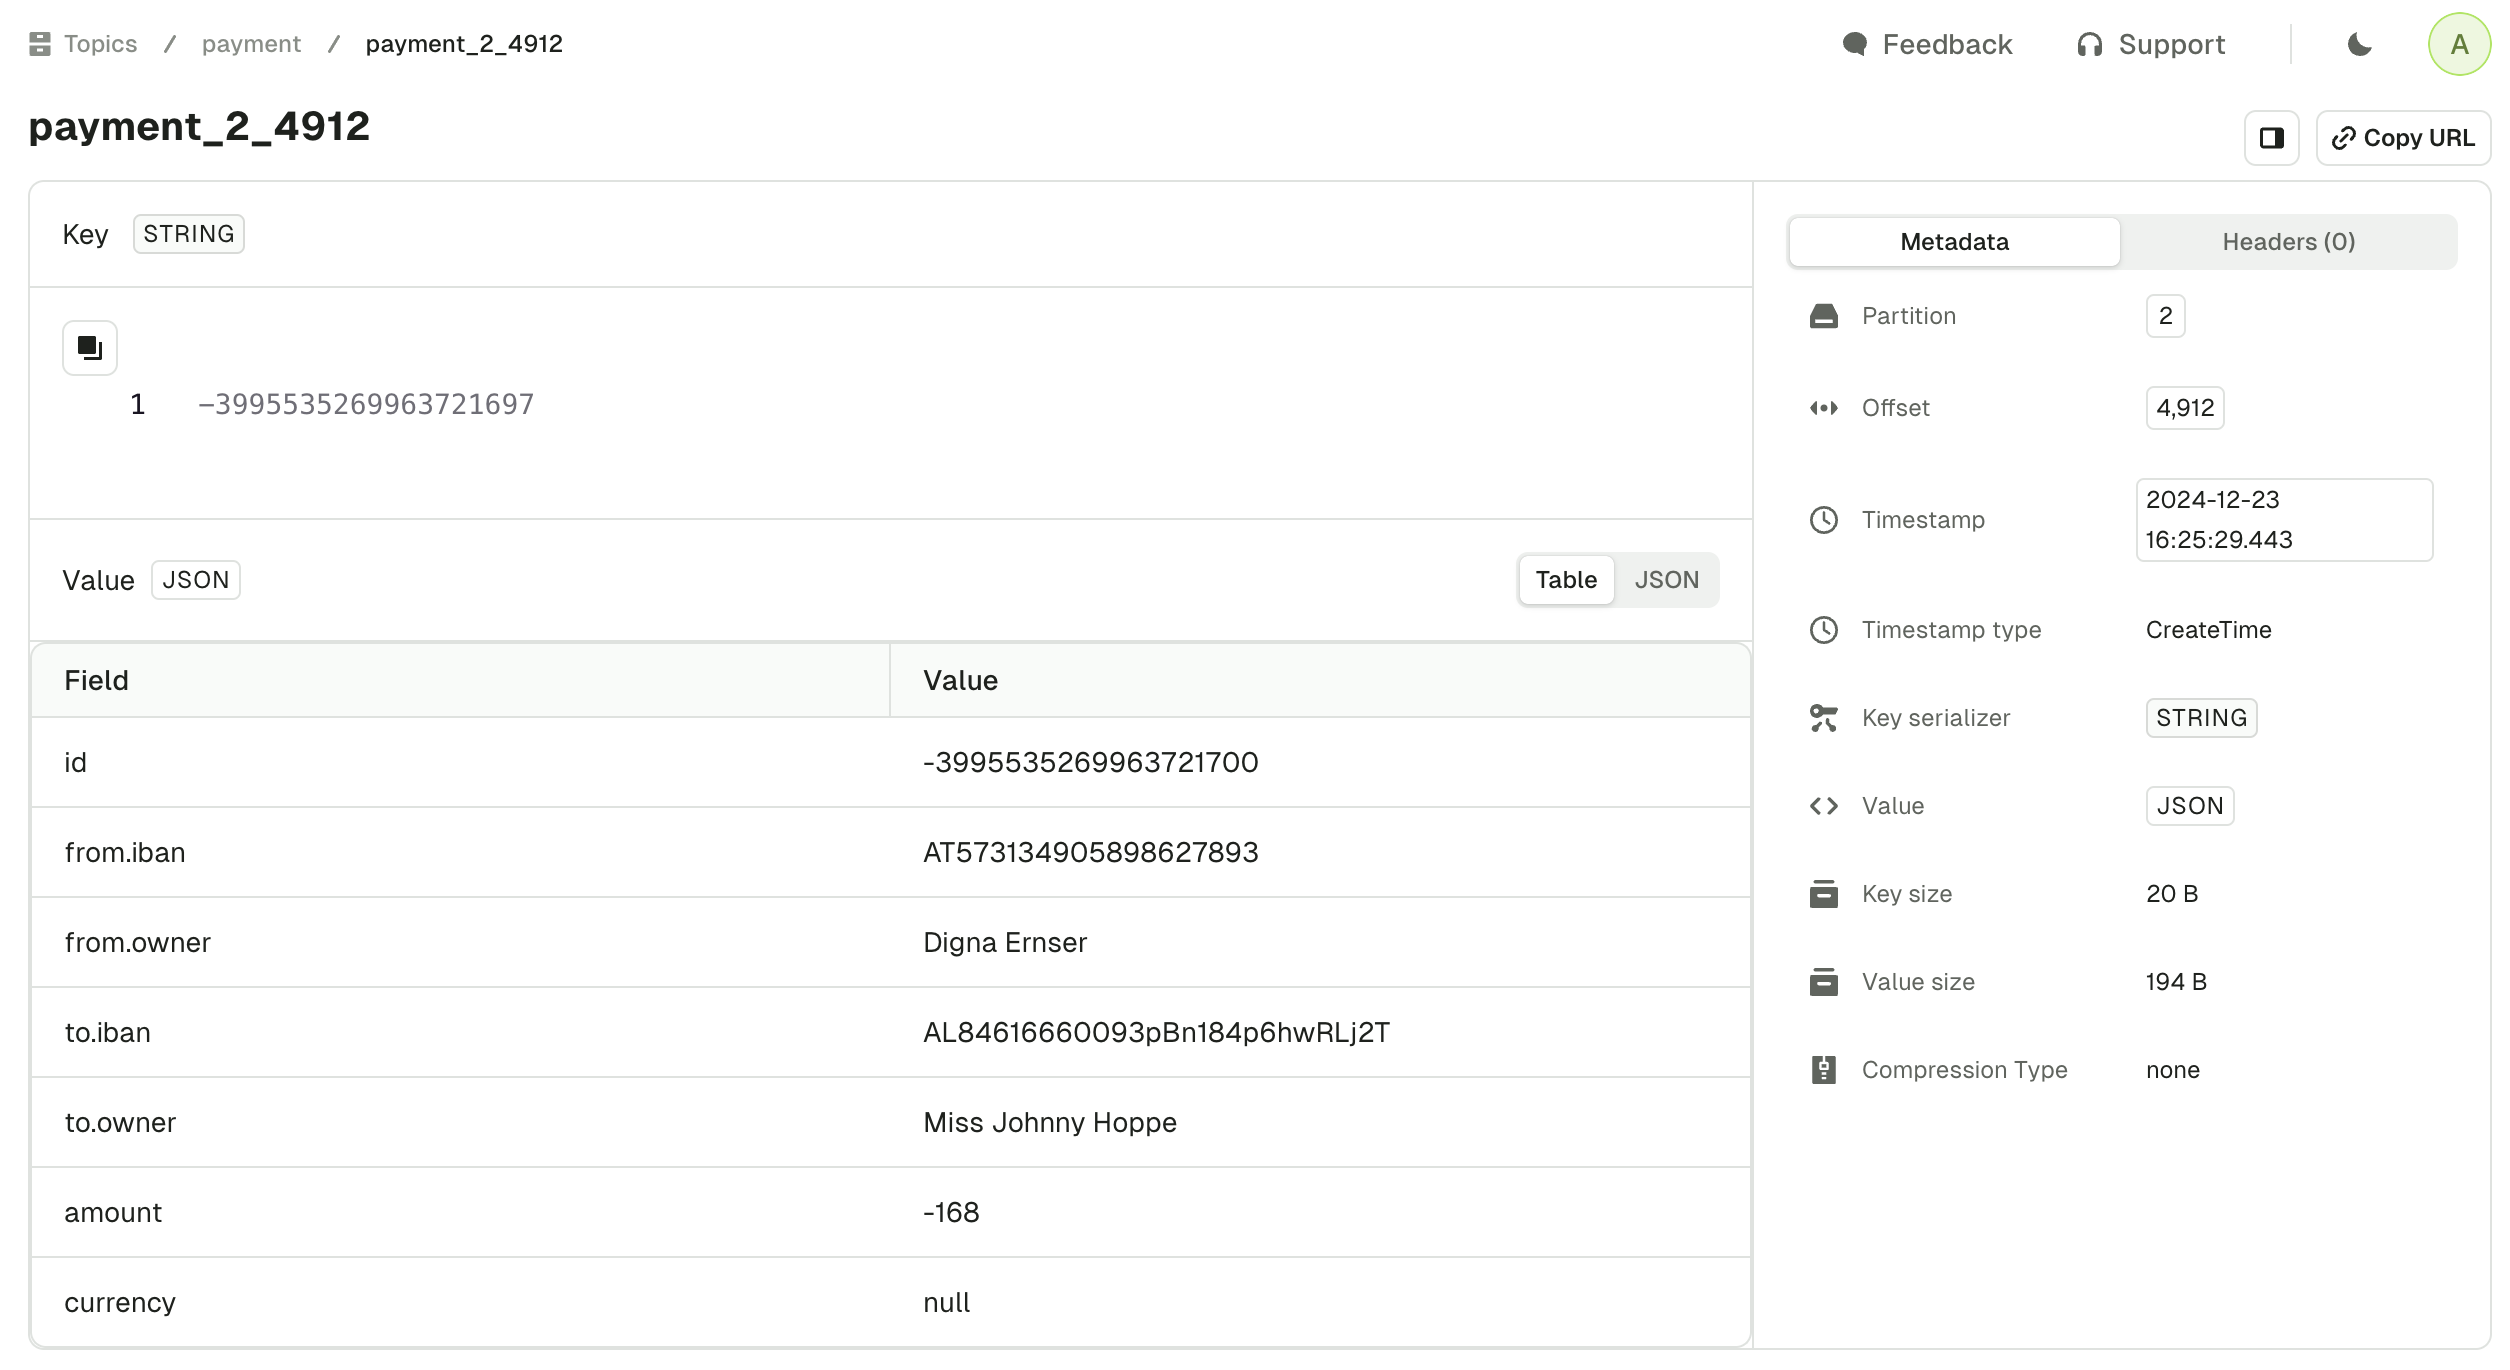
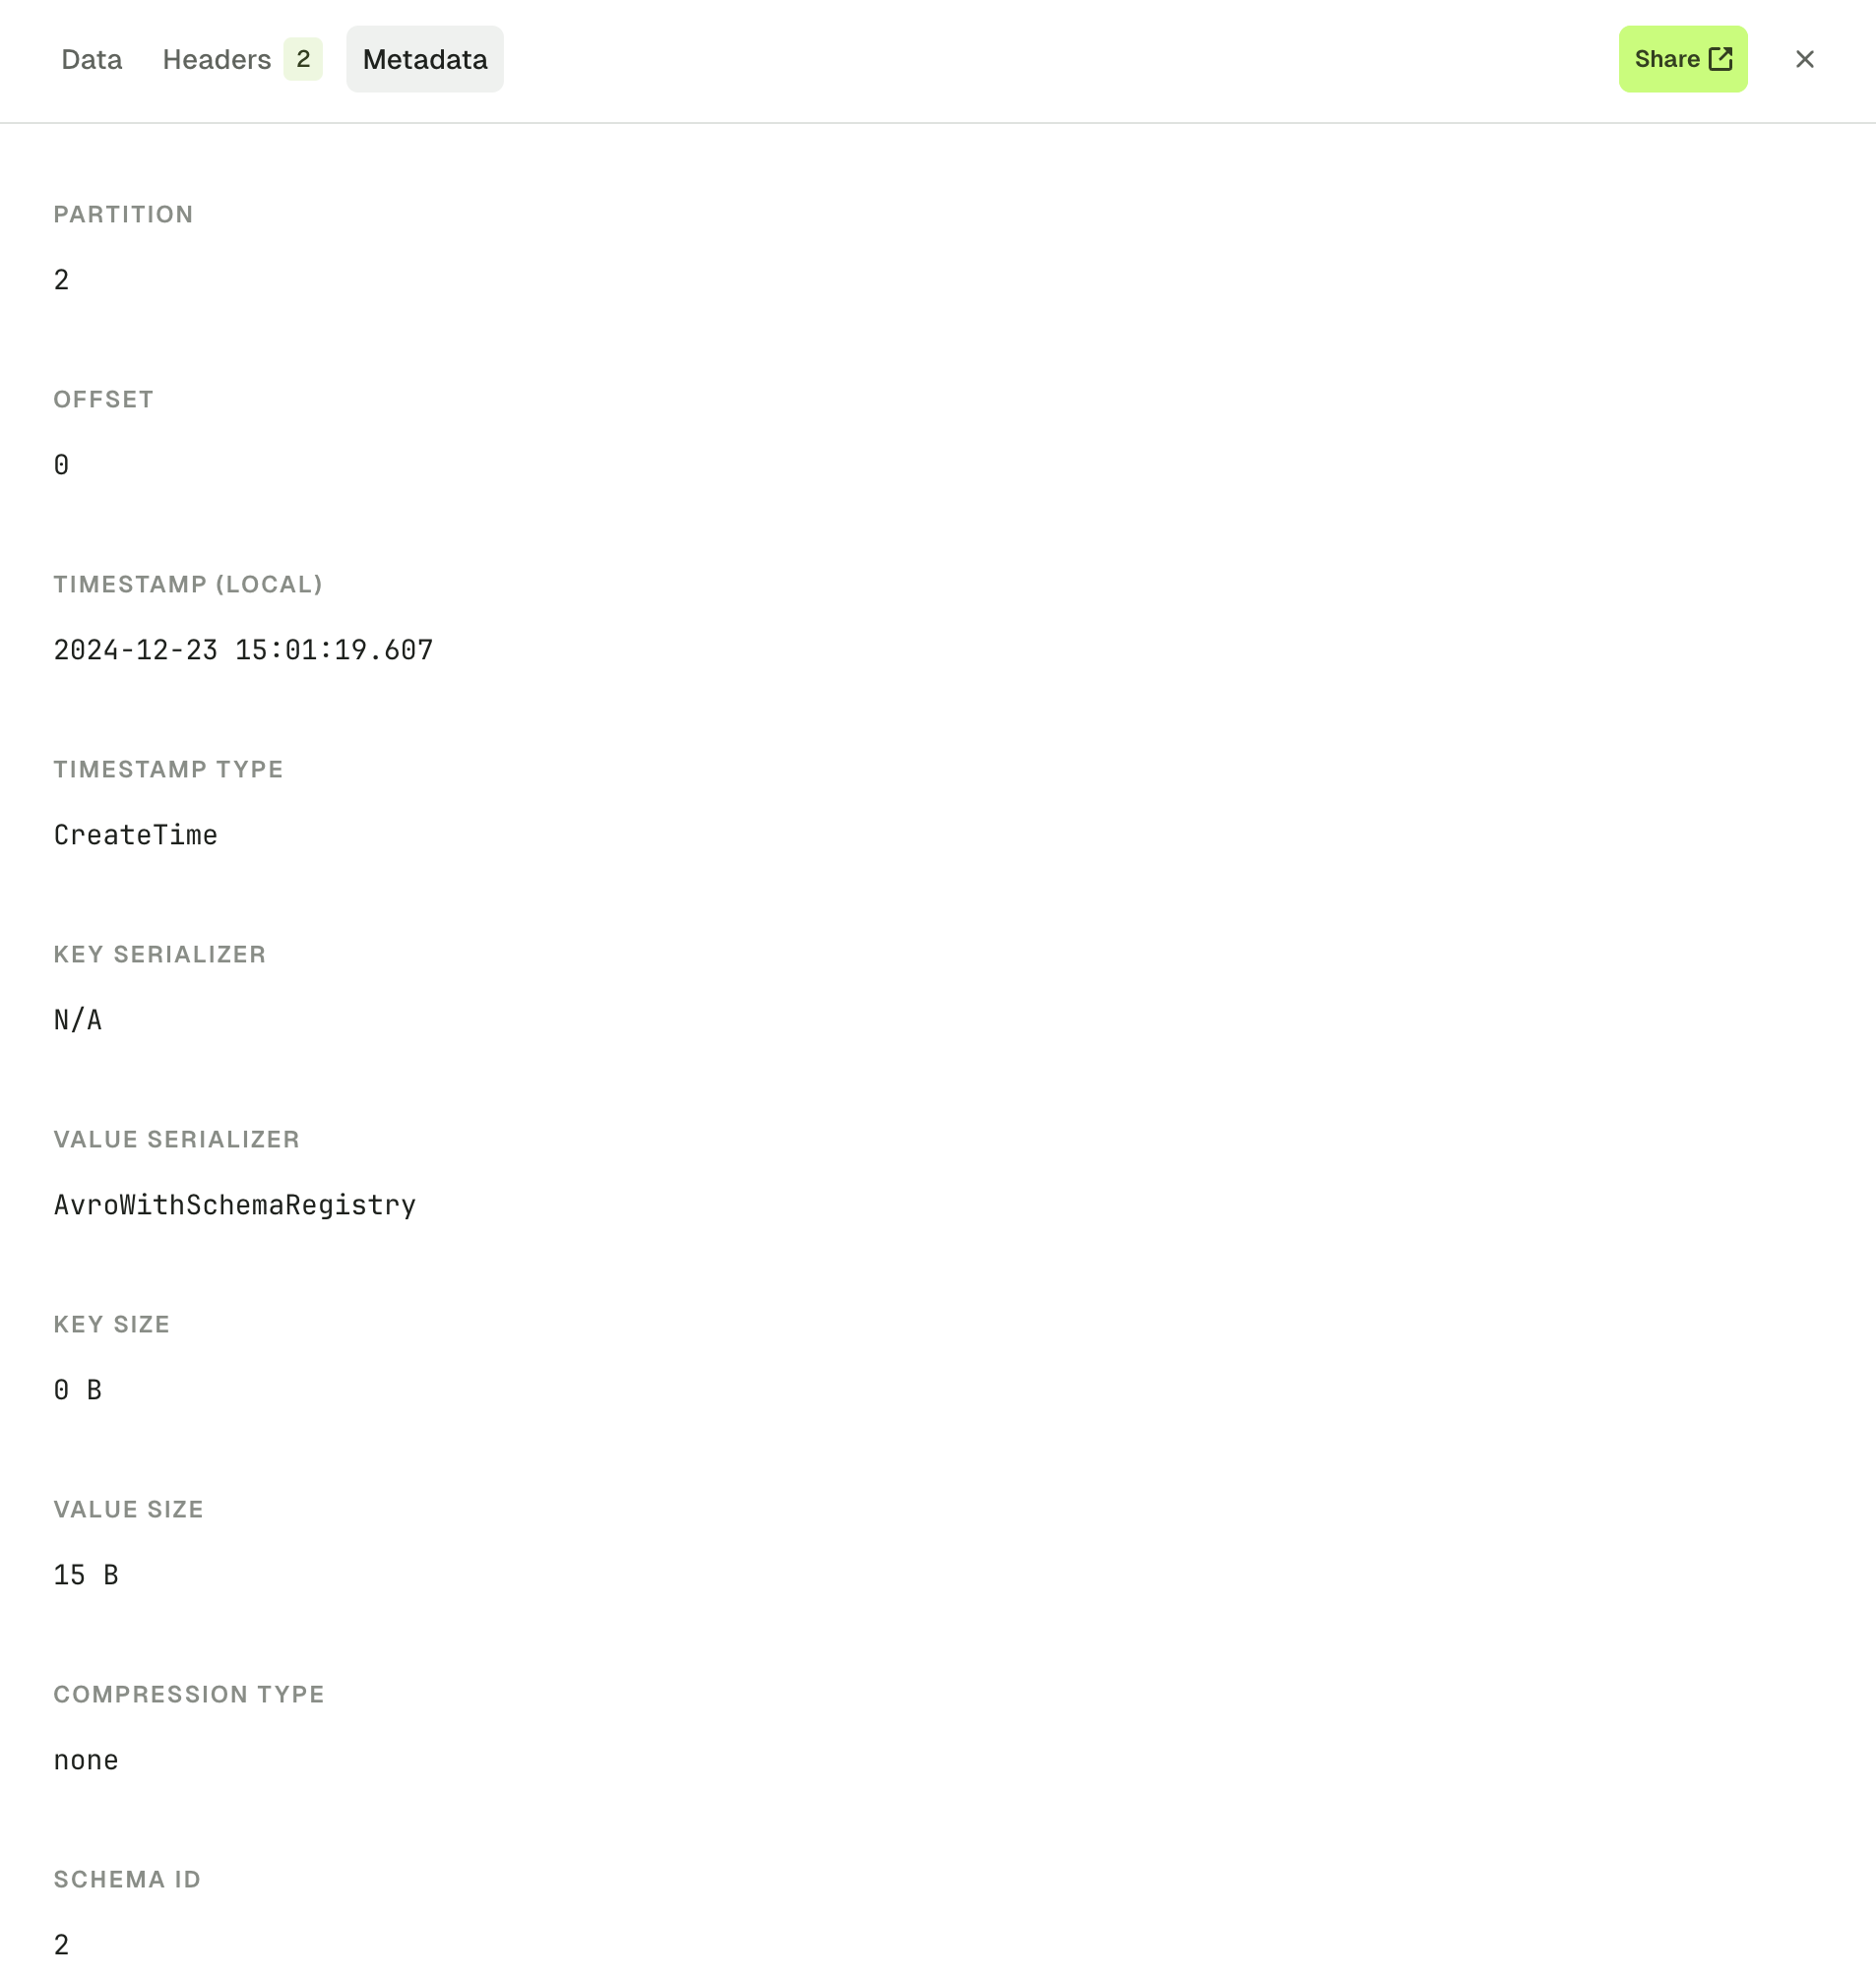
Metadata tab
The Metadata tab provides all other information regarding your record that could be useful:- record partition
- record offset
- record timestamp
- the key and value serializer inferred by the automatic deserializer
- key size and value size (how it’s serialized on the broker)
- compression type
- schema ID, if any
Operations
Export records in CSV and JSON
You can export records in either JSON or CSV format. CSV is particularly useful because you can use Console to re-import the records either in a new topic or in the same topic after modifications (if required). Click on the three dots to see the options:
Reprocess records
This feature lets you pick a record from the list and reprocess it either in the same or in a different topic, while letting you change its content beforehand. Click Reprocess message (1), pick a destination topic (2) which takes you to the Produce tab (3) with your message pre-filled. From there you can either produce the message directly or make adjustments: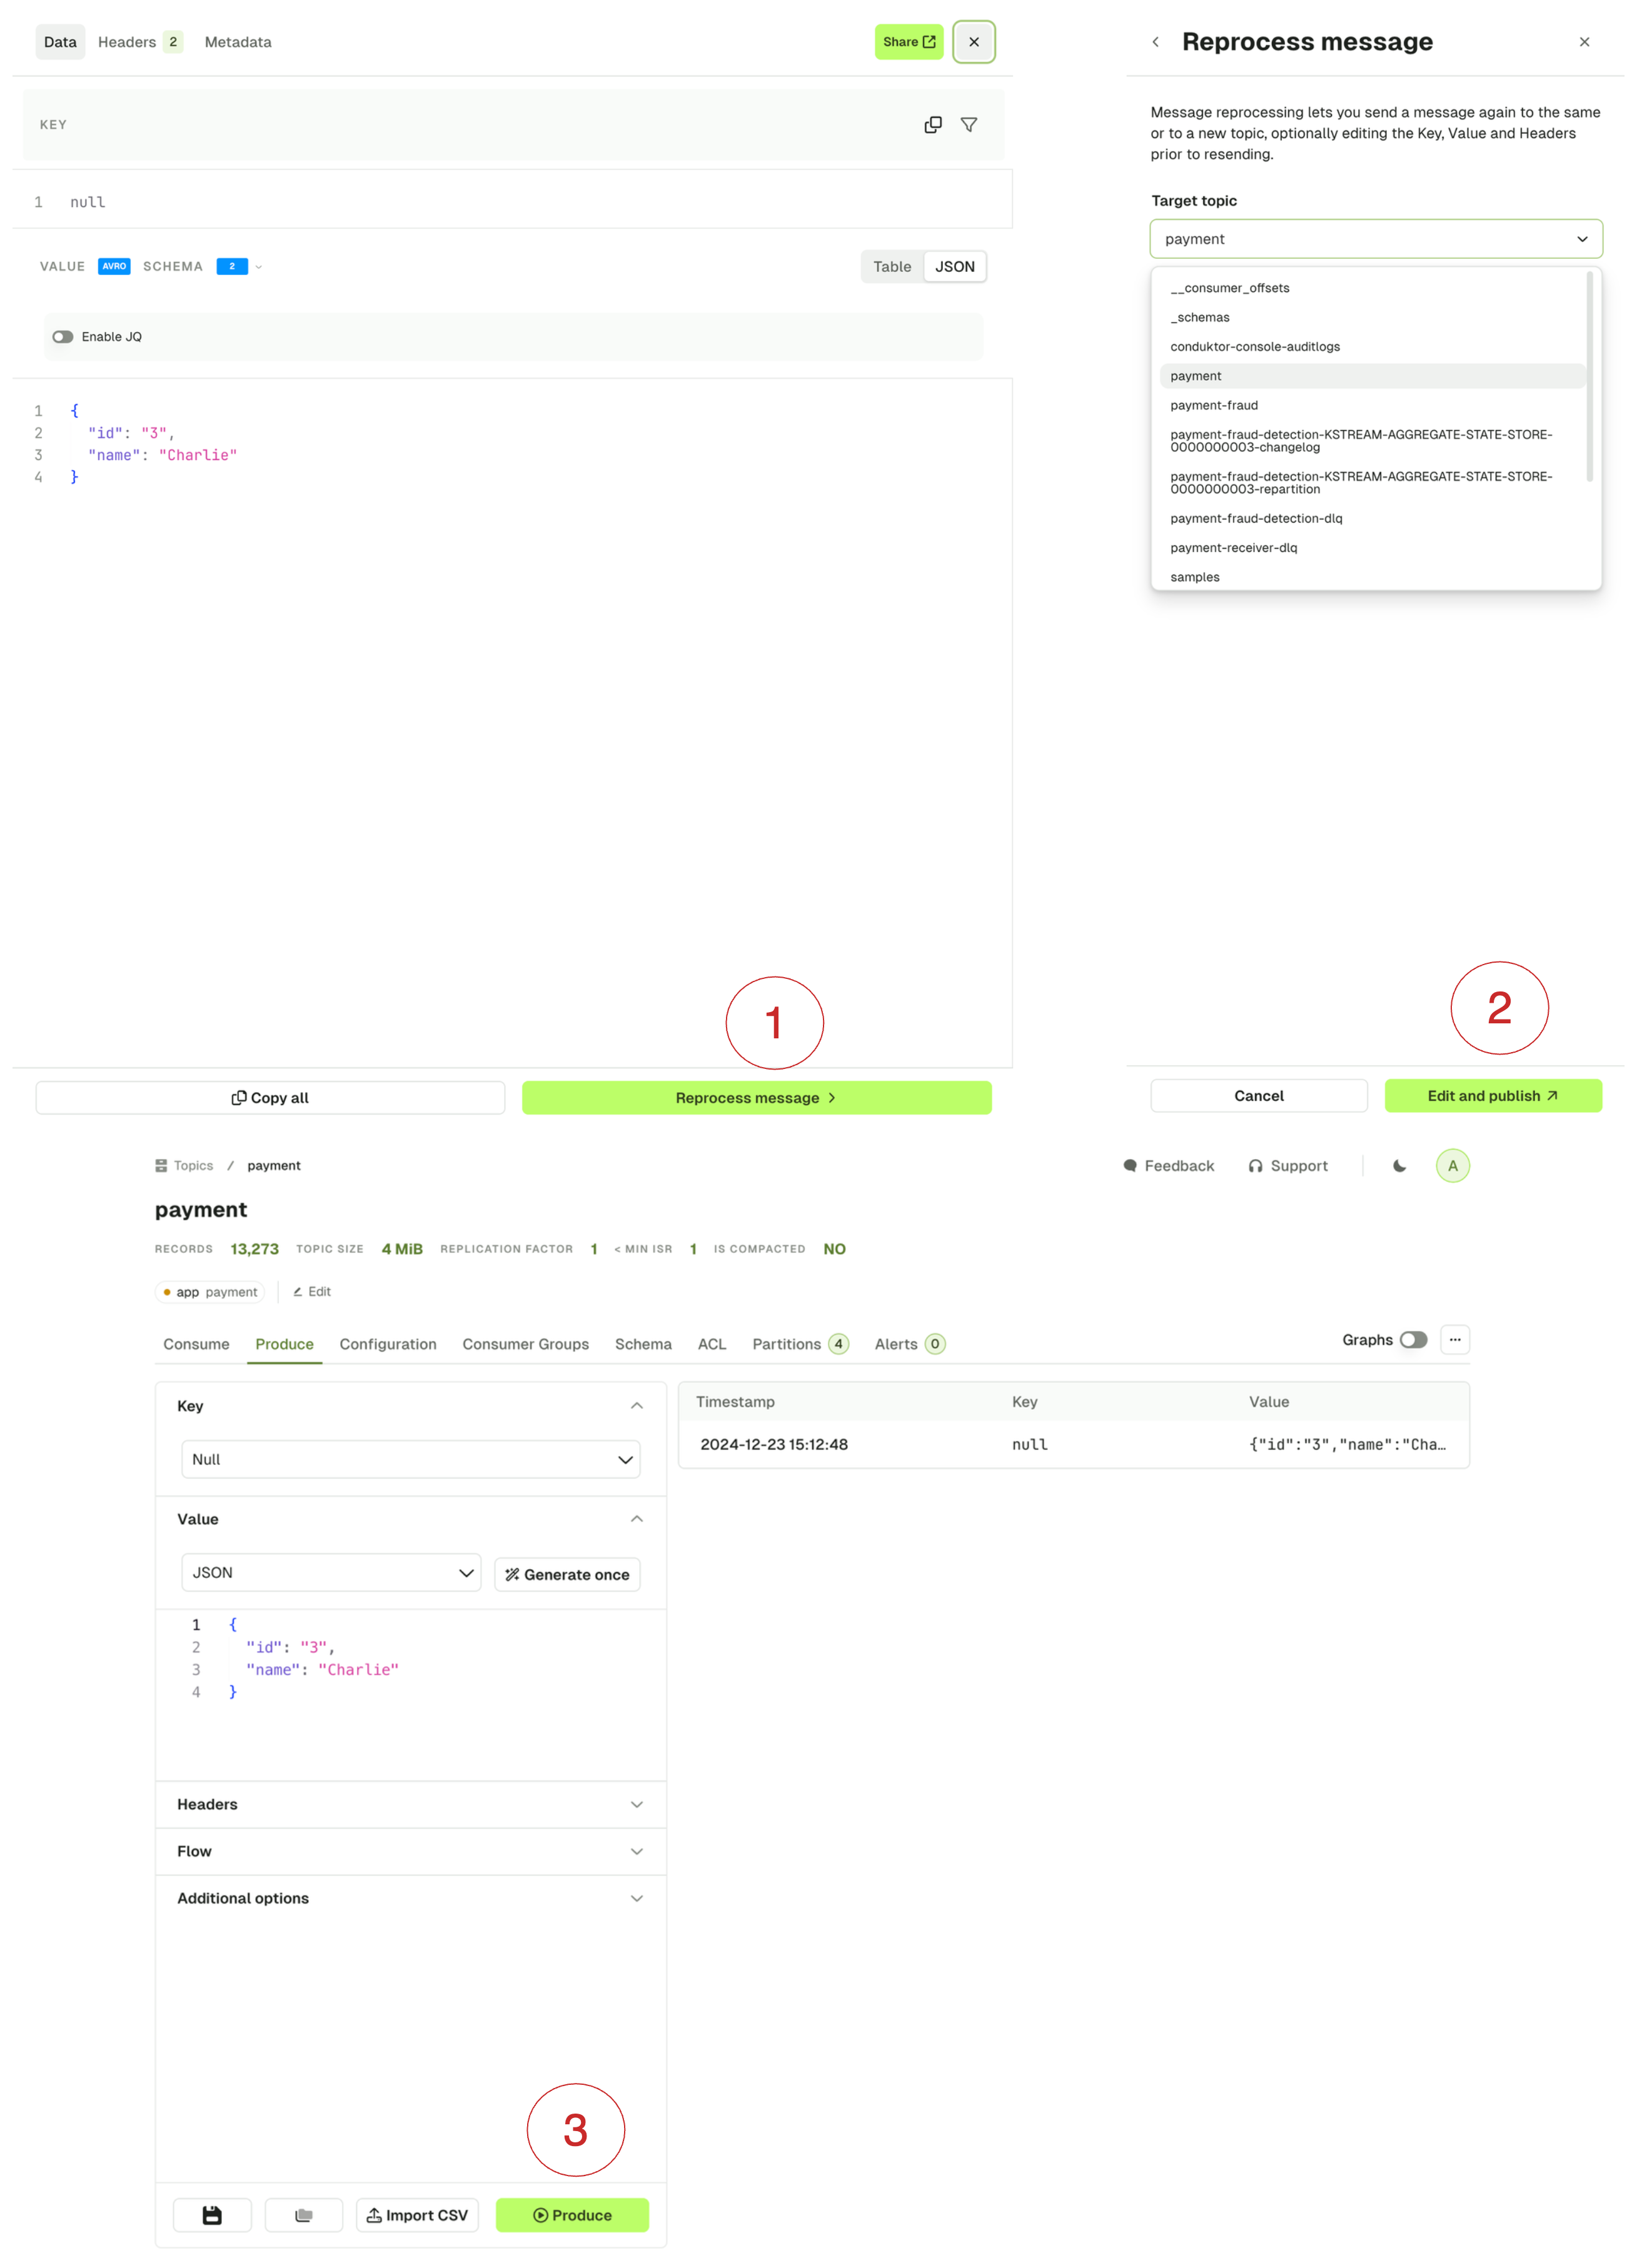
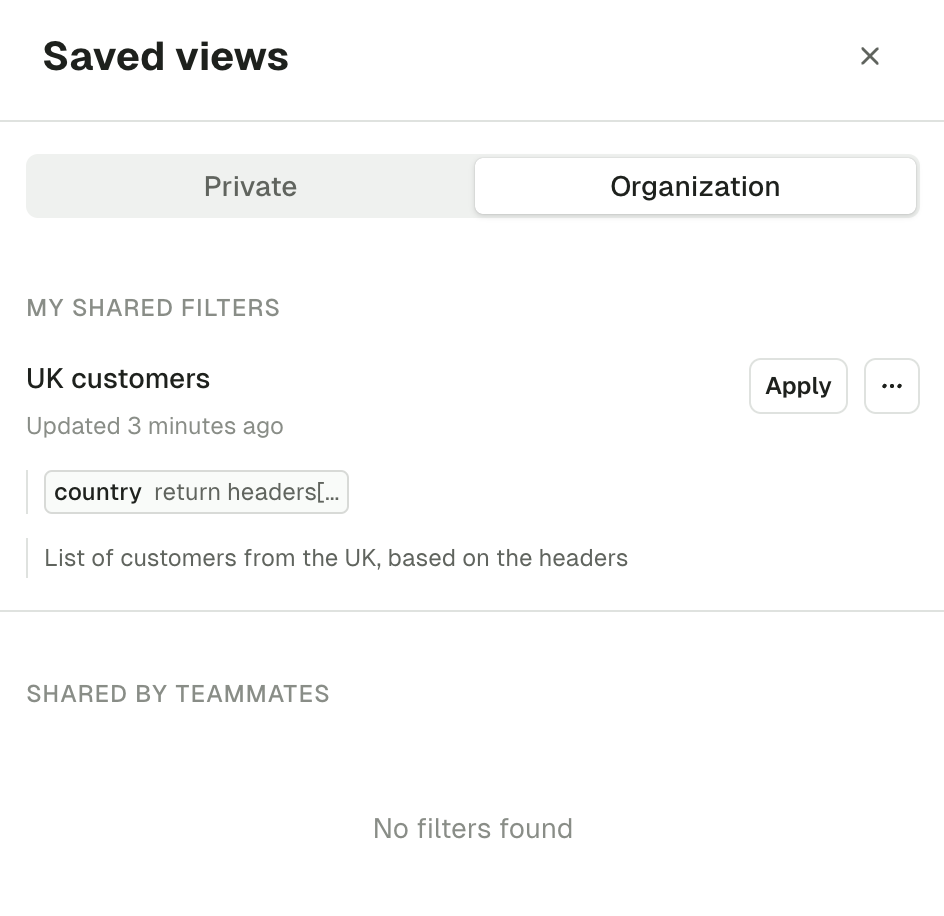
Save and load views
If you’re regularly using the same set of consume configuration (e.g. show from, limit) and the filters or if you’d like to share the views with others, you can save your current view as a template. To create a view, click Save. This will save your current view as a template: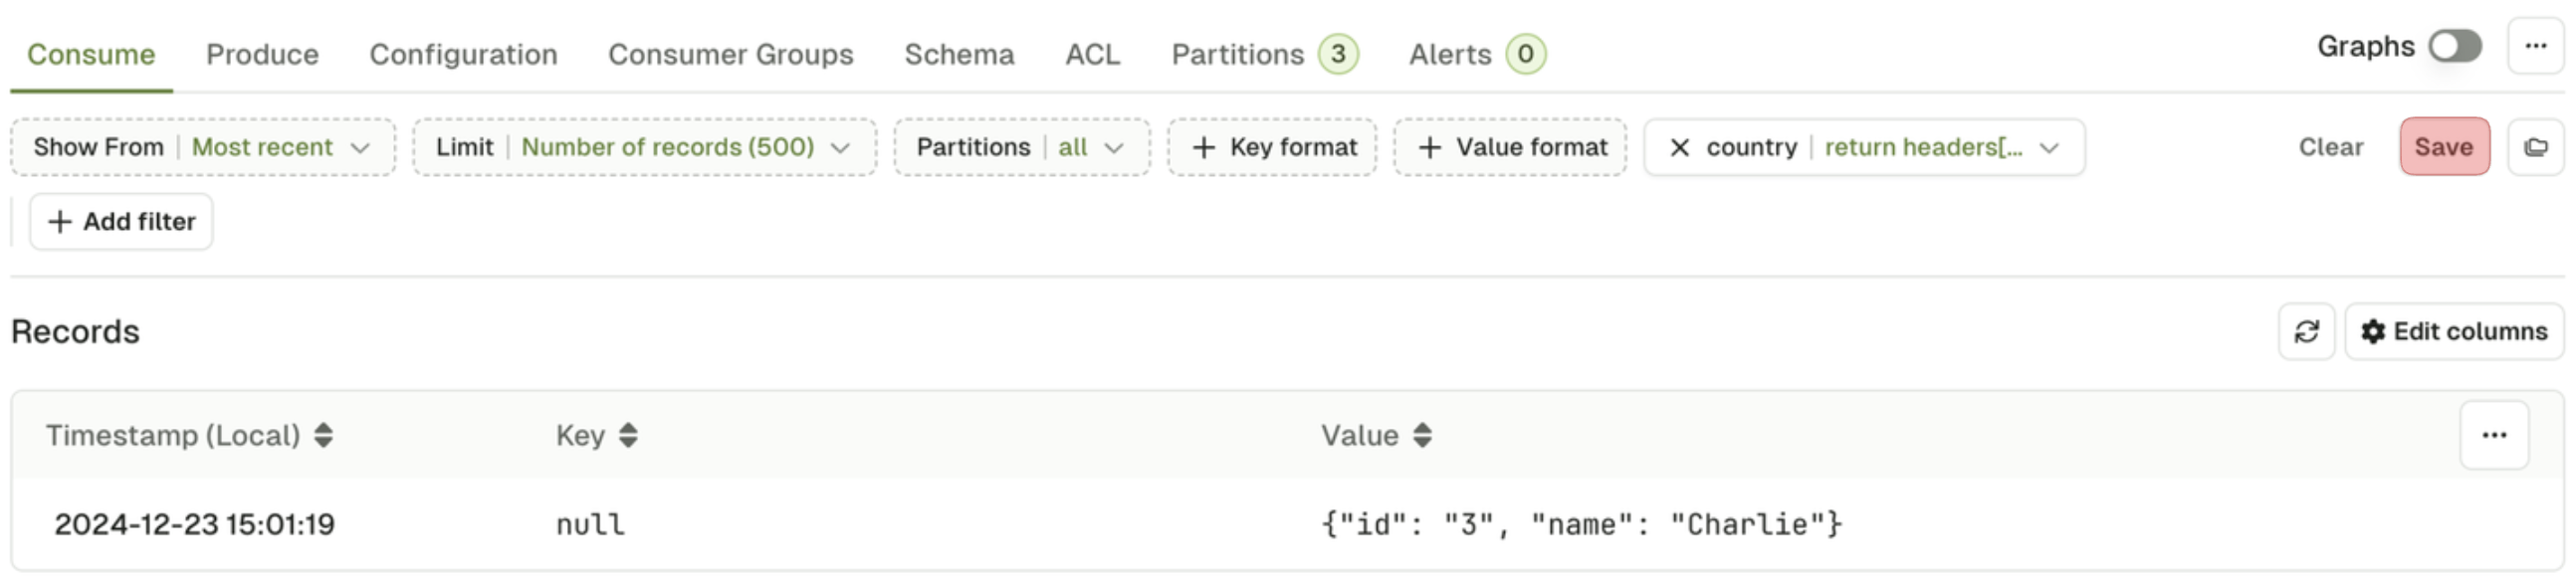


Most recent 500 messages
When you first land on a topic consume page, the default search is configured with Most Recent 500 messages. The intention is to show you the most relevant messages, split across the partitions. This algorithm guarantees to return some messages irrespective of when the records were produced, which we believe is a good starting point when browsing a topic for the first time. In most cases, it will give you500 / num_partitions messages, per partition. If your topic has:10 partitions, Most Recent 500 will give you 50 messages per partition.
2 partitions, Most Recent 500 will give you 250 messages per partition. Edge cases might occur and the algorithm will account for it seamlessly.

JS filter syntax
JS filter is used to filter Kafka records and is evaluated on each record on the server. It’s powerful and can handle complex filters but requires writing JavaScript code. The code has to return a boolean. If your code returnstrue, the record will be included in the results, otherwise it will be skipped.
return value.totalPrice >= 30;
// Selects all the orders having a total price superior to or equal to 30
Record attributes
When creating JavaScript filters, you may want to access message data or the metadata. See the parameters in the table below for accessing different message attributes.Example filters
In this example, we have these two records in our topic: Record 1:The configuration tab
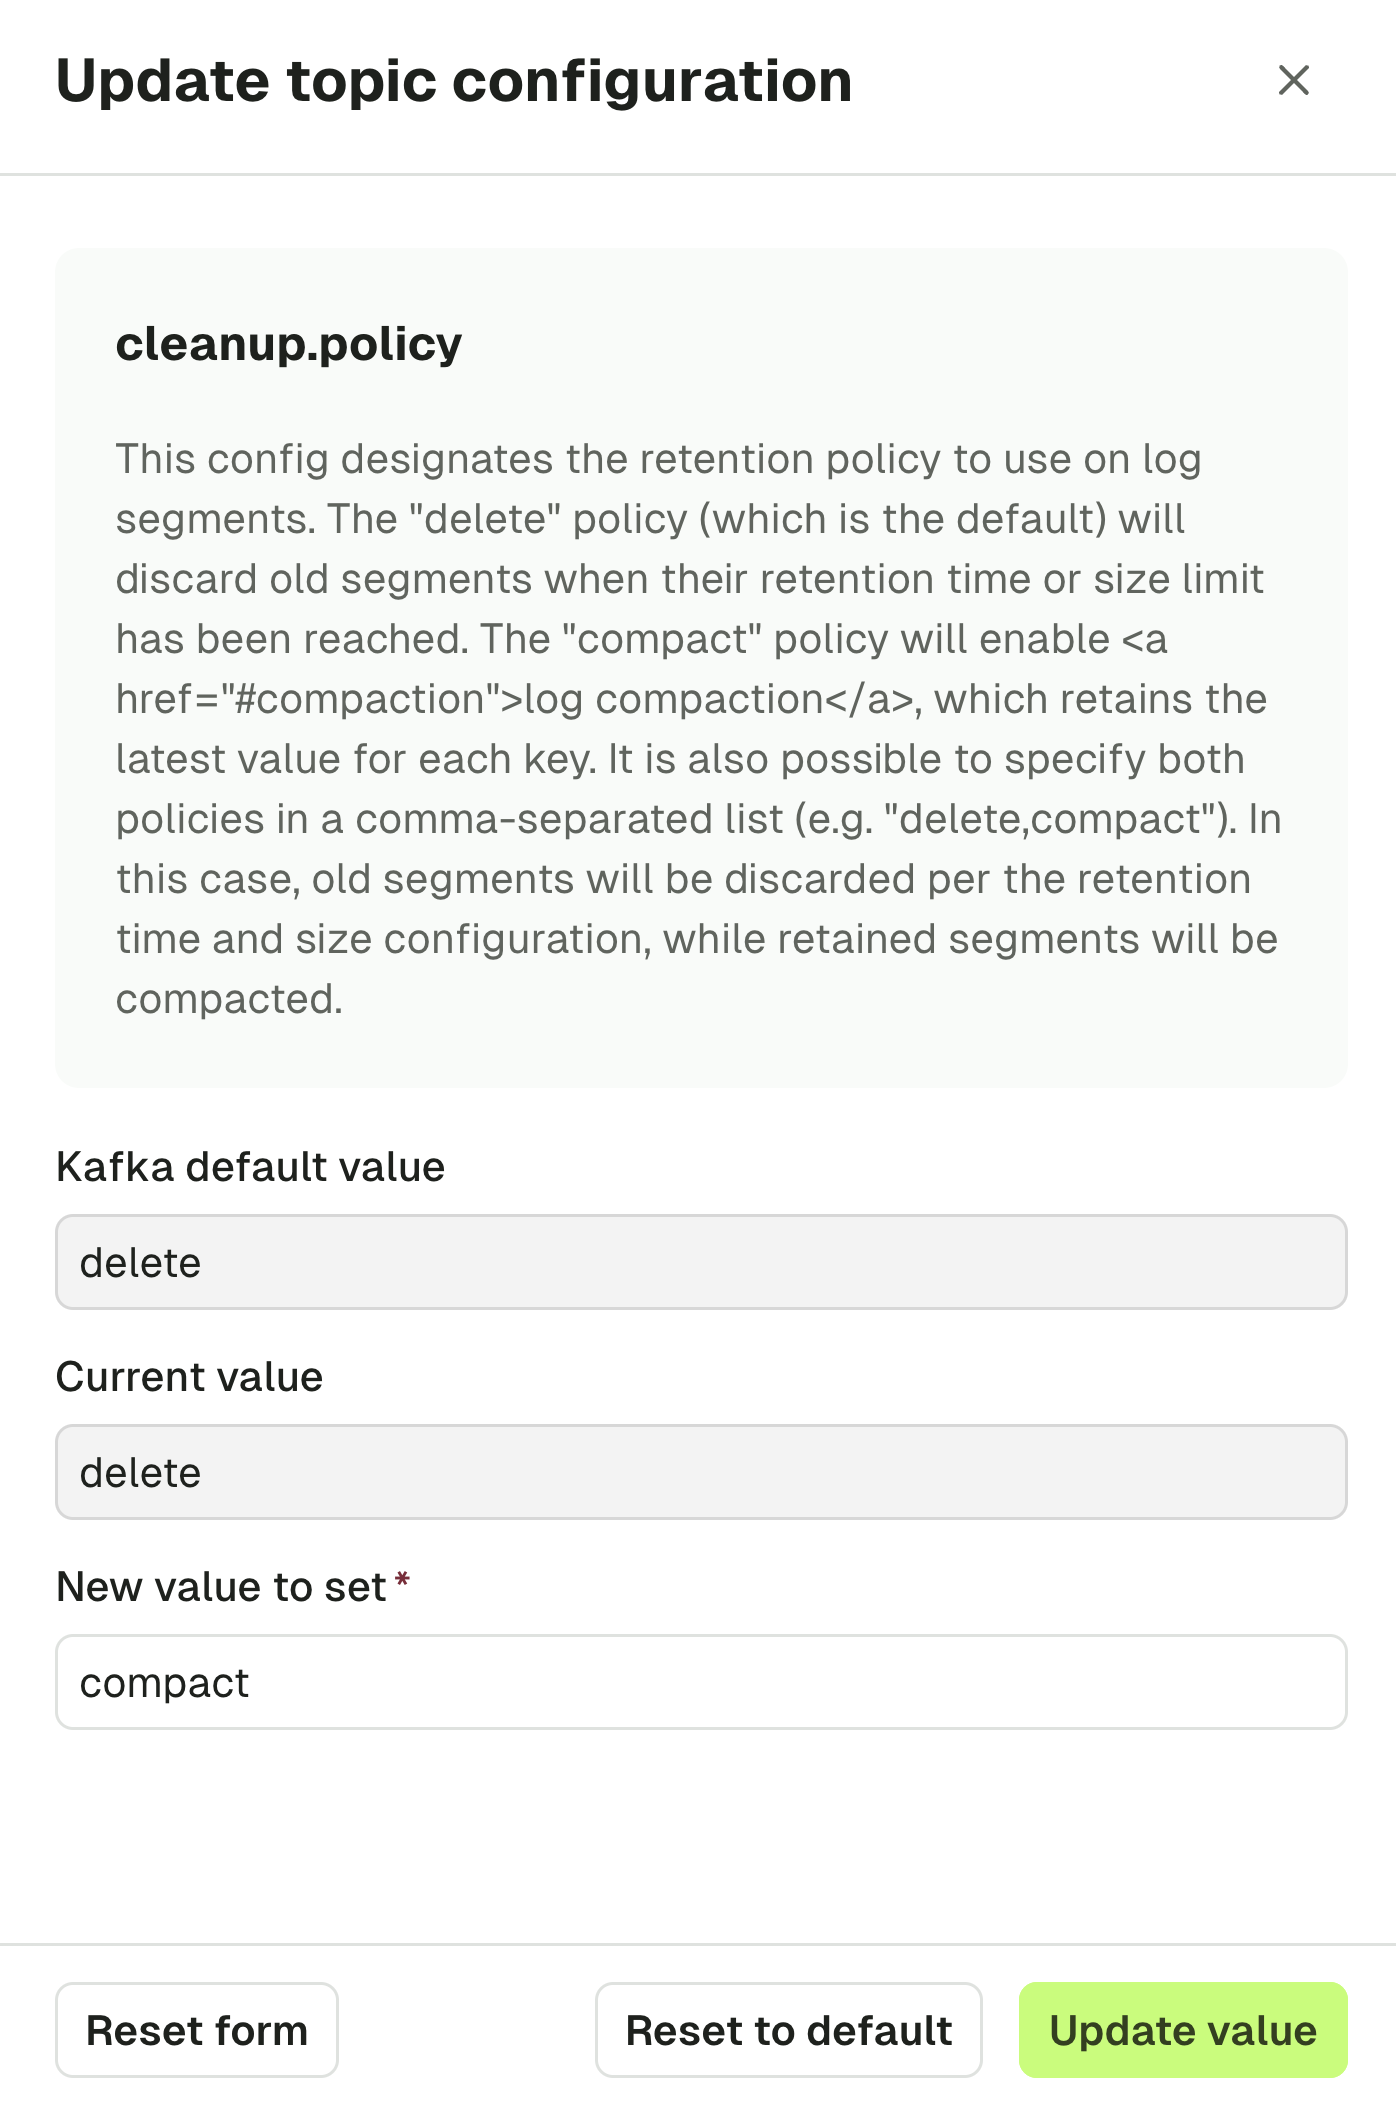
The topic Configuration tab lets you visualize and edit your topic configuration.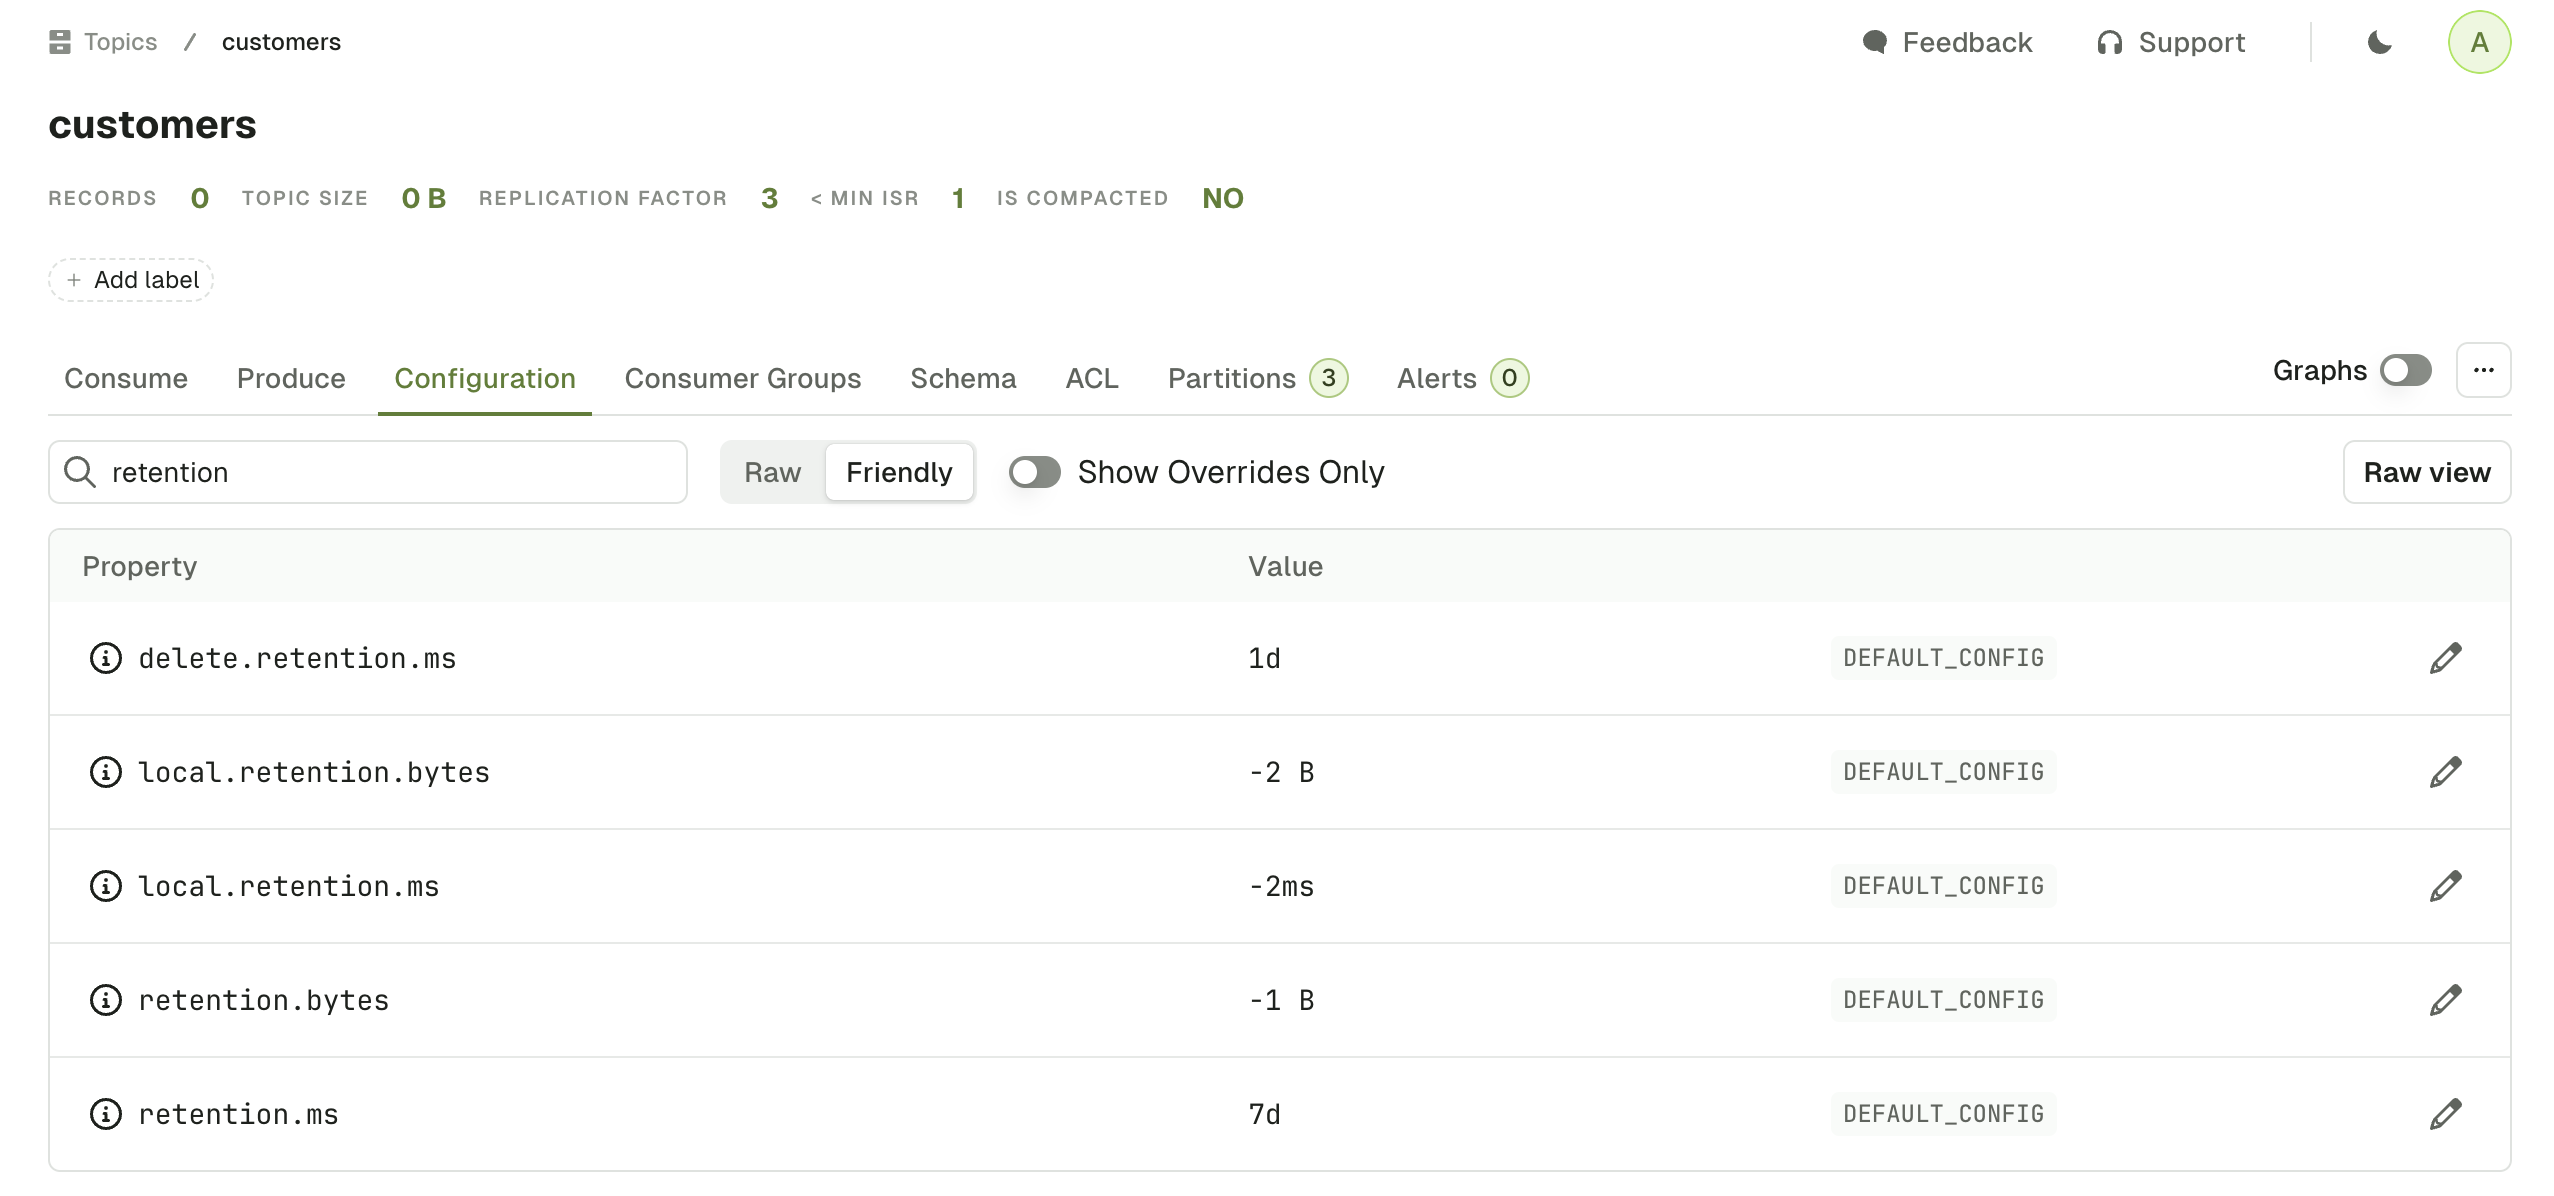
-
Search: filters out the configurations by name. In the example below, we display only configuration with the term
retention. -
Raw/Friendly: formats the information either in its original form or in a more human readable way. For instance,
retention.mscan be represented as raw (43200000) or friendly(12h). Default isFriendly. -
Show overrides only: displays only the configurations that are set at topic level, as opposed to the broker level. Default is
true. - Raw view: shows all the topic configurations as key value pairs.
-
...: lets you do the same three operations that are available on the topic list page: add partitions, empty topic and delete topic.
kafka-configs commands below.